How to Remove Mold From Attic Plywood
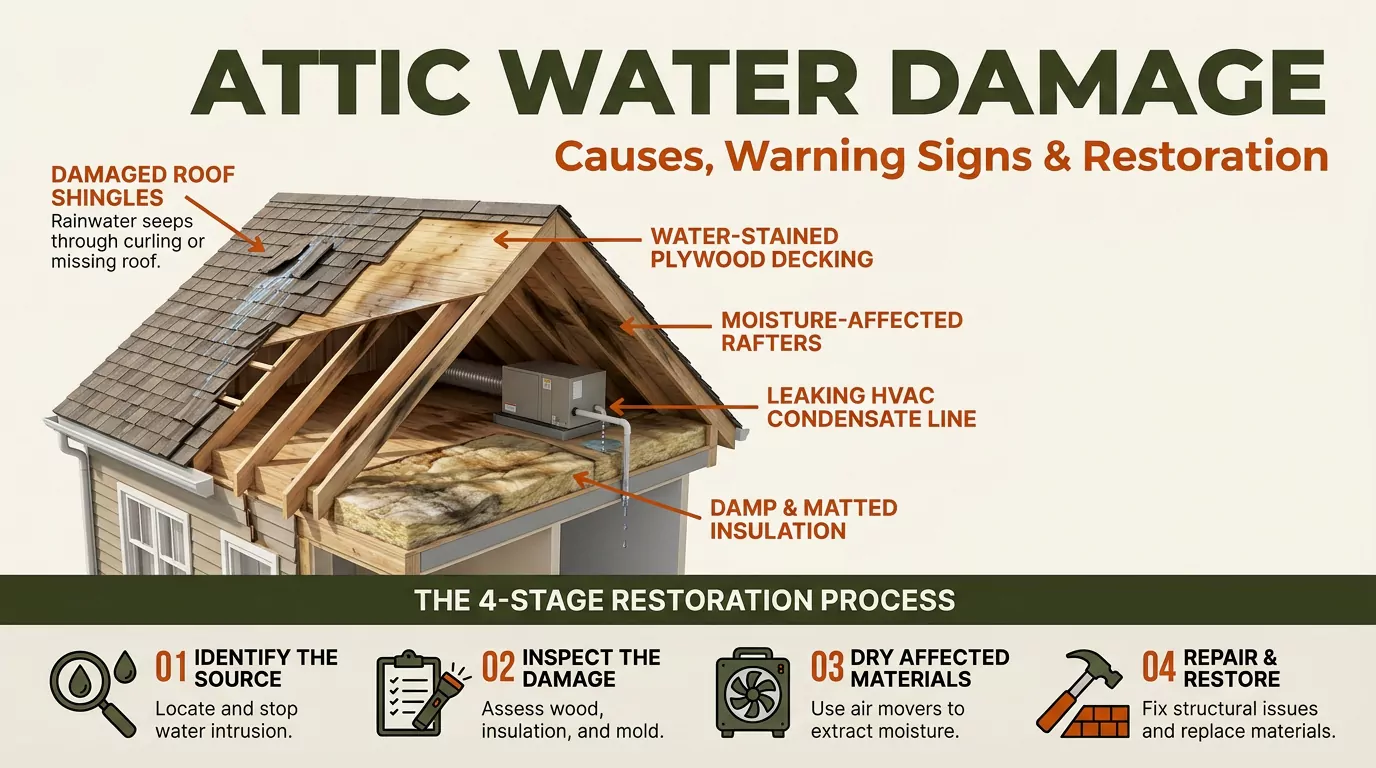
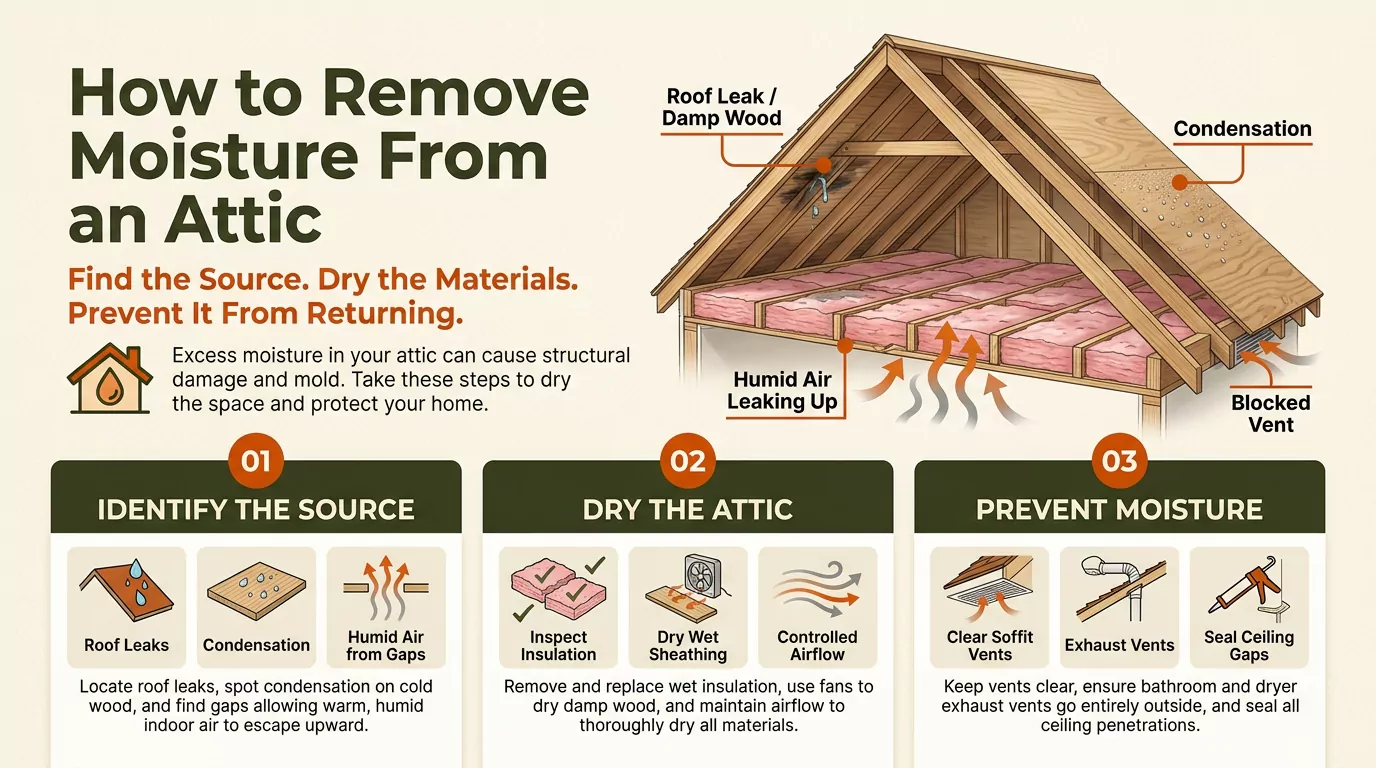
Mold on attic plywood usually means excess moisture is present. The first step is finding where that moisture comes from.
Check for roof leaks, condensation, poor ventilation, and air leaks. Also inspect bathroom and dryer exhaust ducts.
Once the moisture source is corrected, assess the plywood carefully. Sound plywood with limited surface mold may be cleanable. Soft, rotten, or delaminated plywood may need replacement.
Safe removal also requires protective equipment and careful cleanup. Finally, dry the attic completely and correct the conditions that caused mold.
This guide explains each step clearly.
What Causes Mold on Attic Plywood?
Mold needs moisture and a suitable surface to grow.
Attic plywood provides an organic wood surface. Moisture can come from several different sources.
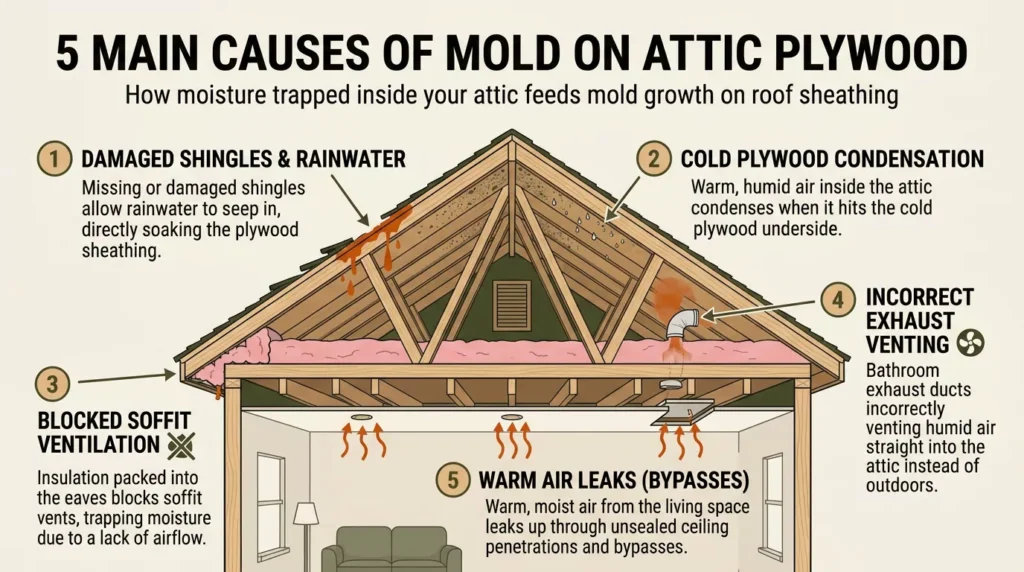
The most common causes include:
- Roof leaks
- Condensation
- Poor attic ventilation
- Indoor air leakage
- Bathroom exhaust
- Dryer exhaust
- Plumbing leaks
- High humidity
- Improper insulation installation
Finding the cause matters more than simply removing visible mold.
If moisture remains, new mold can develop after cleaning.
Roof leaks and water intrusion
A roof leak can introduce water directly into the attic.
Damaged shingles can allow rainwater to enter. Failed flashing can also create hidden leaks.
Pay close attention to areas around:
- Chimneys
- Skylights
- Plumbing vents
- Roof valleys
- Roof penetrations
- Damaged shingles
Water stains on plywood can help identify previous moisture intrusion.
However, the visible stain may not sit directly below the leak.
Water can travel along roof materials before reaching the attic.
Fix the roof problem before completing mold treatment.
Condensation on cold plywood
Condensation is another major cause of attic mold.
Warm air can hold more moisture than cold air.
When warm, moist air reaches cold roof sheathing, moisture can condense. The resulting water can dampen the plywood surface.
This problem can become more noticeable during cold weather.
You may see widespread dark staining without finding an obvious roof leak.
That pattern can point toward condensation rather than direct rainwater.
Poor attic ventilation
Proper ventilation helps manage attic heat and moisture.
A vented attic commonly uses low intake openings and higher exhaust openings.
Soffit vents provide intake airflow near the roof edges. Ridge or gable vents can provide exhaust airflow higher in the attic.
The airflow path must remain open. Blocked soffits can prevent outside air from entering.
Insulation pushed into the eaves can also block ventilation pathways.
Bathroom and dryer exhaust
Bathroom exhaust fans should discharge outdoors. They should not release humid air into the attic.
A bathroom produces significant moisture during showers and baths. That moisture can enter the attic when the exhaust duct terminates there.
Dryer exhaust creates another concern. A dryer should also discharge outdoors through an appropriate duct system.
A disconnected or improperly routed dryer duct can add moisture to the attic.
It can also introduce lint and increase fire risks.
Air leaks from the living space
Moisture can also travel through gaps between your home and attic.
Common leakage points include:
- Attic hatches
- Plumbing penetrations
- Electrical penetrations
- Ceiling openings
- Top plates
- Recessed fixtures
These openings can allow warm indoor air to enter the attic.
During cold weather, that air can reach cold plywood and condense. Air sealing can therefore support moisture control.
Is the Dark Growth on Your Plywood Actually Mold?
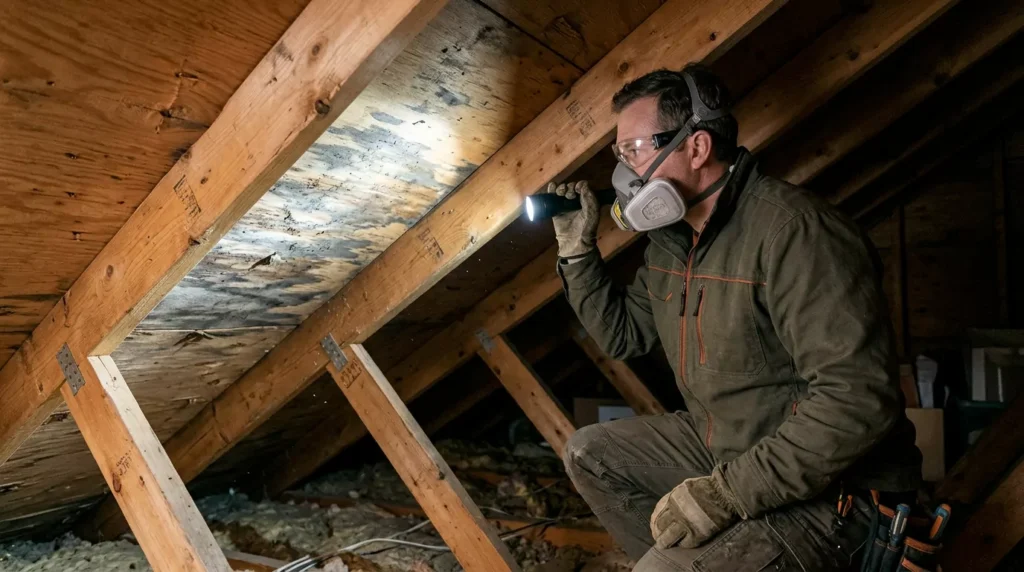
Not every dark mark on plywood is mold. Wood can develop staining from age, moisture, roofing materials, or other causes.
Mold may appear as dark, green, brown, white, or gray growth. It can look fuzzy, powdery, or irregular.
A musty smell can also indicate a moisture or mold problem. However, appearance alone cannot always identify the material.
If you are unsure, consider having the area evaluated. Testing is not automatically necessary in every situation.
Its usefulness depends on the question you need answered.
For example, a visible growth pattern plus an obvious moisture source may already establish the need for correction.
Can You Remove Mold From Attic Plywood Yourself?
Sometimes, but not every attic mold problem is suitable for DIY treatment.
A small, manageable area on sound plywood may be appropriate for careful homeowner cleaning.
The decision changes when contamination becomes extensive. It also changes when insulation or structural materials are affected.
Professional help becomes more important when you find:
- Extensive mold growth
- Repeated mold after previous cleaning
- Soft or deteriorated plywood
- Structural wood damage
- Moldy insulation
- Hidden contamination
- Significant water damage
- Difficult attic access
- Occupants with particular health concerns
The goal is not simply removing what you can see.
The entire moisture and contamination problem needs to be addressed.
What to Do Before Removing Attic Mold
Do not begin aggressive cleaning immediately. Prepare the attic and correct the moisture problem first.
Step 1: Find and fix the moisture source
Inspect the roof and attic carefully.
Look for:
- Active leaks
- Water stains
- Damp insulation
- Condensation
- Blocked vents
- Disconnected exhaust ducts
- Plumbing leaks
- Air leakage
Repair the source before cleaning whenever possible. Otherwise, new mold may develop after treatment.
Step 2: Protect yourself
Disturbing mold can release spores and contaminated dust. Use suitable personal protective equipment for the work.
Basic protective equipment can include:
- Appropriate respiratory protection
- Safety goggles
- Disposable gloves
- Long sleeves
- Protective clothing
Respiratory protection should match the work conditions. Follow the equipment manufacturer’s instructions.
People with significant respiratory sensitivity should consider professional assistance.
Step 3: Create safe attic access
Attic floors can contain areas without solid walking surfaces. Do not step between ceiling joists.
You could fall through the ceiling below. Use suitable walk boards or established attic platforms where necessary.
Keep your footing stable before starting cleanup.
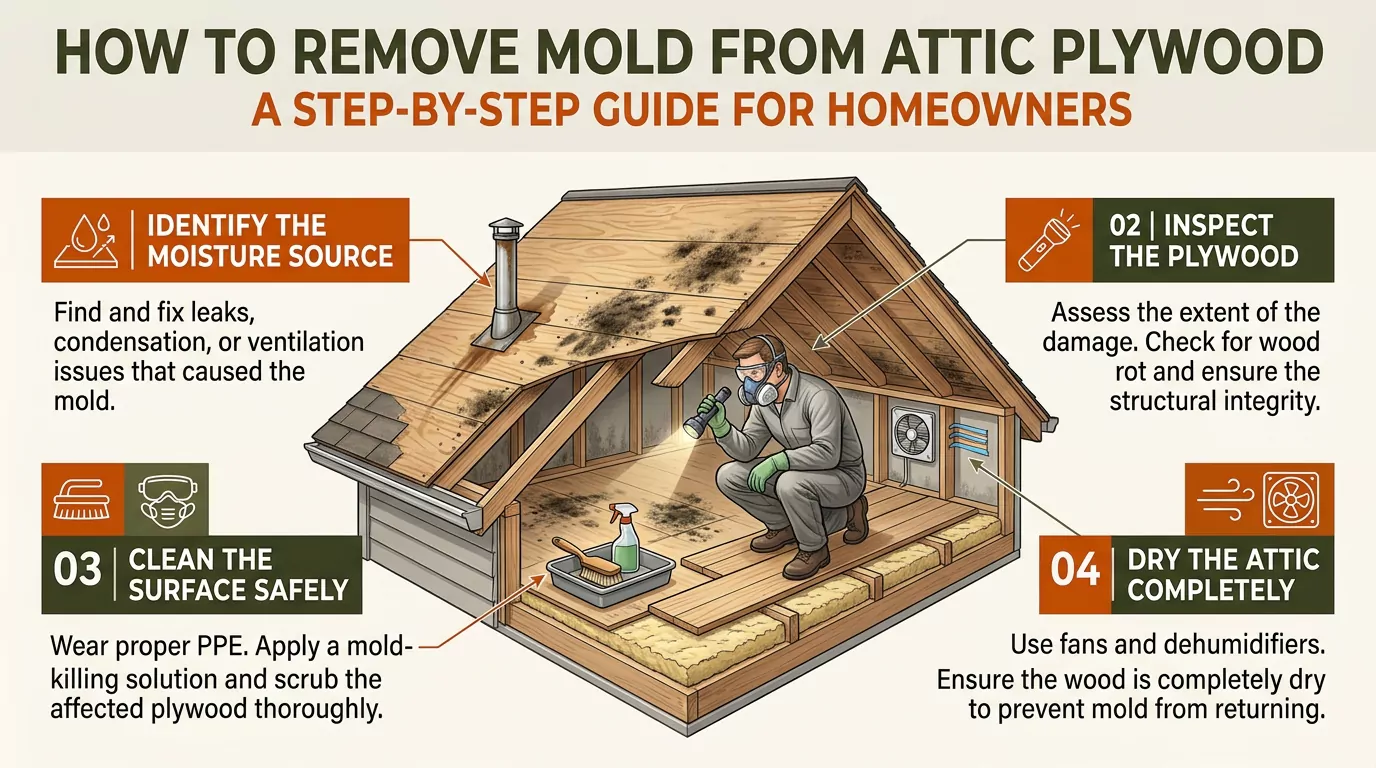
How to Remove Mold From Attic Plywood
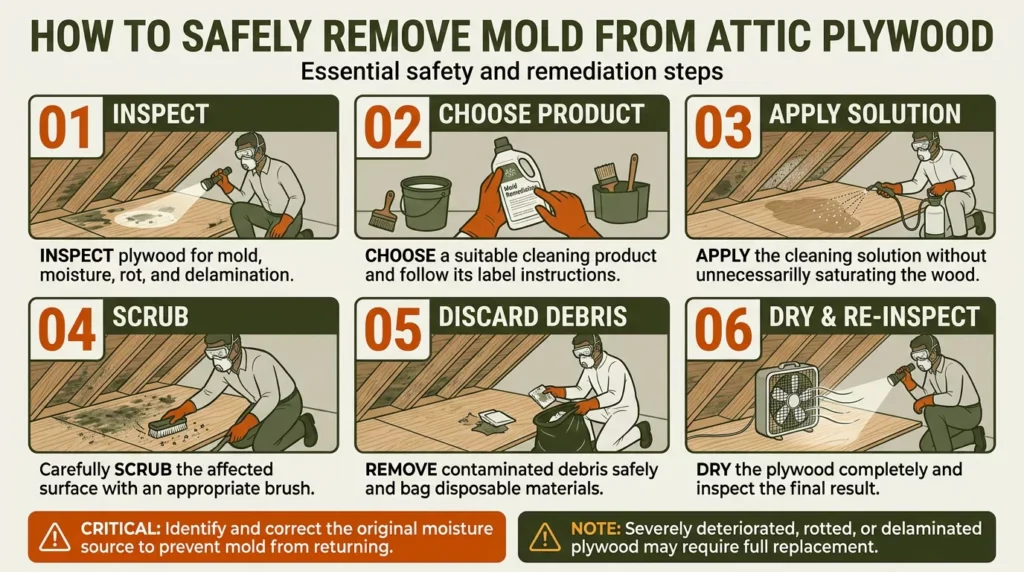
The exact cleaning method depends on the material and contamination. The general process is straightforward.
Step 1: Inspect the plywood
Start by checking the condition of the wood.
Look for:
- Dark surface growth
- Moisture
- Soft areas
- Rot
- Delamination
- Swelling
- Crumbling wood
Sound plywood may be a candidate for cleaning. Damaged plywood requires a different response.
Do not assume every moldy board needs replacement. Likewise, do not clean plywood that has lost structural integrity.
Step 2: Choose an appropriate cleaning method
Use a mold-cleaning product that is compatible with the surface.
Follow its label instructions carefully.
- Identifies borax and water as one possible DIY cleaning approach.
- It recommends one cup of borax mixed with one gallon of warm water.
- However, product directions should always take priority.
- Do not mix cleaning chemicals.
- Some combinations can create dangerous fumes.
- Bleach is also not a universal solution for porous wood.
- Plywood absorbs moisture and contains wood fibers.
- A stronger chemical does not automatically produce better remediation.
- The objective is safe contamination removal and moisture control.
Step 3: Apply the cleaning solution
- Apply the selected product according to its instructions.
- Allow the recommended contact time.
- Avoid excessive saturation when the product does not call for it.
- The goal is to loosen or remove surface contamination.
- Do not rely on spraying alone.
- Mold treatment should include appropriate physical cleaning when the material allows it.
Step 4: Scrub the affected plywood
- Use a suitable brush for the wood surface.
- Work carefully across the affected area.
- Avoid damaging the plywood surface through overly aggressive scrubbing.
- Remove loosened contamination with disposable materials.
- Do not spread contaminated debris through the living space.
- Bag disposable cleaning materials before removing them from the work area.
Step 5: Dry the plywood completely
- Drying is one of the most important parts of remediation.
- Mold thrives when moisture remains available.
- Use appropriate airflow to help dry the affected area.
- A dehumidifier may also help control moisture when conditions allow.
- Do not close up or cover damp plywood.
- Do not paint over visible mold before cleaning.
- Do not seal a wet assembly.
- The plywood needs to be clean and dry before further treatment.
Step 6: Check the result
Inspect the cleaned area after drying.
Check whether:
- The visible contamination has been removed
- The wood remains sound
- Moisture has been corrected
- New growth is appearing
- Nearby insulation is affected
- Ventilation problems remain
A successful result is more than a cleaner-looking board.
The attic should also be dry and free from the original moisture problem.
When Should You Replace Moldy Attic Plywood?
Mold does not automatically mean plywood replacement.
The condition of the wood matters.
Surface contamination can sometimes be addressed when the plywood remains structurally sound.
Replacement becomes more important when moisture has caused significant deterioration.
Signs of plywood deterioration
Watch for:
- Soft or spongy areas
- Delamination
- Severe swelling
- Crumbling wood fibers
- Rot
- Significant water damage
- Loss of structural integrity
Plywood that has deteriorated may no longer provide reliable structural performance.
Cleaning cannot restore wood that has already lost its integrity.
A qualified roofing or building professional should assess questionable structural materials.
Mold versus structural damage
Mold growth and wood deterioration are related but different problems. Mold can exist on a surface without severe structural damage.
Persistent moisture can also lead to wood deterioration. That means visual mold removal should not replace a condition assessment.
If the plywood feels weak, investigate further.
What About Moldy Attic Insulation?
Do not focus only on the plywood.
Nearby insulation can also be affected by moisture or contamination.
Inspect insulation around the affected area.
Look for:
- Dampness
- Visible contamination
- Compression
- Water damage
- Persistent odors
Mold-contaminated insulation may require removal or professional assessment.
The correct response depends on the material and extent of contamination.
Do not assume spraying insulation will solve every problem. The moisture source must still be corrected.
Should You Use Bleach on Attic Plywood?
- Bleach is not a universal solution for mold on plywood.
- Plywood is a porous wood product.
- Surface treatment does not automatically resolve contamination within damaged material.
- Bleach can also create irritating fumes.
- Never mix bleach with other cleaning products.
- For attic plywood, focus on appropriate cleaning, physical removal, drying, and moisture correction.
- A compatible commercial product may be appropriate when used according to its label.
How to Fix the Moisture Problem
Cleaning mold without correcting moisture is incomplete remediation.
The attic needs conditions that discourage recurring mold growth.
Improve soffit and ridge ventilation
- Check whether soffit vents remain open.
- Inspect the ridge or other exhaust ventilation.
- Look for insulation blocking the intake pathway.
- A balanced ventilation system needs a clear airflow path.
- Simply adding an exhaust fan does not automatically solve every ventilation problem.
- The entire ventilation design matters.
Install attic baffles where appropriate
- Attic baffles can maintain an airflow channel near the roof edge.
- They help preserve the pathway between soffit intake and the upper ventilation system.
- This becomes important when insulation could block the eave area.
- Baffles should be appropriate for the roof assembly.
- They should not be treated as a universal solution for every attic.
Seal attic air leaks
Air sealing reduces the movement of conditioned indoor air into the attic.
Inspect common openings around:
- Plumbing
- Wiring
- Attic hatches
- Ceiling penetrations
- Top plates
- Recessed fixtures
The exact sealing method depends on the opening and building materials.
The goal is to reduce unwanted airflow from the conditioned space.
Correct exhaust fan problems
- Trace bathroom exhaust ducts through the attic.
- Confirm that they terminate outdoors.
- Also inspect dryer duct connections.
- A disconnected duct can release moisture directly into the attic.
- Correcting these problems can reduce a major source of attic moisture.
Repair roof leaks
- Inspect areas where roof leaks commonly occur.
- Pay special attention to roof penetrations and flashing.
- Repair damaged roofing before completing the mold project.
- Otherwise, new water can reach the cleaned plywood.
DIY Mold Removal vs. Professional Remediation
Use the condition of the attic to guide your decision.
| Situation | More appropriate approach |
| Small area of surface mold | Careful DIY may be possible |
| Sound exposed plywood | Cleaning may be possible |
| Large contamination | Professional assessment |
| Moldy insulation | Professional assessment may be appropriate |
| Soft or rotten plywood | Professional evaluation |
| Structural damage | Professional evaluation |
| Recurring mold | Find the moisture problem first |
| Hidden contamination | Professional assessment |
| Significant water damage | Professional assessment |
The exact boundary is not based on square footage alone.
Material condition, access, moisture, occupant risk, and contamination scope all matter.
Professional remediation may involve containment and specialized filtration.
The semantic research specifically identifies containment as a method for limiting contaminated dust and debris.
How Much Does Attic Mold Removal Cost?
Attic mold costs vary widely.
The final price depends on the scope of work.
Important cost factors include:
- Contaminated area
- Attic accessibility
- Moisture repairs
- Plywood damage
- Insulation removal
- Containment
- Cleaning
- Drying
- Structural repairs
- Local labor rates
Competitor material gives professional remediation estimates ranging from roughly $1,500 to $4,000 for many residential jobs.
It also notes that severe projects can cost more.
Those figures should be treated as general examples, not guaranteed prices.
A contractor quote should separate the major components.
Ask whether the estimate includes:
- Inspection
- Moisture-source repair
- Mold removal
- Material removal
- Insulation replacement
- Structural repairs
- Drying
- Final cleaning
This makes competing estimates easier to compare.
How to Prevent Mold From Returning
Prevention begins after the visible mold is gone.
Your goal is to keep the attic dry and properly managed.
Control attic moisture
- Monitor conditions during periods when condensation is likely.
- High moisture increases the risk of mold growth.
- Address persistent humidity rather than relying on repeated cleaning.
Maintain roof ventilation
- Keep soffit intake paths clear.
- Check ridge and other exhaust vents.
- Inspect ventilation after insulation work or roof repairs.
- Make sure insulation does not block intended airflow pathways.
Maintain attic insulation
- Insulation should separate the conditioned space from the attic.
- However, it should not block required ventilation pathways.
- Baffles can help maintain those pathways where the roof design requires them.
Maintain air sealing
- Inspect attic penetrations periodically.
- Pay attention to areas disturbed during electrical, plumbing, or insulation work.
- Small openings can allow conditioned air and moisture into the attic.
Inspect after severe weather
Check the attic after significant storms.
Look for:
- Fresh water stains
- Damp insulation
- Wet plywood
- New odors
- Damaged roofing areas
Early detection can prevent a small moisture issue from becoming extensive damage.
Final Attic Mold Checklist
Before considering the project complete, confirm the following:
- The moisture source has been corrected.
- Roof leaks have been repaired.
- Bathroom exhaust vents outdoors.
- Dryer exhaust vents outdoors.
- Soffit vents are not blocked.
- Ventilation pathways remain open.
- Attic air leaks have been addressed.
- Moldy plywood has been properly cleaned.
- Damaged plywood has been evaluated.
- Moldy insulation has been assessed.
- The attic is completely dry.
- Contaminated debris has been removed safely.
- The cleaned area has been inspected again.
- Conditions that caused the mold have been corrected.
The final goal is not simply removing dark marks.
The goal is a cleaner, dry, properly functioning attic assembly.
Frequently Asked Questions
Can I remove mold from attic plywood myself?
You may be able to handle limited surface contamination. The plywood should remain structurally sound. You also need suitable protective equipment and safe attic access. Larger or complicated problems deserve professional evaluation.
Can moldy plywood be cleaned instead of replaced?
Yes, sometimes.
Cleaning may be possible when the plywood remains sound.
Replacement becomes more appropriate when the wood is soft, rotten, delaminated, or structurally compromised.
Why does mold keep coming back after cleaning?
Recurring mold usually means the underlying conditions remain.
Possible causes include:
- Roof leaks
- Condensation
- Poor ventilation
- Air leakage
- Bathroom exhaust
- Dryer exhaust
- Moisture problems
Find and correct the source before repeating the cleaning process.
Should I use bleach on attic plywood?
Bleach should not be treated as a universal plywood mold solution. Plywood is porous and can require more than surface treatment. Follow appropriate product directions and avoid mixing chemicals. Focus on safe cleaning, drying, and moisture correction.
How do I know if attic plywood needs replacement?
Look for soft wood, rot, delamination, crumbling fibers, or significant deterioration. If the wood has lost structural integrity, cleaning will not restore it. Have questionable roof sheathing professionally evaluated.
Does attic ventilation prevent mold?
Proper ventilation can help manage attic heat and moisture. However, ventilation alone does not correct every moisture problem.
Roof leaks, air leakage, exhaust ducts, and insulation problems may also need correction.
Should moldy attic insulation be removed?
It depends on the material and contamination. Visible contamination or significant moisture damage should be evaluated carefully. Mold-contaminated insulation may require removal rather than simple surface treatment.
Do I need mold testing?
Not necessarily in every situation. Testing is most useful when it answers a specific question. A visible mold problem with an identifiable moisture source may not require species identification. When the situation is unclear, professional assessment can help determine the appropriate next step.
When should I hire a professional?
Consider professional help when mold is extensive or keeps returning. Professional evaluation is also appropriate for structural damage, contaminated insulation, hidden mold, or significant water damage.
How much does attic mold remediation cost?
Costs vary according to the project’s scope. Inspection, cleaning, containment, insulation work, moisture repairs, and structural repairs can all affect the final price. Local labor rates and attic accessibility also influence the cost.
Conclusion
Removing mold from attic plywood starts with moisture control. Do not treat visible mold as an isolated cleaning problem.
First find the source of moisture. Check for roof leaks, condensation, poor ventilation, exhaust problems, and air leakage. Then assess the plywood.
Sound plywood may be suitable for careful cleaning. Damaged or structurally compromised plywood may require replacement.
Use appropriate protective equipment during cleanup. Clean the affected surface carefully and remove contaminated debris.
Most importantly, dry the attic completely.
Then correct the ventilation, insulation, and air-sealing problems that allowed moisture to accumulate.
That approach does more than remove visible mold. It addresses the conditions that allowed the mold to grow in the first place.

Daniel Carter specializes in attic maintenance, insulation, ventilation, moisture control, and home improvement. He understands common attic problems and their practical solutions. Through clear, informative guides, he helps homeowners identify issues, prevent damage, improve energy efficiency, and maintain safer, healthier homes.