Attic Water Damage: Causes, Warning Signs, Cleanup, and Restoration
Attic water damage can begin with a small roof leak, a plumbing failure, or trapped moisture. If ignored, water can damage insulation, weaken wooden framing, and contribute to mold growth.
The first priority is to stay safe, control the water source, and prevent further damage. Then, assess the affected materials, arrange appropriate drying, and repair the underlying problem.
This guide explains how to recognize attic water damage, identify its likely cause, clean up safely, and restore affected materials. You will also learn about restoration costs, insurance considerations, and ways to prevent future moisture problems.
What Is Attic Water Damage?
Attic water damage is the deterioration of attic materials caused by unwanted moisture. It can affect insulation, roof decking, rafters, trusses, electrical components, and nearby ceilings.
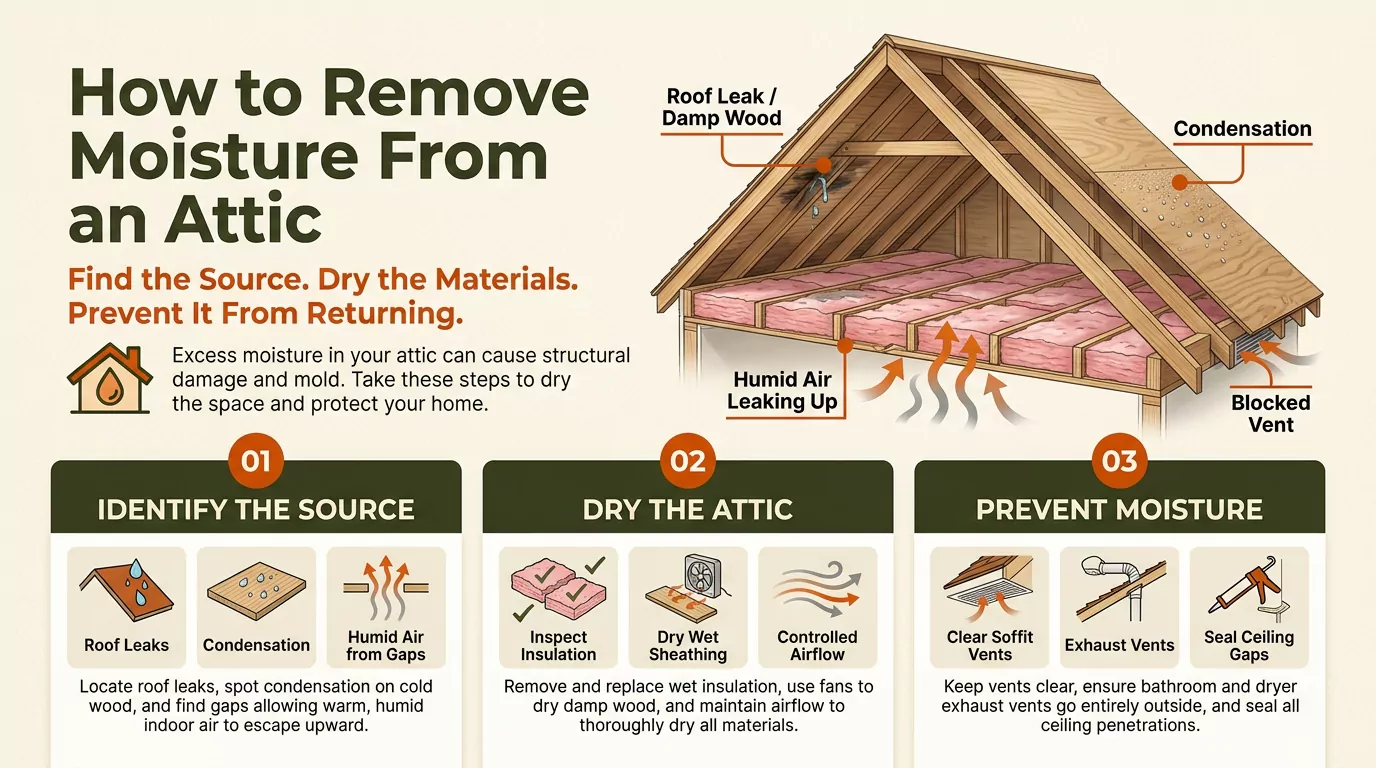
Water can enter through damaged roofing, leaking pipes, HVAC equipment, or other openings. Moisture can also accumulate when warm, humid indoor air reaches cold attic surfaces and condenses.
The damage may be visible or hidden. A roof leak might leave obvious water stains, while moisture trapped beneath insulation may remain unnoticed.
Attic water damage generally falls into three categories:
- Active water intrusion: Water is entering through a leak, plumbing failure, or another opening.
- Condensation-related moisture: Humid air deposits water on cold surfaces, sometimes causing widespread dampness or frost.
- Previous or prolonged moisture damage: Materials show staining, deterioration, corrosion, or possible mold after repeated exposure.
Identifying the type of moisture problem helps determine the appropriate repair and restoration process.
What Causes Water Damage in an Attic?
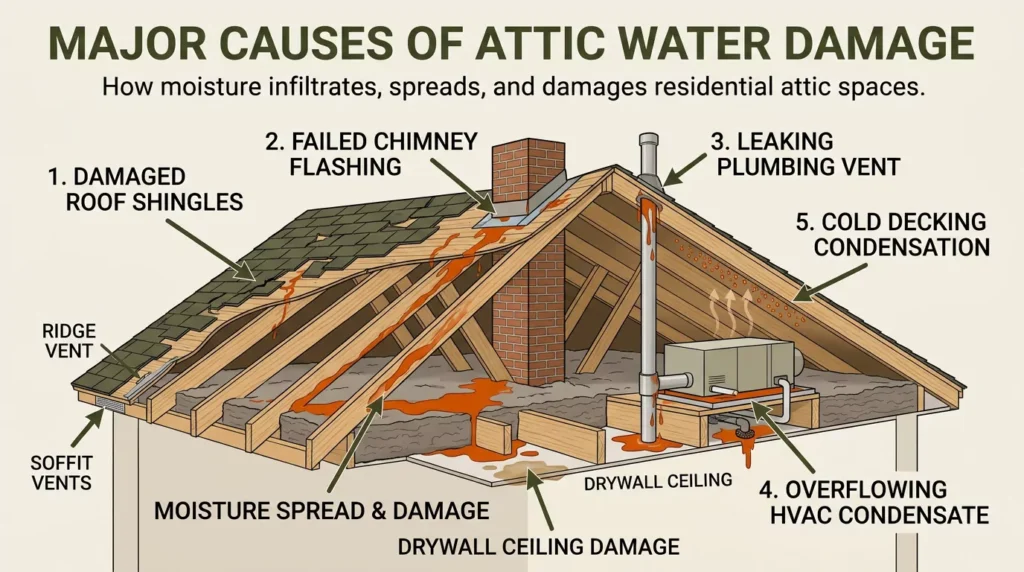
Attic moisture can originate from outside the home or from systems inside the building. Identifying the source is essential because drying the attic alone will not prevent recurring damage.
Roof Leaks and Damaged Shingles
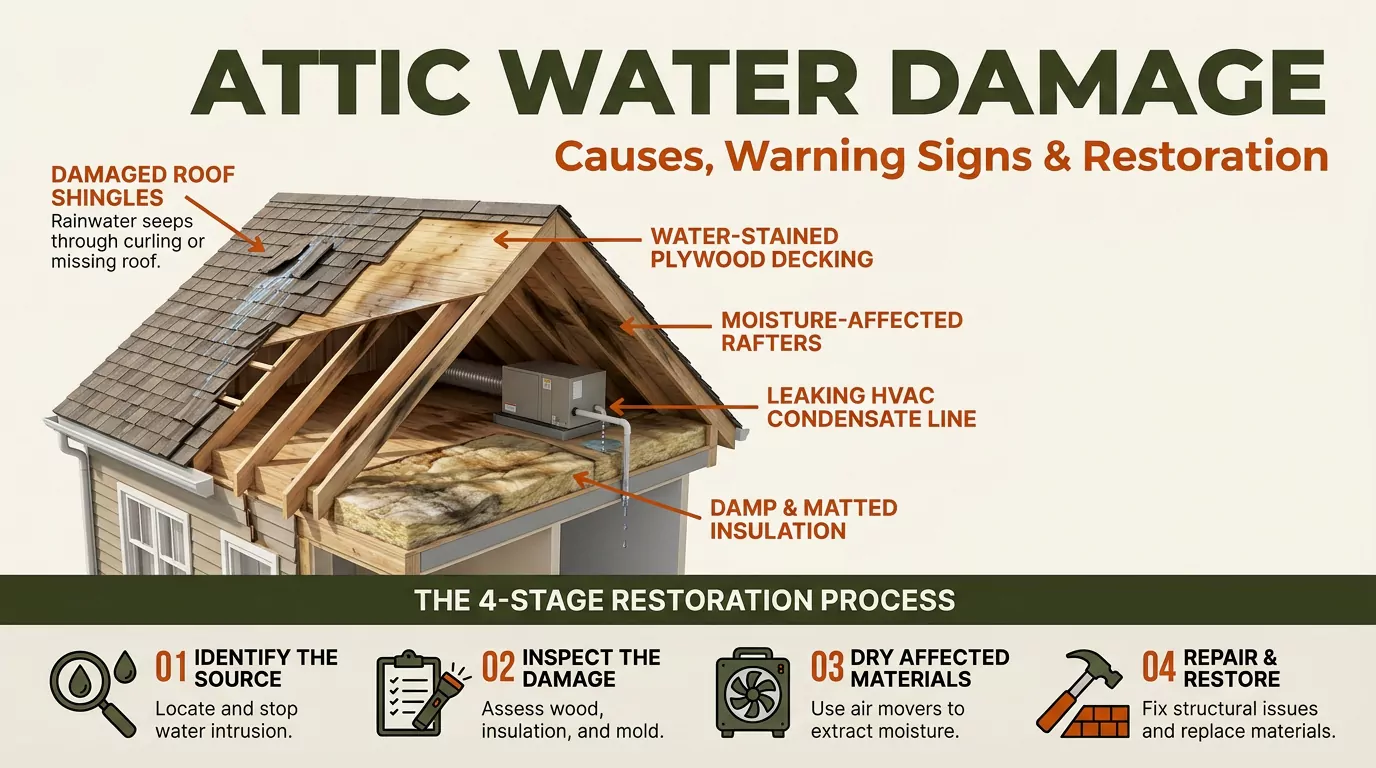
Roof leaks are a common cause of attic water damage. Missing shingles, cracked roofing materials, and deteriorated seals can allow rainwater to enter the roof structure.
Water may travel along the roof decking or wooden framing before dripping onto insulation. Consequently, the wettest visible area may not sit directly beneath the original opening.
Inspect accessible areas for water staining, damp wood, and moisture that appears after rainfall. Roof inspections should be performed by qualified professionals when climbing or accessing the roof would be unsafe.
Faulty Flashing, Roof Valleys, and Gutters
Flashing directs water away from vulnerable roof joints. It commonly surrounds chimneys, skylights, vents, and other roof penetrations.
Damaged, loose, or improperly installed flashing can allow rainwater to reach the attic. Roof valleys may also leak when their roofing materials or drainage details deteriorate.
Clogged gutters create another potential problem. Overflowing water can collect near roof edges and contribute to moisture intrusion.
Look for these possible warning signs:
- Water staining near chimneys or skylights.
- Damp roof decking around vents and pipes.
- Leaks that appear during heavy rain.
- Overflowing gutters or visible roof damage.
- Water marks near roof valleys and eaves.
These observations can help narrow down the source, but a professional inspection may be needed to confirm it.
Plumbing Leaks and HVAC Condensation
Not every attic leak originates in the roof. Plumbing lines, drain connections, and HVAC equipment can introduce water directly into attic spaces.
A leaking pipe may soak nearby insulation and wooden framing. A blocked air-conditioning condensate drain can also cause water to collect or overflow around an air handler.
Poorly insulated ducts and cold surfaces may develop condensation when humid air contacts them. This moisture can accumulate without any roof damage.
If water appears near mechanical equipment, note whether the problem occurs during air-conditioning operation or after plumbing use. A qualified plumber or HVAC technician can inspect the relevant system.
Poor Ventilation and Attic Condensation
Attic condensation occurs when moist air contacts surfaces cold enough for water vapor to condense. This can affect roof decking, nails, ducts, and other components.
Air leakage from bathrooms, kitchens, and living spaces can introduce moisture into the attic. Exhaust fans that discharge indoors or into the attic add unwanted humidity.
Poor ventilation can make moisture management more difficult, especially when combined with inadequate air sealing or insufficient insulation.
Possible signs include widespread dampness, moisture around multiple roof surfaces, and seasonal frost in cold climates. These patterns differ from some localized roof leaks, although inspection may be necessary to distinguish them.
Storm Damage and Ice Dams
Heavy rain, strong winds, hail, and falling branches can damage roofing materials. Water may then enter through newly exposed areas or weakened roof connections.
In freezing climates, ice dams can also cause leaks. Ice builds up near the roof edge, obstructing drainage and allowing melting water to back up beneath roofing materials.
Storm-related damage may appear suddenly, while condensation and smaller leaks can develop gradually. Recording when the moisture appeared can help identify the likely cause.
Signs of Water Damage in Your Attic
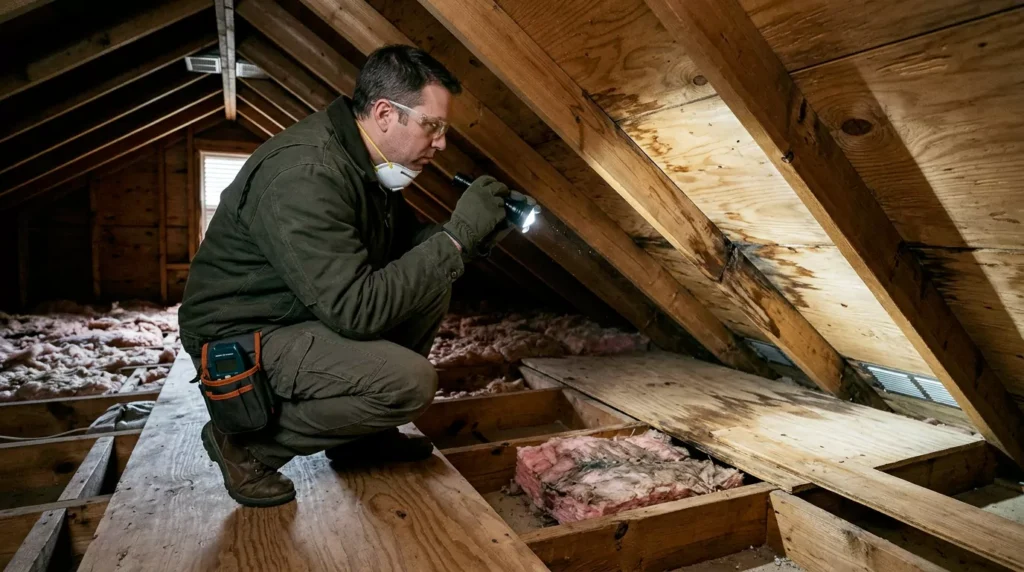
Attic water damage often produces warning signs before major structural problems become visible. Inspect accessible areas carefully, but avoid entering unsafe spaces.
Damp or Compressed Insulation
Wet insulation is one of the most important signs to investigate. Fiberglass may become compressed, while cellulose can become heavy or clumped.
Moisture and compression can reduce insulation performance. Contaminated or extensively damaged insulation may require removal and replacement.
Do not assume every damp area needs the same treatment. The material type, water source, contamination, and ability to dry the insulation all influence the decision.
Water Stains, Musty Odors, and Visible Mold
Brown, yellow, or dark stains may indicate previous or ongoing moisture exposure. Look for discoloration on roof decking, rafters, attic ceilings, and nearby walls.
A musty odor can suggest persistent dampness, but odor alone cannot confirm mold or identify its location.
Visible mold may appear on wood, paper-faced materials, or other susceptible surfaces. Mold growth indicates a need to investigate moisture conditions and determine the appropriate cleanup method.
Do not disturb extensive mold growth or contaminated insulation without understanding the risks.
Darkened Wood, Rust, and Structural Deterioration
Prolonged moisture can damage roof decking, rafters, trusses, and other wooden components.
Warning signs include:
- Dark streaks or unusual discoloration.
- Wood that feels soft or appears decayed.
- Corroded nails, brackets, or other metal components.
- Warped roof sheathing or visibly deteriorated framing.
- Repeated dampness around the same structural area.
Discoloration alone does not prove structural failure. However, soft wood, significant decay, or visibly distorted framing should be assessed by a qualified building professional.
Ceiling Stains and Peeling Paint Below the Attic
Water from the attic can travel along framing before reaching an interior ceiling. This explains why a ceiling stain may appear away from the original roof leak.
Look for peeling paint, bubbling surfaces, discoloration, or sagging drywall in rooms below the attic.
A stain may remain after an earlier leak has stopped. Its appearance alone cannot establish whether moisture is still present.
If a ceiling is bulging, sagging, or actively dripping, keep people away from the affected area. Do not puncture a bulging ceiling yourself; pooled water, unstable materials, and hidden electrical components can create serious hazards.
What to Do Immediately After Discovering Attic Water Damage
The correct response depends on the severity of the leak and whether the area is safe to enter.
1. Check for Immediate Hazards
Stay out of areas with unstable flooring, damaged framing, exposed wiring, or standing water near electrical equipment.
If water may have reached electrical wiring or fixtures, avoid touching affected components. Contact a qualified electrician and arrange professional assistance as needed.
Never climb onto a wet roof or enter an attic that appears structurally unsafe.
2. Control the Water Source
If the source is an accessible plumbing leak, shut off the relevant water supply when safe.
For suspected roof leaks, arrange appropriate roof repairs. Do not attempt dangerous temporary repairs during a storm or on a slippery roof.
If an HVAC condensate system is overflowing, stop using the affected equipment when appropriate and contact an HVAC technician.
3. Protect Nearby Belongings
Move stored items away from affected areas if they can be moved safely. Place containers beneath accessible drips only when doing so does not expose anyone to electrical or structural hazards.
Protect nearby furnishings and flooring from water that has already entered the living space.
4. Document the Damage
Take dated photographs of visible stains, wet insulation, damaged belongings, and the apparent source.
Record when you discovered the problem and whether it followed rainfall, plumbing use, or HVAC operation. Keep receipts for emergency expenses and copies of relevant repair estimates.
This information can assist restoration professionals and support an insurance claim when applicable.
5. Arrange an Inspection
Seek professional help when water damage is extensive, the source remains unclear, mold is widespread, or structural materials appear compromised.
An inspection should identify the likely source, affected materials, moisture extent, safety concerns, and necessary repairs.
How to Find the Source of Attic Moisture
Finding the source requires more than locating the wettest visible area. Water may travel through insulation and along framing before becoming noticeable.
Start with a safe visual inspection from an accessible location. Look for patterns and compare them with recent weather, plumbing use, and HVAC operation.
Roof Leak vs. Condensation vs. Plumbing Leak
| Observation | Possible explanation | Recommended next step |
| Moisture appears after rainfall | Roof leak or damaged flashing | Arrange a roof inspection |
| Water collects near pipes | Plumbing leak or drain problem | Contact a qualified plumber |
| Moisture appears near an air handler | Condensate overflow or equipment issue | Contact an HVAC technician |
| Widespread dampness or seasonal frost | Condensation or moisture-laden air | Assess ventilation and air leakage |
| Water enters after a severe storm | Roofing or exterior damage | Arrange a storm-damage inspection |
| Ceiling stains persist after repairs | Residual moisture or another leak | Request further moisture assessment |
These patterns are diagnostic clues, not definitive proof. Several problems can occur at the same time.
Use Moisture Detection When Needed
A visual inspection may not reveal moisture trapped behind insulation or inside building materials.
Restoration professionals may use moisture meters, thermal imaging, and other inspection methods to investigate affected areas. Each tool has limitations, so results should be interpreted alongside visible evidence and the building’s construction.
The goal is to identify the full extent of moisture before damaged materials are covered or replaced.
How to Clean Up and Restore Attic Water Damage
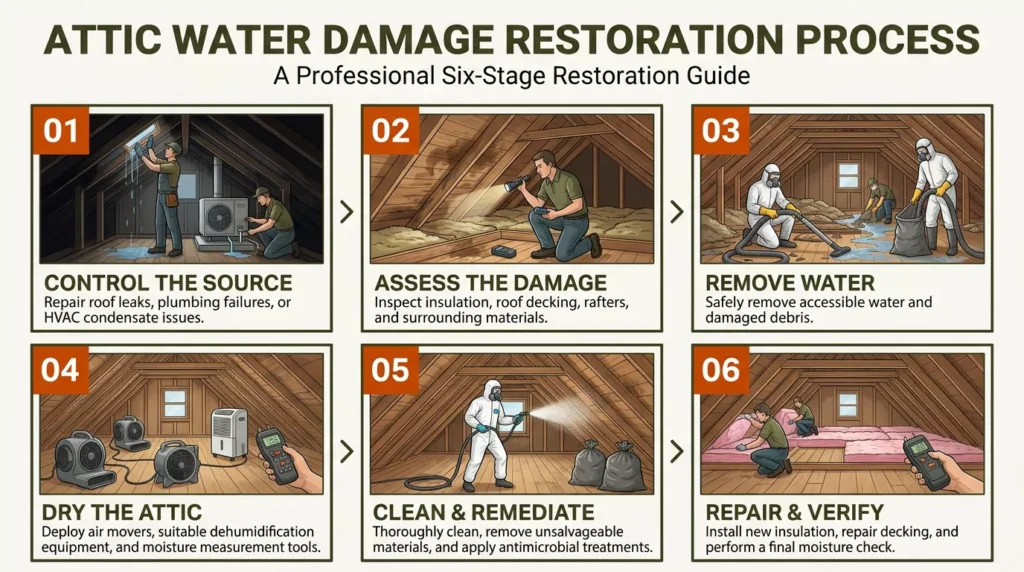
Attic water damage restoration usually involves source correction, damage assessment, water removal, drying, cleaning, and repairs.
The exact process depends on the amount of water, the affected materials, contamination, and the condition of the roof structure.
Water Removal and Damaged Material Assessment
Standing water and accessible wet debris should be removed when safe. Restoration professionals may use extraction equipment and other methods suited to the affected space.
They then assess insulation, framing, roof decking, and other materials to determine what can be dried and what requires replacement.
Water contamination matters. Water from a clean supply line may present different risks from water containing sewage or other contaminants.
Do not handle potentially contaminated materials without suitable protection and an appropriate cleanup plan.
Insulation Removal and Replacement
Wet insulation should be assessed promptly because prolonged moisture can affect its performance and condition.
The right approach depends on the insulation type, contamination, moisture exposure, and whether it can be dried effectively.
| Insulation type | Assessment considerations |
| Fiberglass | Check for saturation, compression, contamination, and retained moisture |
| Cellulose | Assess moisture retention, clumping, contamination, and drying feasibility |
| Foam insulation | Examine the material and surrounding assemblies for trapped moisture or damage |
This table provides general assessment guidance, not a universal replacement rule. A qualified professional should evaluate questionable materials before they are covered again.
Replacement may be appropriate when insulation is contaminated, physically damaged, or unable to dry adequately.
Structural Drying and Dehumidification
Drying is necessary even after the active leak has stopped. Wooden framing, roof decking, and surrounding materials may retain moisture beneath their surfaces.
Professionals may use air movers, dehumidifiers, controlled ventilation, and repeated moisture measurements. Equipment placement depends on the affected area and environmental conditions.
There is no single drying duration that applies to every attic. Material thickness, moisture levels, temperature, humidity, and airflow all influence the process.
Before rebuilding, verify that affected materials have reached appropriate moisture conditions. Covering damp materials can conceal unresolved problems.
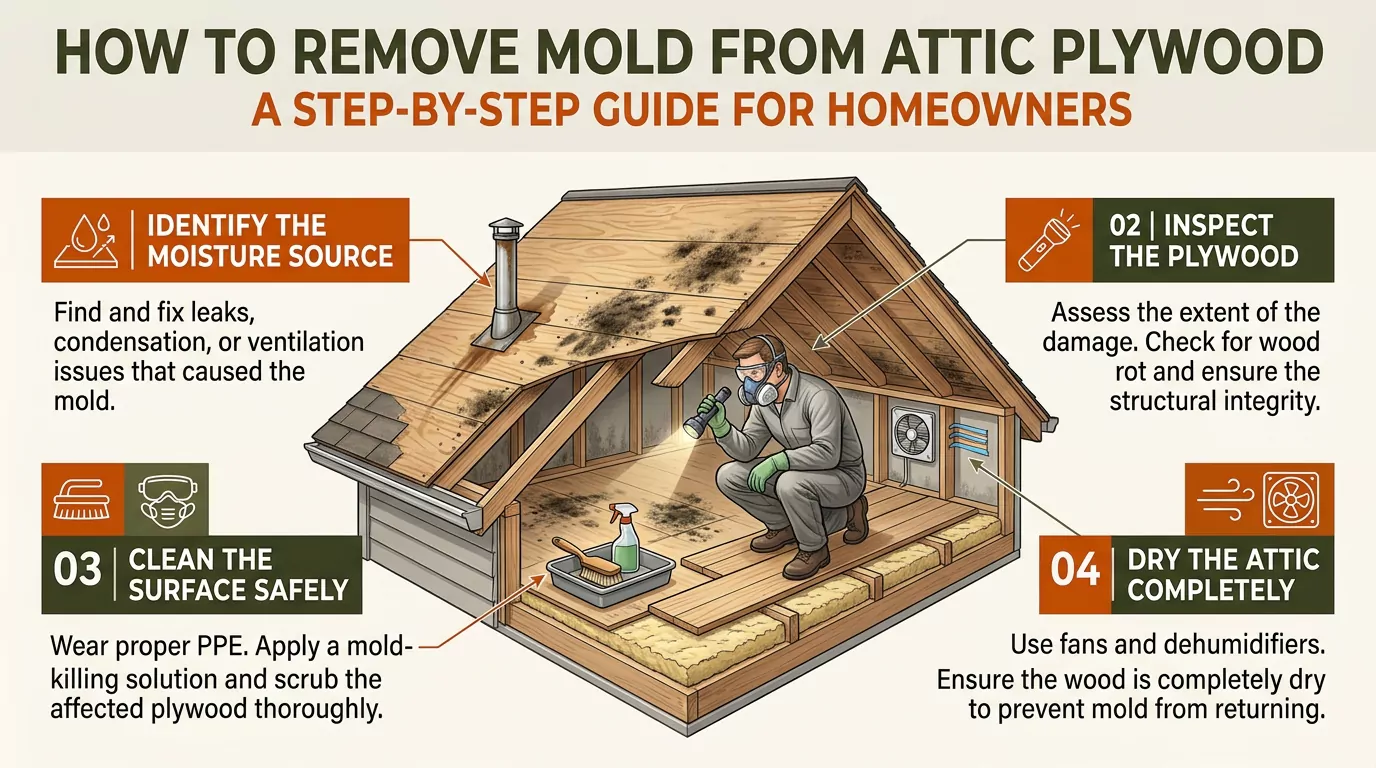
Mold Remediation and Cleaning
Persistent moisture can support mold growth on susceptible materials. Cleanup must address both the contamination and the conditions that allowed it to develop.
A suitable remediation process may include:
- Identifying and correcting the moisture source.
- Assessing the extent of affected materials.
- Establishing appropriate containment when needed.
- Removing materials that cannot be cleaned or restored effectively.
- Cleaning suitable remaining surfaces.
- Verifying moisture control before repairs are completed.
Small areas may sometimes be manageable when the source is known, the materials are sound, and cleanup can be performed safely. Extensive growth, contaminated insulation, hidden mold, or structural deterioration warrants professional assessment.
Avoid disturbing moldy materials in ways that spread dust or spores. Never rely on surface cleaning alone when moisture continues to enter the attic.
Roof and Interior Repairs
Once the moisture source is controlled and affected materials are appropriately dry, repairs can address the underlying damage.
Roofing work may involve replacing damaged shingles, repairing flashing, or correcting roof penetrations. Plumbing and HVAC repairs should address the actual equipment or piping failure.
Interior work may include replacing insulation, repairing roof decking, restoring damaged ceilings, or treating other affected building components.
Repairs should follow the inspection findings rather than focus only on visible stains.
Final Moisture and Restoration Inspection
A completed restoration should include more than new insulation or freshly painted ceilings.
Before considering the work finished, confirm that:
- The original water source has been corrected.
- Affected materials have been assessed and dried appropriately.
- Damaged or contaminated materials have been handled correctly.
- Required structural and interior repairs are complete.
- Remaining moisture concerns have been investigated.
- The contractor has provided relevant readings, photographs, or completion records.
A final inspection helps identify unresolved moisture before repaired surfaces conceal it.
How Much Does Attic Water Damage Restoration Cost?
The cost of attic water damage restoration depends on the cause, damage extent, materials involved, and labor required.
A small leak affecting a limited area may require less work than widespread saturation involving insulation, roof decking, framing, and interior ceilings. Mold remediation or difficult attic access can also increase project complexity.
| Cost factor | Why it matters |
| Water source repair | Roof, plumbing, and HVAC repairs require different work |
| Water removal | Significant accumulation may require specialized equipment |
| Insulation replacement | The affected area and material type influence labor and material costs |
| Structural repairs | Damaged decking or framing may require additional assessment and reconstruction |
| Mold remediation | Contamination may require containment, removal, and specialized cleaning |
| Drying equipment | The amount of equipment and drying time affect project costs |
| Interior restoration | Ceiling, drywall, paint, and finish repairs add to the total |
Ask for a written estimate that separates mitigation, demolition, drying, repairs, and reconstruction where practical.
Clarify whether the estimate includes moisture monitoring, insulation replacement, mold remediation, disposal, and the repair of the original leak.
Prices vary by location, project conditions, labor rates, material availability, and contractor scope. Without a defined location and project assessment, a reliable property-specific estimate cannot be established.
How Long Does Attic Water Damage Restoration Take?
Restoration time depends on how much water entered the attic and how extensively materials were affected.
A limited incident may require less work than a leak involving soaked insulation, structural wood, mold, and damaged ceilings.
The process generally follows these phases:
- Inspection and source control: Identify the likely cause and stop further water intrusion.
- Water removal and material assessment: Remove accessible water and evaluate affected materials.
- Drying and moisture monitoring: Use suitable drying methods and confirm progress through measurements.
- Cleaning and remediation: Address contamination and remove materials that cannot be restored.
- Repairs and reconstruction: Replace damaged materials and restore affected surfaces.
- Final verification: Confirm that the moisture problem has been addressed and the work is complete.
Some phases can overlap, while others must wait for earlier work to finish. Drying should not be rushed to meet an arbitrary schedule.
Ask the restoration contractor for an estimated timeline with clear checkpoints and an explanation of what could delay completion.
Does Homeowners Insurance Cover Attic Water Damage?
Homeowners insurance may cover certain types of attic water damage, but coverage depends on the policy, the cause, and the circumstances.
Sudden and accidental damage may receive different treatment from damage caused by long-term deterioration, neglected maintenance, or excluded events.
For example, a sudden plumbing failure may be treated differently from a roof leak that developed over time. Actual coverage depends on the specific policy language and applicable exclusions.
If you discover damage:
- Photograph the affected areas and damaged belongings.
- Record when the damage was discovered.
- Take reasonable steps to prevent additional damage without risking personal safety.
- Keep receipts for emergency work and related expenses.
- Contact your insurer promptly and ask about claim requirements.
- Keep copies of estimates, inspection findings, and contractor communications.
Do not assume that all restoration costs will be covered. Ask your insurer about the deductible, applicable limits, exclusions, and whether additional documentation is required.
DIY Cleanup vs. Professional Restoration
DIY cleanup may be reasonable for a small, clearly understood incident involving limited damage and no significant safety or contamination concerns.
Professional restoration is generally more appropriate when moisture affects extensive areas, insulation is saturated, mold is widespread, or structural damage is suspected.
| Situation | Appropriate approach |
| Small, accessible area with a known, controlled source | Assess whether safe cleanup and drying are feasible |
| Wet insulation covering a large area | Arrange a professional material assessment |
| Water near electrical wiring or equipment | Avoid affected components and contact qualified professionals |
| Soft wood, sagging framing, or unstable surfaces | Keep out of the area and arrange a qualified structural assessment |
| Extensive mold or contaminated water | Seek appropriate remediation expertise |
| Repeated moisture with no clear cause | Arrange a thorough inspection and moisture assessment |
DIY efforts should not delay urgent repairs or expose homeowners to hazards.
When hiring a restoration company, ask about its relevant experience, insurance, required local credentials, drying procedures, written scope, and documentation. Confirm which work it performs directly and which work requires a roofer, plumber, electrician, or other specialist.
How to Prevent Future Attic Water Damage
Prevention requires controlling exterior water entry and managing moisture generated inside the home.
Maintain the Roof and Drainage System
Inspect the roof periodically and after significant storms when a safe inspection can be arranged.
Address damaged shingles, deteriorated flashing, roof penetrations, and other defects promptly. Clean gutters and downspouts so water can drain away from the roofline.
Trim hazardous branches where appropriate and keep drainage paths clear.
Check Plumbing and HVAC Equipment
Inspect accessible plumbing connections and attic mechanical equipment for leaks or unusual moisture.
Maintain condensate drains and follow the equipment manufacturer’s maintenance recommendations. Have damaged components repaired by qualified technicians.
Recurring moisture around the same pipe or unit should be investigated rather than repeatedly dried without fixing the cause.
Improve Ventilation and Air Sealing
Attic moisture control depends on more than adding vents. Ventilation, air sealing, insulation, and indoor humidity management must work together.
Ensure bathroom and kitchen exhaust fans discharge outdoors through suitable ductwork. Seal appropriate air leakage pathways between living spaces and the attic, following building requirements and safety guidance.
Maintain balanced attic ventilation where the building design requires it. Do not block intended ventilation openings with insulation or stored items.
Inspect for Early Warning Signs
Periodically check accessible insulation, roof decking, and framing for unusual dampness, discoloration, or corrosion.
Investigate musty odors, new ceiling stains, and moisture that returns after previous repairs.
Early attention can reduce the likelihood of extensive material damage and help prevent recurring problems.
Frequently Asked Questions
Is attic water damage always caused by a roof leak?
No. Roof leaks are one possible cause, but plumbing failures, HVAC condensation, and attic condensation can also introduce moisture. The source should be identified before repairs begin.
Can attic water damage cause mold?
Yes. Persistent moisture can support mold growth on susceptible materials. The risk depends on moisture conditions, materials, and how quickly the affected area is dried.
Does wet attic insulation need to be replaced?
Not always. The decision depends on insulation type, contamination, physical condition, and whether the material can be dried effectively. Saturated or contaminated insulation may need replacement.
How can I tell whether attic water damage is still active?
Look for new dripping, expanding stains, fresh dampness, or moisture that appears after rain or equipment use. Moisture measurements and a professional inspection can help determine whether the problem continues.
Can attic water damage weaken the roof?
Prolonged moisture can deteriorate roof decking and wooden framing. If wood is soft, visibly decayed, or structurally distorted, arrange an assessment by a qualified building professional.
Should I use a dehumidifier in my attic?
A dehumidifier may help during a properly managed drying process. However, it does not repair leaks or correct the underlying cause of condensation. Equipment choice and placement should suit the conditions.
How do I know whether attic restoration is complete?
Confirm that the original moisture source has been addressed, affected materials have dried appropriately, necessary repairs are complete, and unresolved moisture concerns have been investigated. Request documentation from the contractor.
What should I photograph for an attic water damage insurance claim?
Photograph visible water entry, stains, wet insulation, damaged framing, affected belongings, and related interior damage when safe. Keep dated records, receipts, inspection reports, and relevant communications.
Can I repair attic water damage myself?
Limited damage may be manageable when the source is understood and the work is safe. Electrical hazards, structural damage, extensive mold, contaminated water, and widespread saturation warrant qualified professional assistance.
Why does my attic get wet when it has not rained?
Condensation, leaking plumbing, and HVAC condensate problems can create moisture without rainfall. Check the pattern and timing of the moisture, then arrange an appropriate inspection if the cause remains unclear.
Conclusion
Attic water damage can affect insulation, roof decking, framing, and the rooms below. Finding the source early is essential to limiting further deterioration.
Start with safety, control the water source, and document the damage. Then assess affected materials, arrange appropriate drying, and complete necessary cleaning and repairs.
The most important step is to correct the cause, not just remove the visible water. Regular roof inspections, plumbing and HVAC maintenance, and effective moisture control can help prevent the same problem from returning.

Daniel Carter specializes in attic maintenance, insulation, ventilation, moisture control, and home improvement. He understands common attic problems and their practical solutions. Through clear, informative guides, he helps homeowners identify issues, prevent damage, improve energy efficiency, and maintain safer, healthier homes.