Attic Moisture Problems: Causes, Signs, and How to Fix Them
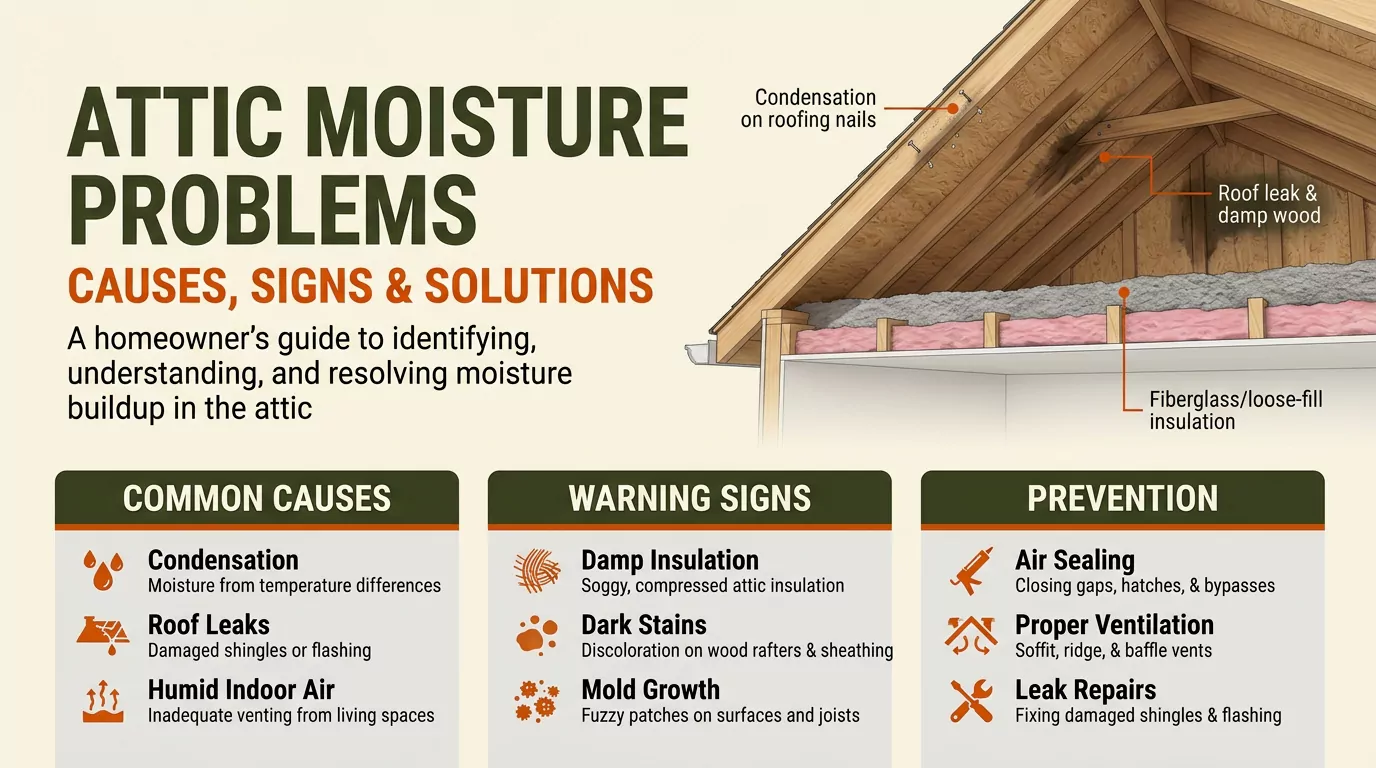
Attic moisture problems usually come from condensation, roof leaks, or humid indoor air entering the attic. If moisture remains, it can damage insulation, encourage mold growth, and weaken roof materials. Finding the source is the first step toward a lasting repair.
Common warning signs include damp insulation, dark roof stains, rusty nails, musty odors, and peeling ceiling paint. However, these symptoms do not always reveal the exact cause. A careful inspection can help distinguish condensation from water intrusion and identify the repairs your attic needs.
What Causes Moisture Problems in an Attic?
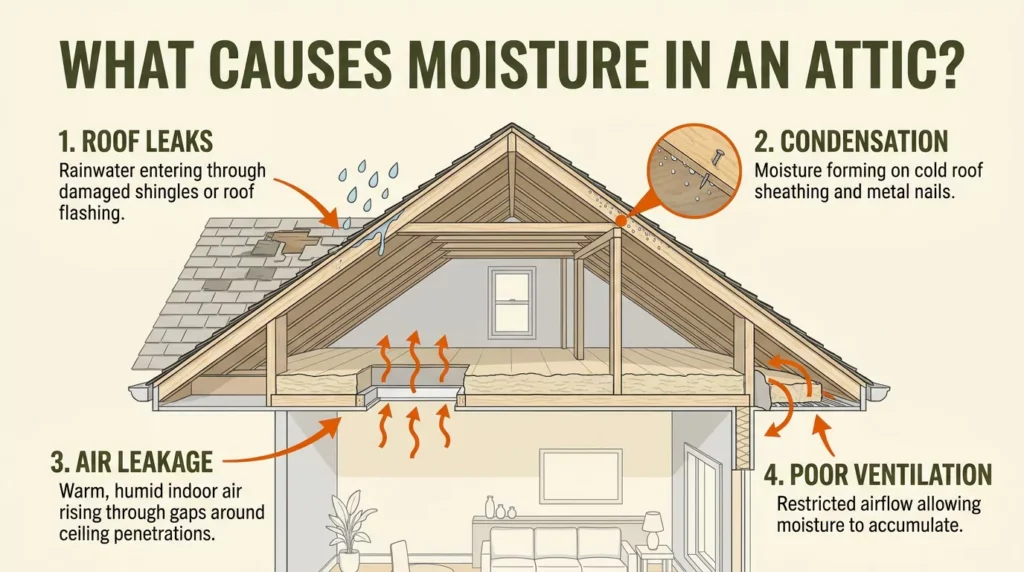
Attic moisture develops when water enters the roof assembly or water vapor condenses on cool surfaces. Air leakage, high indoor humidity, poor ventilation, and roof defects can all contribute. More than one problem may occur at the same time.
1. Attic Condensation
Attic condensation occurs when moist air reaches a surface below its dew point. The dew point is the temperature at which air can no longer hold all its water vapor.
For example, warm indoor air may escape through ceiling gaps during cold weather. When this air reaches cold roof sheathing or metal nails, moisture can condense on those surfaces.
For a closer look at the causes, warning signs, and prevention methods, read our guide to attic condensation.
Condensation may appear as droplets, damp wood, or frost beneath the roof deck. When temperatures rise, accumulated frost can melt and wet nearby materials.
Common contributors include:
- Gaps around ceiling lights and plumbing penetrations.
- Unsealed attic hatches and access doors.
- Bathroom exhaust fans discharging into the attic.
- High indoor humidity from showers, cooking, and laundry.
- Blocked or poorly designed ventilation pathways.
Condensation can occur in different seasons when temperature and humidity conditions allow it. The exact risk depends on the climate, building design, and how moisture moves through the house.
2. Roof Leaks and Flashing Failures
Roof leaks allow rainwater or melting snow to enter the attic through damaged roofing components. Even a small defect can cause repeated moisture exposure during wet weather.
Common leak sources include:
- Cracked, missing, or damaged shingles.
- Deteriorated flashing around chimneys and roof vents.
- Defective roof-to-wall intersections.
- Damaged roof valleys or underlayment.
- Failed seals around roof penetrations.
- Storm damage or improperly installed roofing materials.
Water may travel along rafters before dripping onto insulation. Therefore, the wet spot inside the attic may not sit directly beneath the roof defect.
Look for localized staining, wet wood, or water tracks near roof penetrations. Compare these observations with recent rainfall, but remember that wind-driven rain and hidden pathways can complicate diagnosis.
A roofing contractor can inspect the roof covering, flashing, underlayment, and vulnerable junctions. Repairing the entry point is essential before damaged materials can remain dry.
3. Air Leakage and High Indoor Humidity
Air leakage occurs when indoor air escapes through gaps in the ceiling and surrounding building materials. This air can carry moisture into an otherwise cold attic.
Everyday activities add water vapor to indoor air. Showers, cooking, drying clothes, and some household equipment increase the moisture load.
Problems become more likely when indoor air has easy access to cold roof surfaces. Leaky ductwork or exhaust systems can add further moisture under certain conditions.
Inspect accessible areas around:
- Plumbing pipes and electrical wiring.
- Recessed lights and ceiling fixtures.
- Attic access hatches.
- Ductwork and ceiling penetrations.
- Gaps around chimneys and other penetrations.
Air sealing reduces the movement of indoor air into the attic. Use appropriate materials for each location, and leave heat-producing fixtures, chimneys, and other fire-rated assemblies to suitable methods and qualified professionals.
4. Poor or Unbalanced Attic Ventilation
Attic ventilation helps manage heat and moisture when designed for the roof structure and climate. Many vented attics use soffit vents for intake and ridge or other roof vents for exhaust.
Problems occur when insulation blocks intake vents, screens become obstructed, or the ventilation layout fails to provide the intended airflow.
However, ventilation is not a complete solution to every moisture problem. Excessive indoor air leakage can overwhelm a ventilation system, while poorly configured vents may fail to remove moisture effectively.
A proper assessment considers the existing vent arrangement, available intake and exhaust areas, roof design, and local building requirements.
5. Insulation and Vapor-Control Problems
Attic insulation slows heat transfer between living spaces and the roof assembly. When insulation is missing, compressed, or poorly installed, heat can move through the ceiling more easily.
Wet insulation may lose some of its thermal performance. Persistent dampness can also encourage mold growth and damage nearby materials.
Vapor barriers and vapor-retarding materials help limit water vapor diffusion through building assemblies. Their correct placement depends on climate, construction, and the overall moisture-control design.
Do not automatically add more insulation or install a vapor barrier without investigating the existing assembly. First address moisture sources and air leaks, then determine whether insulation or vapor control needs improvement.
What Are the Warning Signs of Attic Moisture and Water Damage?
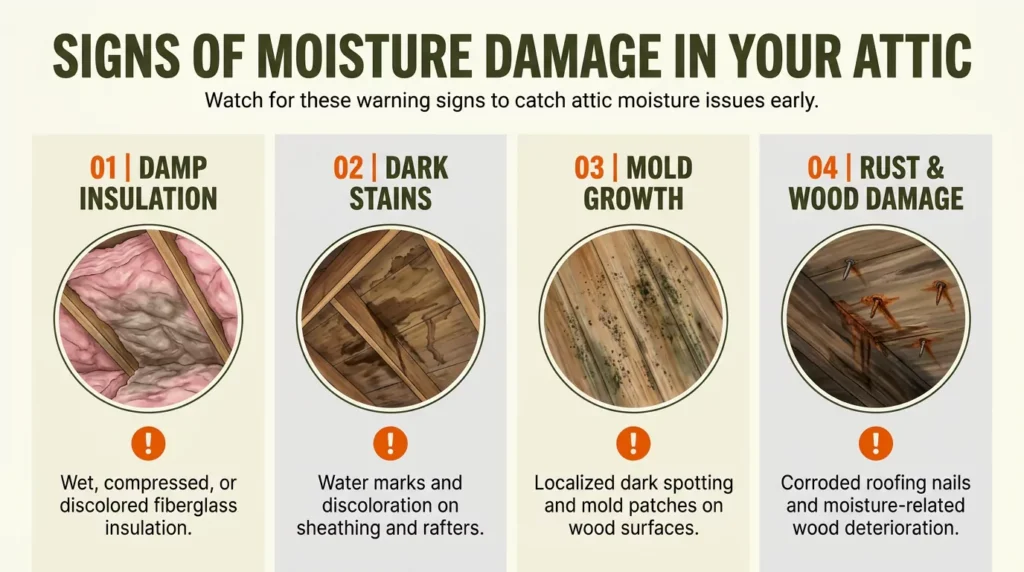
The most common signs include damp insulation, roof stains, rusted fasteners, musty odors, mold growth, and water marks on ceilings. Some signs suggest a recent leak, while others indicate a longer moisture problem.
Damp or Damaged Insulation
Fiberglass batts may become wet, compressed, or displaced. Blown-in cellulose may become damp and compacted, depending on its exposure and condition.
Insulation that has been wet for a long time may lose performance or become contaminated. Do not cover wet insulation with a new layer, because this can conceal the problem and delay drying.
Dark Stains, Mold, and Musty Odors
Dark marks on rafters or roof sheathing may indicate moisture exposure. Fuzzy or spot-like growth can suggest mold, while a persistent musty smell may indicate damp materials.
Not every dark stain is mold, and not every musty odor identifies its source. Inspection is necessary to determine whether the materials are wet, contaminated, or simply discolored.
Mold can grow on wood, paper-faced materials, and other surfaces when conditions remain suitable. Controlling moisture is essential to preventing continued growth.
Rusted Nails and Roof Sheathing Damage
Rusted roofing nails may indicate repeated condensation or another source of moisture. Widespread rust can justify a closer examination of the roof deck and ventilation conditions.
Prolonged dampness may cause wood to swell, plywood or oriented strand board to deteriorate, and fasteners to corrode. Severe or recurring exposure can contribute to wood decay and structural problems.
If rafters appear soft, damaged, or deformed, arrange a professional assessment. Avoid walking on questionable framing or unsupported attic surfaces.
Ceiling Stains and Interior Damage
Water stains, peeling paint, bubbling finishes, and sagging ceilings may indicate moisture above the living space. Water can also travel through wall cavities before becoming visible.
A ceiling stain does not prove that the roof is leaking. Plumbing leaks, condensation, and other water sources may produce similar symptoms.
If a ceiling is bulging or sagging, keep people away from the area. Do not puncture it or attempt repairs while water may still be accumulating.
How Can You Tell Attic Condensation From a Roof Leak?
Condensation often affects multiple cold surfaces, while roof leaks may create localized water tracks near a roof defect. These are useful clues, but neither pattern proves the cause on its own.
| Clue | Possible condensation | Possible roof leak |
| Moisture pattern | Dampness across several roof bays | Concentrated staining or a water track |
| Weather connection | May follow cold periods or humidity changes | May appear after rain or wind-driven rain |
| Roof fasteners | Widespread droplets or frost may occur | Moisture may cluster near a defect |
| Roof sheathing | Broad dampness may be present | Localized wet areas may develop |
| Likely investigation | Check humidity, air leaks, and ventilation | Check shingles, flashing, penetrations, and underlayment |
Both problems can occur together. A roof leak can wet insulation, while indoor air leakage creates condensation elsewhere in the attic.
Use Weather Patterns as Evidence
Record when you first notice moisture and whether it follows rainfall, a cold night, or a period of high indoor humidity.
If water appears after storms, investigate the roof and its penetrations. If droplets repeatedly form during cold weather, examine indoor humidity, ceiling air leaks, and ventilation.
Do not delay repairs while waiting for another weather event if active water intrusion or significant damage is already visible.
How to Investigate Attic Moisture Safely
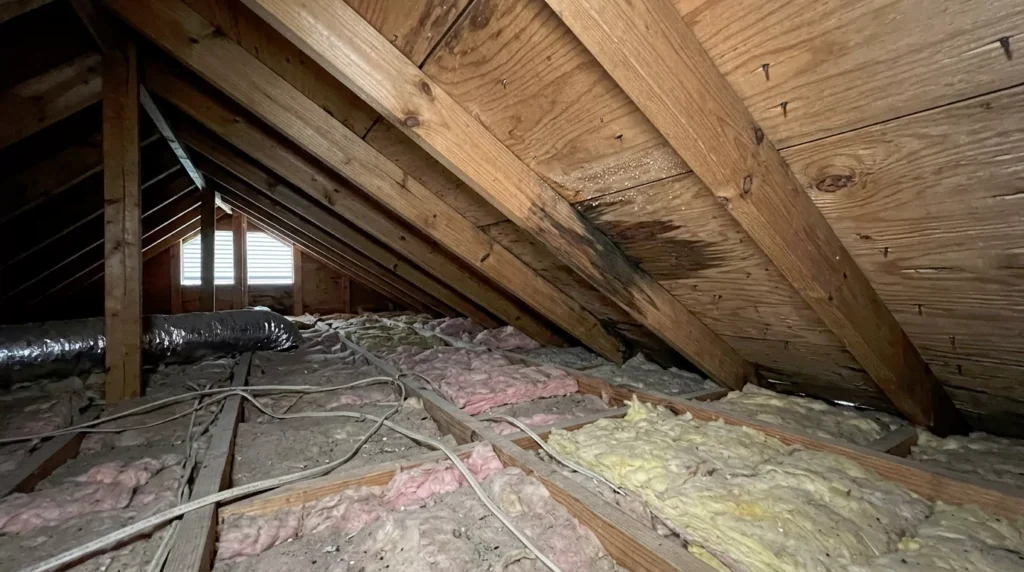
A useful investigation identifies the moisture source, the materials affected, and the extent of the damage. Begin with visible evidence, then arrange specialist testing when the cause remains uncertain.
Step 1: Check for Immediate Hazards
Before entering the attic, consider electrical hazards, unstable framing, extreme temperatures, and the condition of the attic floor.
Do not touch wet electrical equipment or wiring. If water has reached electrical components, keep clear and contact a qualified electrician. Address active leaks and unstable ceilings promptly.
Use the attic access point rather than stepping onto drywall or unsupported ceiling areas. If the attic contains extensive mold, contaminated water, or unsafe access conditions, leave the investigation to qualified professionals.
Step 2: Document Visible Moisture
From a safe position, photograph stains, damp insulation, roof sheathing, and visible mold-like growth.
Record the location and approximate extent of each affected area. Note recent storms, temperature changes, unusual odors, and any recent plumbing or HVAC problems.
This information can help a contractor distinguish possible causes and prepare a more accurate inspection plan.
Step 3: Inspect the Roof and Ventilation
Look for visible roof damage, staining around penetrations, obstructed soffit vents, and insulation covering intended airflow paths.
Check whether bathroom exhaust ducts appear to terminate outdoors. Exhausting humid air into the attic can introduce substantial moisture.
Avoid removing roofing materials or disturbing suspect mold during an initial inspection. Hidden leaks and concealed defects may require professional access or testing.
Step 4: Measure Moisture When Appropriate
Moisture meters can help assess wood and other compatible materials. Thermal imaging may reveal temperature patterns associated with moisture, air leakage, or insulation gaps.
These tools do not independently confirm every moisture source. Readings require context, and thermal images can be affected by several conditions.
A qualified inspector may combine measurements with visual inspection, humidity readings, and other diagnostic methods. Ask for documented findings that identify affected materials and recommended next steps.
How to Fix and Remove Moisture From an Attic
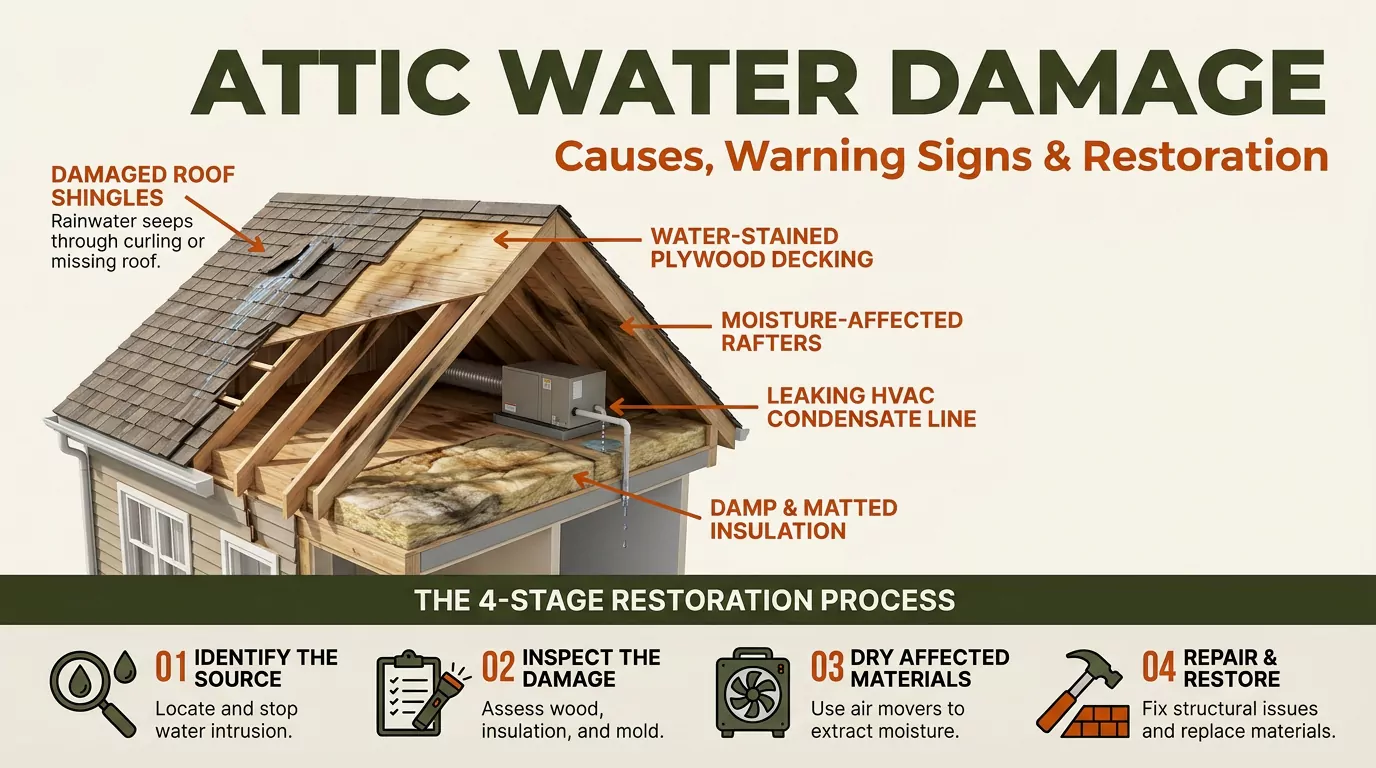
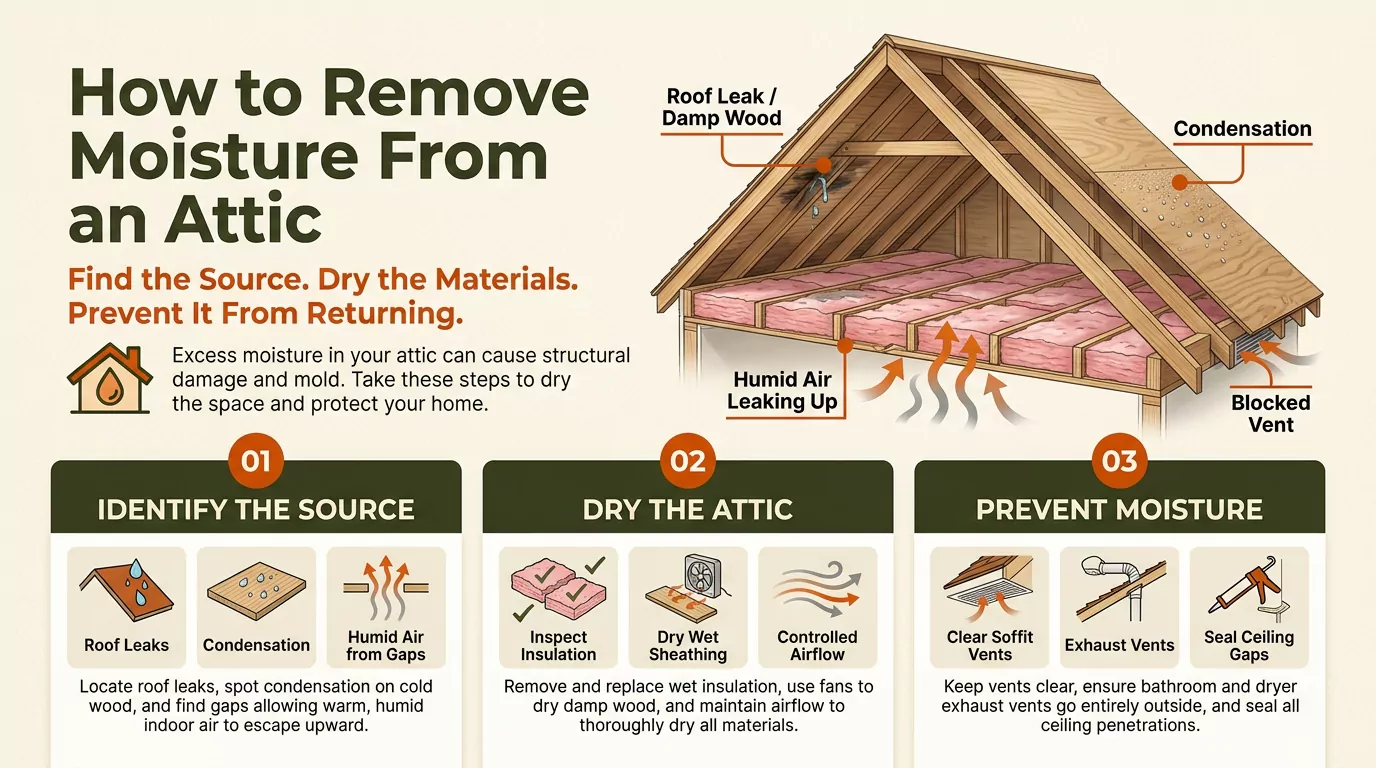
The correct repair depends on the source of moisture and the condition of the affected materials. Stop ongoing water entry first, then dry or remove damaged materials and correct the conditions that caused the problem.
Step 1: Stop the Moisture Source
Repair active roof leaks, defective flashing, plumbing leaks, or other confirmed sources of water. If an exhaust duct discharges into the attic, arrange for its proper outdoor termination.
Temporary protection may be necessary during severe weather, but roof work can be dangerous. Use a qualified roofing contractor when the roof is unsafe or the defect is difficult to locate.
Do not assume that repainting a ceiling or replacing insulation will solve the underlying problem.
Step 2: Dry the Affected Area
Drying requirements depend on the water source, material type, temperature, humidity, and duration of exposure.
Professional restoration may involve water removal, controlled drying equipment, air movement, dehumidification, and moisture monitoring. The goal is to dry materials appropriately without spreading contamination or causing further damage.
Do not direct strong airflow across mold-contaminated materials, as this can spread spores and contaminated dust. Avoid using heat alone as a substitute for moisture removal.
If water may contain sewage or other contaminants, do not handle the cleanup without appropriate training and protective measures.
Step 3: Decide Whether Insulation Needs Replacement
Some materials may be salvageable after limited, clean-water exposure. Others may remain wet, become contaminated, lose their shape, or fail to dry properly.
The decision depends on the material, the extent of saturation, exposure time, contamination, and whether thorough drying is possible.
Saturated or mold-contaminated insulation often requires removal. Have affected materials assessed before installing replacement insulation, and correct the source before closing the assembly.
If your attic remains damp, learn how to remove moisture from attic and address the underlying cause before repairing damaged materials.
Step 4: Correct Air Leaks and Exhaust Ducts
Seal suitable gaps around wiring, plumbing, attic hatches, and ceiling penetrations. Choose sealants appropriate for the materials and location.
Bathroom and kitchen exhaust ducts should discharge outdoors, not into the attic. Clothes dryer exhaust must also terminate outdoors and follow applicable installation requirements.
Ducts passing through cold areas may require suitable insulation to reduce condensation. Confirm that duct connections remain secure and that the exhaust path is clear.
Step 5: Improve Ventilation and Insulation
Once air leakage and moisture sources have been addressed, evaluate the attic’s insulation and ventilation system.
In suitable vented attics, clear soffit intake paths and compatible exhaust vents help support airflow. Baffles may preserve the intended air channel where insulation meets the eaves.
Insulation should provide appropriate coverage without blocking required ventilation. The correct insulation level and moisture-control details depend on climate and building design.
Some roofs use unvented assemblies instead of conventional soffit-to-ridge ventilation. These require a different approach, so do not add vents without understanding the existing roof assembly.
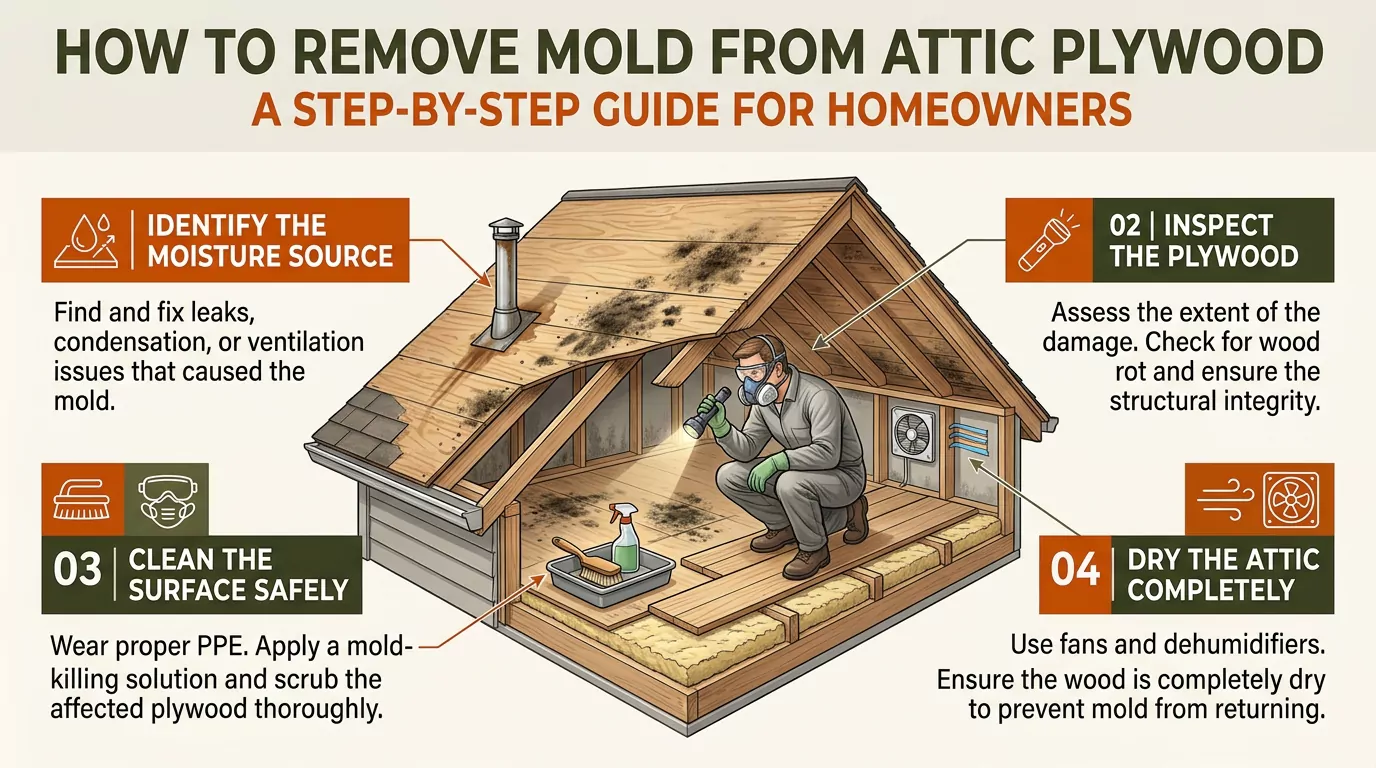
Step 6: Address Mold and Damaged Wood
Mold remediation must address both the visible growth and the moisture source. Small areas on suitable, nonporous or cleanable surfaces may sometimes be handled by trained occupants using appropriate precautions.
Porous materials may be difficult to clean completely. Contaminated insulation and severely affected materials may require removal, while damaged wood may need cleaning, drying, or replacement depending on its condition.
Avoid dry brushing, sanding, or aggressive cleaning that releases spores into the air. Do not mix cleaning chemicals or use bleach indiscriminately on porous building materials.
Seek professional help for extensive growth, recurring mold, hidden contamination, contaminated water, or damage involving vulnerable occupants. A qualified professional can determine the appropriate containment, removal, cleaning, and verification steps.
For additional guidance, see attic mold and how to remove mold from attic plywood.
How to Prevent Attic Moisture From Returning
Long-term prevention requires controlling water entry, limiting humid indoor air movement, and maintaining the building’s moisture-control systems.
Control Indoor Humidity
Use bathroom and kitchen exhaust fans during moisture-producing activities and allow them to run afterward as appropriate. Make sure the fans discharge outdoors.
A relative humidity level around 30% to 50% is a common indoor target, but suitable levels vary with outdoor conditions, building design, and condensation risk. In cold weather, a lower indoor humidity level may be needed to prevent condensation on cold surfaces.
Use a hygrometer to monitor indoor humidity. If humidity remains high, investigate ventilation, plumbing leaks, and other moisture sources.
Maintain Air Sealing and Insulation
Inspect the attic hatch, ceiling penetrations, and visible insulation periodically. Look for gaps, compressed areas, displaced batts, and insulation that blocks intended ventilation pathways.
When upgrading insulation, address air leakage first and follow appropriate local building guidance. The entire roof and ceiling assembly should work together to manage heat and moisture.
Maintain the Roof and Drainage Systems
Inspect roofing materials, flashing, roof penetrations, and related drainage components periodically and after significant storms when safe.
Repair damaged components promptly. Keep records of repairs and photograph recurring problem areas so you can identify changes over time.
Follow a Simple Inspection Schedule
Seasonally: Look for new stains, musty odors, wet insulation, and blocked vents from a safe access point.
After heavy rain: Check for evidence of water entry, especially near known roof defects and penetrations.
During cold weather: Watch for recurring condensation, frost, and rusted fasteners when these conditions are relevant to your climate.
After repairs: Confirm that materials are drying and that the original moisture source has been corrected.
A recurring moisture problem deserves a new investigation rather than repeated cosmetic repairs.
Attic Moisture Repair Costs and Insurance
Repair costs depend on the cause, the size of the affected area, the materials involved, and the amount of work needed. There is no reliable single price for every attic moisture problem.
What Affects Repair Costs?
| Repair category | Factors that affect cost |
| Inspection | Accessibility, testing requirements, and complexity of the moisture source |
| Roof repair | Roofing materials, flashing defects, roof pitch, and access |
| Water damage restoration | Water volume, contamination, drying time, and affected materials |
| Insulation work | Insulation type, depth, removal needs, and replacement area |
| Mold remediation | Contamination extent, containment, material removal, and cleanup |
| Structural repair | Severity of decay, framing damage, and necessary reconstruction |
A small, accessible repair may require less work than a recurring leak involving insulation, roof sheathing, and interior ceilings. Request an itemized estimate that separates diagnosis, source repair, drying, material removal, and reconstruction.
Who Pays for Mold Remediation?
Responsibility depends on the cause of the damage, the insurance policy, and any applicable legal or contractual obligations.
A homeowners insurance policy may cover certain sudden and accidental water damage, but coverage for mold, long-term seepage, maintenance problems, and gradual deterioration can differ substantially.
For more information about damaged insulation, roof sheathing, and repair options, read our guide to attic water damage.
Review your policy’s exclusions, limits, deductibles, and notification requirements. Document the damage, preserve relevant receipts, and contact your insurer before authorizing non-emergency work when practical.
Do not assume every mold problem is covered or automatically excluded. The specific facts and policy language determine the outcome.
Read who pays for mold remediation for a more detailed explanation of insurance and responsibility.
When Should You Call an Attic Moisture Professional?
Professional help is appropriate when the moisture source remains uncertain, the damage is extensive, or the attic presents safety risks.
Contact a qualified specialist when you notice:
- Active leaks that you cannot safely stop.
- Widespread dampness or repeatedly wet insulation.
- Extensive or recurring mold growth.
- Soft, deteriorating, or deformed roof framing.
- Water near electrical equipment or wiring.
- Persistent moisture despite previous repairs.
- Damage that may involve contaminated water or concealed cavities.
Different problems require different specialists. A roofing contractor investigates roof defects, while a restoration professional addresses water-damaged materials. Mold remediation professionals handle appropriate contamination-control and cleanup work. A building-performance specialist can investigate air leakage, insulation, humidity, and ventilation interactions.
Ask contractors about relevant experience, insurance, licensing where required, written scopes of work, and how they will verify that the moisture source has been corrected.
A useful report should identify the likely source, affected materials, immediate risks, recommended repairs, and any remaining uncertainties. It should also distinguish confirmed findings from suspected causes.
Frequently Asked Questions
Is attic moisture always caused by a roof leak?
No. Moisture can result from condensation, air leakage, improperly vented exhaust fans, plumbing leaks, or roof defects. An inspection helps identify the source.
Can attic condensation cause water damage?
Yes. Persistent condensation can wet insulation and roof sheathing, corrode fasteners, support mold growth, and contribute to wood deterioration.
Should I add insulation to a damp attic?
Not before investigating the moisture source. Correct air leaks and ventilation problems, repair leaks, and assess the existing insulation before adding more.
Can wet attic insulation be saved?
Sometimes. The decision depends on the material, water source, contamination, saturation, and whether it can be dried properly. Saturated or mold-contaminated insulation often requires replacement.
How can I tell whether attic mold is dangerous?
Appearance alone cannot establish the species or health risk. Mold exposure can cause allergic reactions or irritation in susceptible people. Avoid disturbing extensive growth and seek professional guidance when contamination is significant.
How long does it take to dry a wet attic?
Drying time varies with the amount of water, material type, temperature, humidity, airflow, and contamination. Monitoring material moisture is more reliable than assuming the attic is dry after a fixed number of days.
Does attic ventilation alone prevent moisture?
Not always. Ventilation can help manage moisture, but air leakage, roof defects, indoor humidity, and insulation problems may also need correction.
Can I remove attic mold myself?
Limited mold on suitable surfaces may be manageable with appropriate precautions. Extensive growth, contaminated insulation, hidden contamination, recurring problems, or unsafe access warrant professional assessment.
Conclusion
Attic moisture problems need more than a quick cleanup or a fresh coat of paint. The lasting solution starts with identifying whether condensation, a roof leak, indoor humidity, or another source is introducing moisture. Next, affected materials must be assessed, dried or removed as appropriate, and repaired safely.
Air sealing, suitable insulation, properly designed ventilation, and outdoor exhaust ducting help reduce future moisture risks. Regular inspections can also reveal early warning signs before damage spreads. If moisture keeps returning, mold is extensive, or roof framing appears damaged, seek qualified help. Addressing the cause protects your attic, supports energy efficiency, and helps prevent expensive repairs.

Daniel Carter specializes in attic maintenance, insulation, ventilation, moisture control, and home improvement. He understands common attic problems and their practical solutions. Through clear, informative guides, he helps homeowners identify issues, prevent damage, improve energy efficiency, and maintain safer, healthier homes.