How to Get Rid of Mice in the Attic
To get rid of mice in the attic, combine trapping, exclusion, sanitation, and follow-up monitoring. First, identify their travel routes and reduce the existing mouse population. Then seal suitable entry points and remove contaminated nesting materials. This approach addresses both the current infestation and the conditions that allow mice to return.
Mice can nest in insulation, contaminate stored belongings, and chew electrical wiring. They may also move between attics, walls, crawl spaces, and living areas. Understanding where they travel helps you choose the right treatment and avoid unnecessary damage.
What to Do First When You Find Mice in Your Attic
Start with a careful inspection before disturbing insulation or placing poison. Look for droppings, shredded materials, gnaw marks, urine odors, and possible entry holes. These signs help you locate active areas and decide whether professional assistance is necessary.
Follow these initial steps:
- Protect yourself. Keep children and pets away from contaminated areas. Avoid touching droppings or disturbing dusty nesting materials.
- Inspect accessible spaces. Use a flashlight to examine visible insulation, stored belongings, beams, and roof edges.
- Locate likely travel routes. Check for droppings, gnaw marks, and repeated activity along edges.
- Choose suitable traps. Follow the manufacturer’s instructions and keep traps away from children and pets.
- Inspect the exterior. Check vents, soffits, roof intersections, pipes, and other potential openings.
- Plan exclusion and cleanup. Control existing mice, prevent additional entry, and arrange safe waste removal.
Do not walk across unsupported ceiling surfaces or enter unsafe attic spaces. Insulation can hide weak flooring, wiring, and other hazards.
If you discover damaged electrical wiring, avoid touching it. Have a qualified electrician assess the damage.
How to Tell If You Have Mice in the Attic
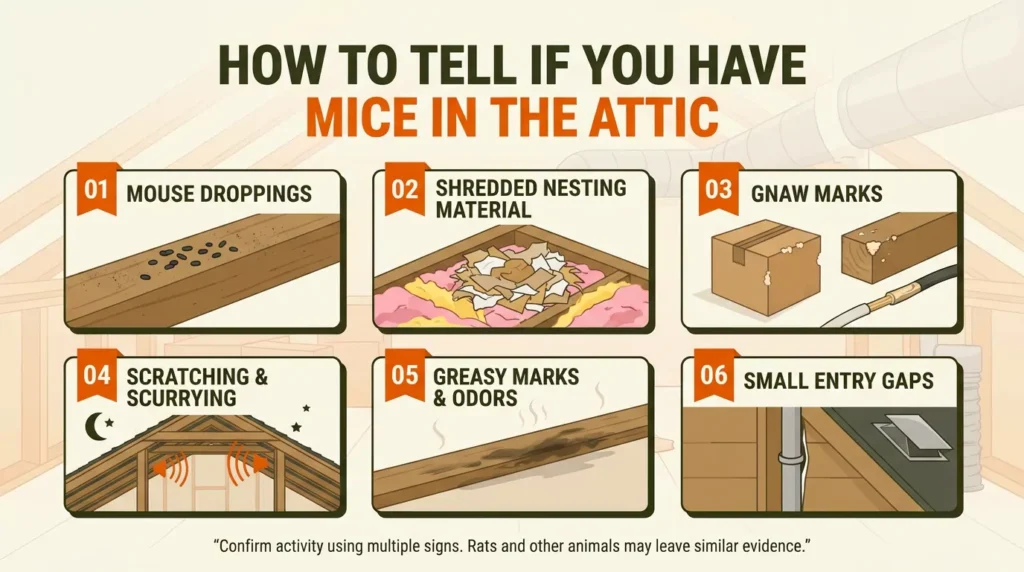
Mice often remain hidden while searching for food or building nests. You may notice droppings, unusual smells, or damaged materials before seeing an actual mouse.
Mouse droppings
Mouse droppings are usually small, dark, and rice-shaped. Fresh droppings may appear moist, while older ones become dry. Their presence suggests rodent activity, but appearance alone may not confirm the species.
Shredded insulation and nesting material
Mice collect paper, fabric, and insulation fibers for nesting. Look for disturbed insulation, torn cardboard, and small piles of shredded materials in sheltered corners.
Gnaw marks and damaged materials
Mice chew packaging, wood, and electrical cable insulation. Fresh damage near droppings or openings may indicate continued activity. Damaged wiring requires prompt professional assessment.
Scratching and scurrying sounds
Mice may make light scratching, squeaking, and running sounds at night. Rats and other animals can make similar noises. Consider the timing and physical evidence before identifying the animal.
What does mouse urine smell like?
Mouse urine can produce a strong, ammonia-like odor, especially in enclosed spaces. A persistent smell may indicate repeated contamination or a hidden nest.
However, odor alone cannot confirm an infestation. Check nearby insulation, stored belongings, and openings for additional evidence.
How can you distinguish mice from rats and squirrels?
Different rodents may require different control methods. Use several clues instead of relying on one sign.
| Sign | Mice | Rats | Squirrels |
| Droppings | Generally small | Generally larger | Different size and appearance |
| Movement sounds | Often light and quick | May sound heavier | Often louder movement |
| Activity patterns | Commonly active at night | Commonly active at night | Often active during daylight |
| Typical evidence | Small gnaw marks and shredded material | Often larger droppings and gnaw marks | Roof damage and larger nesting areas |
These are general clues rather than definitive identification rules. If the evidence is unclear, ask a pest-control professional to identify the animal.
How to Get Rid of Mice in the Attic Step by Step
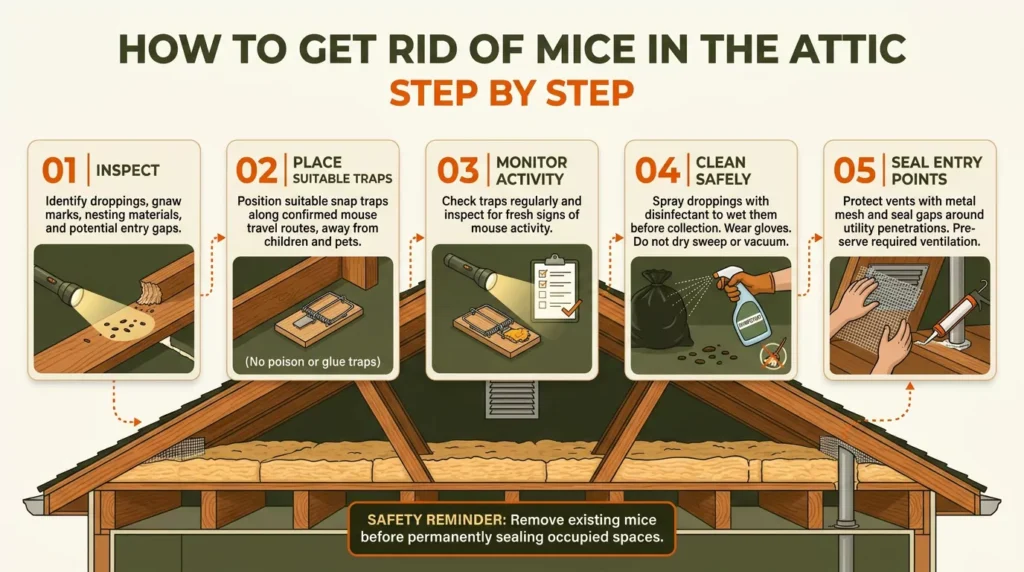
Successful mouse removal requires more than catching the animals you see. You must also address hidden activity, access points, and contaminated materials.
Step 1: Inspect the attic and locate mouse travel routes
Begin with sheltered areas where mice can nest undisturbed. These include insulation edges, stored boxes, roof intersections, and spaces near utility lines.
Look for:
- Droppings along beams and stored belongings.
- Shredded paper, fabric, or insulation fibers.
- Gnaw marks on wood and packaging.
- Openings around pipes, cables, and roof vents.
- Signs of movement between the attic and wall cavities.
Avoid moving contaminated insulation unnecessarily. Disturbing waste may spread contaminated particles.
If signs appear in multiple locations, inspect connected spaces such as garages, crawl spaces, and accessible utility areas. Several affected areas may indicate a larger access problem.
Step 2: Choose suitable mouse traps
Snap traps are a practical option for many household mouse infestations. Properly positioned traps can capture mice without introducing poison into hidden wall cavities.
Live-capture traps are another option, but they require frequent monitoring and responsible handling.
| Trap type | Main advantage | Important consideration |
| Snap trap | Quickly kills a mouse when correctly positioned | Keep it inaccessible to children and pets |
| Live-capture trap | Captures a mouse without immediately killing it | Requires frequent checks and lawful, humane handling |
| Enclosed trap | Houses the trapping mechanism within a protective case | Check suitability and follow product instructions |
| Electronic trap | Uses an electrical mechanism to kill mice | Requires correct placement and routine inspection |
Avoid glue traps where possible because they can cause prolonged suffering. Choose a method suitable for the location and follow applicable local requirements.
Step 3: Place traps along active routes
Trap placement matters more than scattering traps randomly throughout the attic. Mice commonly travel along edges and sheltered pathways.
For suitable snap traps:
- Position traps near droppings, gnaw marks, or other evidence.
- Place them along edges where mice regularly travel.
- Follow the manufacturer’s instructions for orientation and baiting.
- Use a small amount of suitable bait without blocking the mechanism.
- Keep traps away from children, pets, and areas where they could be disturbed.
- Check traps regularly and handle catches according to the product instructions.
Peanut butter can attract mice in many settings. Other suitable baits may work depending on the food available nearby.
If the attic is difficult to access safely, avoid reaching blindly into insulation. A professional can place traps and inspect concealed spaces more safely.
Step 4: Monitor traps and reassess the infestation
Check traps according to their instructions. Remove catches safely, reset traps when needed, and record where activity continues.
Catching one mouse does not prove that every mouse has been removed. Other mice may remain hidden or enter through the same opening.
Watch for:
- New droppings or gnaw marks.
- Continued nighttime noises.
- Freshly disturbed insulation.
- Repeated catches in the same area.
- New signs near roof gaps or utility openings.
If activity continues despite correct trap placement, reassess the entry points and consider professional inspection.
Step 5: Coordinate removal with entry-point sealing
Mice can enter through small gaps around roof vents, pipes, soffits, and other building openings. Sealing these gaps helps prevent additional rodents from entering.
However, blindly sealing every opening while mice remain inside may trap animals in walls or inaccessible cavities.
First assess the infestation and plan how existing mice will be removed. Where needed, use professional exclusion methods that allow animals to leave without returning.
Suitable barriers may include fine metal mesh, hardware cloth, sheet metal, mortar, and compatible sealants. The correct choice depends on the opening and surrounding materials.
Do not block required ventilation or drainage openings.
Step 6: Remove attractants and nesting opportunities
Reduce the materials and food sources that support mouse activity.
- Store belongings in sturdy containers with secure lids.
- Remove unnecessary cardboard and loose paper.
- Keep food and animal feed in sealed containers.
- Dispose of rubbish regularly.
- Reduce clutter around attic access points.
- Repair leaks and address moisture problems.
- Store lumber and other materials away from exterior walls.
You do not need to discard every stored item. Assess each item and safely remove belongings that are heavily contaminated or damaged.
Step 7: Clean contaminated areas and continue monitoring
Trapping removes mice, but it does not eliminate the contamination they leave behind. Droppings, urine, nesting debris, and damaged insulation require separate attention.
Use appropriate disinfection procedures before removing waste. Never sweep or vacuum dry droppings.
After cleanup, check previously affected areas for fresh evidence. If new droppings or gnaw marks appear, reassess the treatment and look for overlooked entry points.
Should You Use Mouse Poison in the Attic?
Rodenticides can control mice, but they carry risks in attic spaces. A poisoned mouse may die inside insulation or an inaccessible wall cavity. Removing the carcass can then become difficult.
Consider these factors before choosing poison:
- Accessibility: Dead rodents may be difficult to locate inside concealed spaces.
- Exposure risks: Improperly secured bait can harm children, pets, and wildlife.
- Product restrictions: Some rodenticides have specific legal and label requirements.
- Hidden activity: Poison does not reveal every nesting location or close entry points.
- Alternatives: Monitored traps can make it easier to locate and retrieve captured mice.
Never scatter loose poison around the attic or mix different rodent-control products. Use only products permitted for your location and follow their labels exactly.
If the attic is difficult to access or bait exposure is a concern, consult a qualified pest-control professional.
How to Seal Mouse Entry Points
Rodent exclusion means blocking mice from entering a building. It is essential for long-term control because trapping alone does not stop new mice from arriving.
Where should you look for openings?
Start with a ground-level inspection. Use binoculars to examine roof edges when necessary. Do not climb onto a roof without appropriate equipment and experience.
Check these locations carefully:
- Gaps where roof sections meet.
- Loose fascia boards and damaged soffits.
- Unprotected attic and gable vents.
- Openings around electrical cables and plumbing.
- Cracks in exterior walls and foundations.
- Damaged siding and loose door seals.
Mice can squeeze through openings roughly a quarter-inch wide. Even small gaps deserve attention when they connect to protected interior spaces.
Which materials help seal mouse entry points?
The appropriate material depends on the opening, building surface, weather exposure, and ventilation needs.
| Material | Suitable application | Important limitation |
| Galvanized hardware cloth | Protecting suitable vents and larger openings | Must be securely fitted with openings small enough to exclude mice |
| Sheet metal | Creating durable barriers over suitable openings | Requires secure attachment and careful handling |
| Copper or stainless-steel mesh | Filling suitable narrow gaps | May need a compatible sealant or backing |
| Mortar | Closing appropriate masonry gaps | Unsuitable for joints requiring movement |
| Exterior-grade sealant | Sealing compatible joints and small cracks | Not every sealant resists gnawing or weather equally |
Ordinary expanding foam or plastic alone may not resist gnawing. Use suitable rodent-resistant materials and install them correctly.
Do not block required ventilation or drainage. Utility penetrations may also require approved fire-stopping materials. Seek professional advice when the correct repair is unclear.
How to Clean Mouse Droppings and Urine Safely
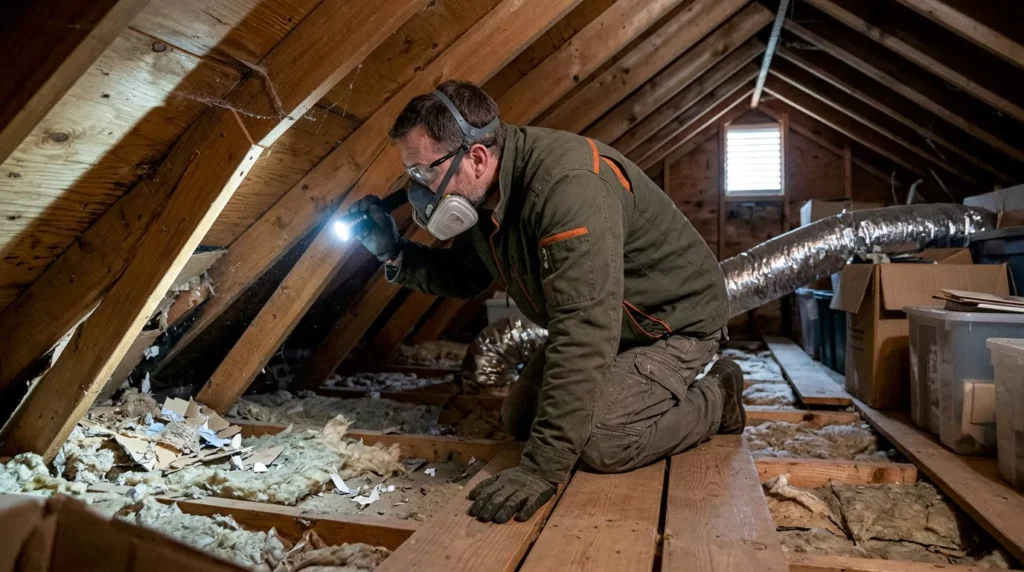
Mouse waste can contaminate surfaces and materials. Disturbing dry droppings may release contaminated particles into the air, so safe cleanup is essential.
Follow these cleanup precautions
- Ventilate the space. When practical, open doors or windows and allow fresh air to circulate before cleaning. Follow relevant public-health guidance for enclosed spaces.
- Wear suitable protection. Use disposable gloves and appropriate protective equipment. Heavy contamination may require professional remediation.
- Wet the waste with disinfectant. Apply an appropriate disinfectant according to its label. Allow the specified contact time before wiping.
- Collect the waste carefully. Use disposable materials and follow local waste-handling guidance.
- Clean suitable surfaces. Disinfect compatible hard surfaces and equipment according to product instructions.
- Finish safely. Remove gloves carefully and wash your hands thoroughly.
Never sweep or vacuum dry mouse droppings or nesting debris. This can spread potentially contaminated particles.
Do not mix bleach with ammonia or other cleaning products. If using a bleach solution, follow current public-health guidance and the product’s dilution instructions. Some surfaces may require a different compatible disinfectant.
What if the attic contains a large amount of mouse waste?
Heavy contamination requires greater caution than a few droppings on a hard surface. Extensive waste, hidden nests, contaminated insulation, or substantial dust may require professional remediation.
Do not use an ordinary household vacuum to remove contaminated debris. A qualified professional can assess the area and recommend suitable cleaning and waste-removal methods.
What to Do About Contaminated Attic Insulation
Mice may burrow into insulation, shred its fibers, and use it for nesting. Urine and droppings can contaminate the material. Damaged insulation may also lose performance and become difficult to clean thoroughly.
Not every infestation requires complete insulation replacement. The decision depends on contamination, physical damage, insulation type, and whether safe remediation is possible.
When should insulation be replaced?
Consider a professional assessment when you find:
- Heavy accumulation of droppings or urine.
- Strong odors that persist after accessible surfaces are cleaned.
- Shredded, compressed, or displaced insulation.
- Nesting material buried within insulation.
- Contamination across a large or inaccessible area.
Undamaged insulation may be retained when a suitable assessment confirms it can be safely managed. Heavily contaminated porous materials may need removal and replacement.
How does insulation remediation work?
A suitable remediation plan typically involves:
- Controlling the mouse infestation.
- Identifying and addressing entry points.
- Assessing the amount and type of insulation damage.
- Removing contaminated materials using appropriate precautions.
- Cleaning suitable surrounding surfaces.
- Replacing insulation where necessary.
Avoid pulling apart insulation without understanding the contamination risks. Fiberglass and other insulation materials can also irritate the skin and respiratory system.
What If Mice Are Inside Walls or Crawl Spaces?
Mouse activity in several areas may indicate connected access routes. Mice can travel between attics, wall cavities, garages, and crawl spaces through openings around pipes, cables, and structural joints.
Mice inside wall cavities
If you hear scratching inside a wall, inspect nearby rooms for droppings and openings around utility lines. Place traps in accessible locations along suspected routes when safe.
Do not cut into walls without assessing electrical wiring, plumbing, and structural components. If activity continues or a dead rodent causes a persistent odor, a professional can determine whether targeted access and removal are necessary.
Poisoning mice inside walls can create avoidable carcass and odor problems. Accessible trapping is often easier to monitor.
Mice in crawl spaces
Crawl spaces can provide shelter and access to wall and floor cavities. Inspect accessible foundation gaps, pipe openings, insulation, and evidence of moisture problems.
Do not enter a crawl space that appears unsafe, heavily contaminated, or poorly ventilated. Some spaces contain electrical hazards, standing water, or other dangerous conditions.
What if mice occupy both the attic and crawl space?
Treat the situation as a whole-house rodent problem rather than two unrelated infestations.
Inspect the attic, crawl space, garage, kitchen, utility areas, and exterior foundation. Map likely access routes and coordinate trapping, cleanup, and exclusion.
Crawl space encapsulation may help manage moisture when properly designed. However, it does not remove mice or replace rodent-resistant barriers.
How to Prevent Mice From Returning
Long-term prevention depends on keeping rodents outside and removing conditions that attract them. Continue checking the building after the initial infestation appears resolved.
Maintain a mouse-resistant attic
- Store clothing, linens, and keepsakes in sturdy containers with secure lids.
- Remove unnecessary cardboard, loose paper, and other nesting materials.
- Keep food, seeds, and animal feed in sealed containers.
- Dispose of rubbish and food waste regularly.
- Repair roof damage and maintain attic vents.
- Trim vegetation that provides access to the roof.
- Keep firewood, lumber, and clutter away from exterior walls.
- Repair leaking pipes and address damp areas.
- Inspect utility openings after maintenance work.
A clean attic can still attract mice if they have an accessible entry point. Combine sanitation with structural repairs for better results.
Follow a simple inspection schedule
| Frequency | What to check |
| Weekly during active treatment | Trap catches, fresh droppings, new damage, and continuing noises |
| Monthly after activity stops | Previously affected areas and repaired openings |
| Seasonally | Roof edges, soffits, vents, vegetation, and exterior gaps |
| After storms or repairs | Damaged materials and newly opened gaps |
Adjust the schedule to the severity of the infestation and any recommendations from your pest-control provider.
The goal is to detect renewed activity early, before mice establish new nests or damage insulation.
When to Hire a Professional Mouse Exterminator
Professional help is appropriate when mice remain active despite trapping, entry points are difficult to locate, or contamination creates safety concerns.
Consider hiring a specialist if:
- Mice repeatedly return after treatment.
- You hear activity inside inaccessible walls or ceilings.
- Droppings and nesting materials cover large areas.
- Insulation is heavily contaminated.
- You suspect rodents have damaged electrical wiring.
- The attic or crawl space cannot be accessed safely.
- You cannot identify whether the animal is a mouse, rat, squirrel, or other wildlife.
What should a professional mouse-removal service include?
A comprehensive service should address more than killing rodents. Ask whether the provider offers:
- An inspection of the attic and exterior.
- Identification of likely rodent species and entry routes.
- A suitable trapping or treatment plan.
- Recommendations for rodent-resistant exclusion.
- Safe handling of contaminated waste.
- Assessment of damaged insulation.
- Follow-up visits and monitoring.
- Written details of the service scope and any warranty.
Check applicable licensing requirements, insurance, and the provider’s experience with attic infestations. Compare the proposed work rather than choosing solely on the initial price.
What Affects the Cost of Attic Mouse Removal?
There is no single price for every attic infestation. Costs depend on the number of affected areas, access conditions, required repairs, and contamination.
| Cost factor | Why it matters |
| Inspection | The provider must locate activity and assess potential entry routes. |
| Trapping and treatment | The number of affected areas and follow-up visits influence labor. |
| Exclusion work | Sealing roof gaps or repairing vents requires materials and labor. |
| Insulation remediation | Contaminated insulation may need specialized removal and replacement. |
| Wall-cavity access | Hidden nests or dead rodents may require targeted inspection and removal. |
| Ongoing monitoring | Repeat visits may be necessary to confirm that activity has stopped. |
Ask whether a quote includes exclusion, cleanup, insulation work, and follow-up visits. Some providers charge separately for these services.
A lower initial quote may not cover the repairs needed to prevent another infestation. Request an itemized estimate to compare the actual scope of work.
Frequently Asked Questions
What should I do first if I find mice in my attic?
Inspect accessible areas for droppings, nesting materials, gnaw marks, and entry holes. Avoid disturbing dry waste. Set suitable traps in safe locations, plan exclusion, and seek professional help if access or contamination creates hazards.
What is the most effective way to trap mice in an attic?
Properly placed snap traps are a practical option for many infestations. Position them along active travel routes and follow the manufacturer’s instructions. Monitor traps regularly and address entry points to prevent new mice from entering.
Can mice enter through attic vents?
Yes. Mice may enter through damaged vent covers, gaps around frames, or openings in the surrounding roof structure. Install suitable rodent-resistant protection without blocking required ventilation.
Should I use poison to get rid of mice in the attic?
Poison can control mice, but it creates risks for children, pets, and wildlife. Rodents may also die in inaccessible spaces. Consider monitored trapping and exclusion, and use rodenticides only according to applicable regulations and product instructions.
How do I get mice out of wall cavities?
Inspect nearby openings and look for droppings or other evidence. Place traps in accessible locations along suspected routes when safe. Avoid cutting into walls without checking for wiring and plumbing. Persistent activity may require professional inspection.
How do I clean mouse droppings in the attic?
Ventilate the area when practical, avoid disturbing dry droppings, and apply an appropriate disinfectant according to its label. Allow the required contact time before wiping up waste. Heavy contamination may require professional remediation.
Do I need to replace insulation after a mouse infestation?
Not always. The decision depends on contamination, physical damage, insulation type, and whether safe remediation is possible. Heavily contaminated or damaged insulation may require removal and replacement.
How long does it take to get rid of mice in an attic?
The timeframe depends on the number of mice, their access routes, and the effectiveness of treatment. Some infestations improve quickly, while hidden nests and recurring entry require longer monitoring. Continue checking for fresh signs after trapping.
Why do mice keep returning to my attic?
Common reasons include unsealed entry points, remaining mice, accessible food, and untreated nesting areas. Inspect the entire building exterior and connected spaces instead of repeatedly treating only the attic.
Can mice in the attic cause electrical problems?
Yes. Mice can gnaw through electrical wire insulation, potentially creating shock or fire hazards. Do not touch damaged wiring. Have a qualified electrician inspect suspected damage.
When should I call a pest-control professional?
Call when activity persists, mice occupy inaccessible spaces, insulation is heavily contaminated, or safe access is difficult. Professional help is also appropriate when removal, exclusion, and cleanup must be coordinated across several areas.
Conclusion
Getting rid of mice in the attic requires more than setting a few traps. Identify their travel routes, control the existing population, and close the openings that allow them inside.
Safe cleanup matters because droppings, urine, and damaged insulation can remain after mice disappear. Inspect connected areas if you find activity in walls or crawl spaces. Monitor the attic after treatment and repair overlooked gaps promptly.
If the infestation is extensive or difficult to reach, a qualified pest-control professional can coordinate removal, exclusion, and cleanup. Consistent maintenance offers the best chance of keeping your attic free of mice.

Daniel Carter specializes in attic maintenance, insulation, ventilation, moisture control, and home improvement. He understands common attic problems and their practical solutions. Through clear, informative guides, he helps homeowners identify issues, prevent damage, improve energy efficiency, and maintain safer, healthier homes.