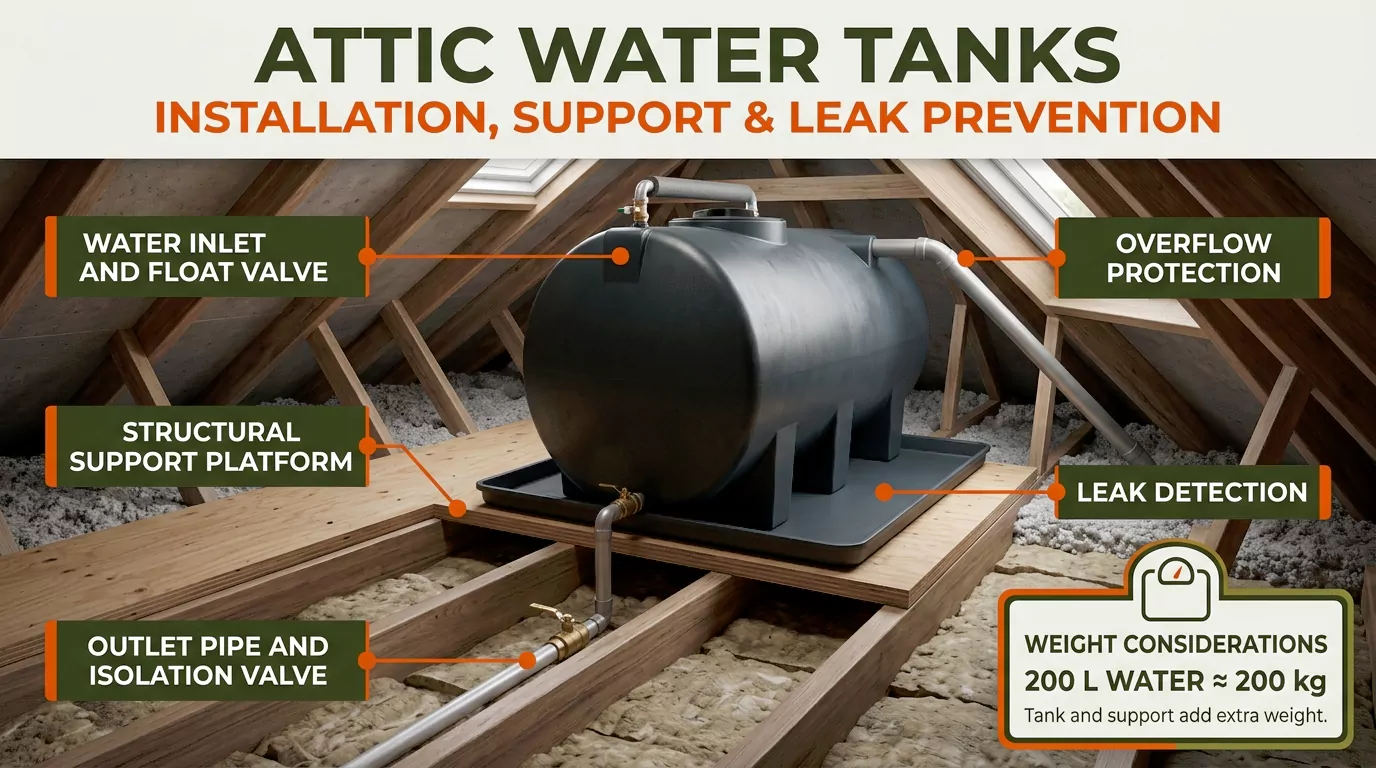
Attic Water Tanks: Installation, Support, and Leak Prevention
Attic water tanks provide convenient water storage, but their installation requires careful planning. A full tank can place a substantial load on the building structure.
Poor plumbing connections or faulty valves can also cause hidden leaks and expensive damage.
Safe installation depends on three essentials: adequate structural support, correctly installed plumbing, and reliable overflow and leak protection. The tank must also remain accessible for inspection and maintenance.
This guide explains how attic water tanks work, how their support should be assessed, and how to reduce installation risks.
It also covers common tank problems, water hygiene, maintenance, and hot-water equipment safety.
What Is an Attic Water Tank and How Does It Work?
An attic water tank is a storage vessel installed in a roof space or attic. In some plumbing systems, it supplies water to household fixtures through gravity.
Other systems use pumps or different pressure arrangements. The tank’s purpose depends on the home’s plumbing design.
A cold-water storage tank is not the same as a hot-water cylinder or a pressurized water heater.
Common types of attic water tanks
Tank material affects weight, durability, corrosion resistance, and maintenance needs. The correct choice depends on the water’s intended use, installation conditions, and manufacturer requirements.
| Tank material | Main characteristics | Important considerations |
| Polyethylene plastic | Lightweight and resistant to rust | Check material suitability, UV exposure where relevant, and connection integrity. |
| Galvanized steel | Strong metal construction | Older tanks may corrode, develop weak spots, or leak. |
| Fiberglass | Corrosion-resistant composite material | Check compatibility, support requirements, and the manufacturer’s maintenance guidance. |
Plastic tanks are common in modern installations, but material alone does not determine safety. A suitable tank must match the water system, available space, required capacity, and support design.
Bladder tanks are another storage option in some applications. Their suitability depends on their intended use and installation requirements.
How tank capacity affects household water supply
Tank capacity determines how much water the system can store. The right size depends on household demand, available supply, refill arrangements, and the plumbing system’s design.
A larger tank may provide a greater reserve, but it also increases the structural load. Choosing the largest available tank is therefore not always the best decision.
Before selecting a capacity, consider:
- The number of people using the system.
- Typical daily water consumption.
- The reliability of the incoming water supply.
- Available attic space and safe access.
- The building’s verified load-bearing capacity.
- The tank manufacturer’s requirements.
The storage volume should meet the household’s needs without creating an unsuitable structural or maintenance burden.
Benefits and limitations of attic water storage
Attic water tanks can keep stored water out of living areas and support gravity-fed plumbing where the system is designed for it.
They may also provide a reserve during interruptions to the incoming supply.
However, attic placement introduces several concerns:
- Water adds significant weight above occupied rooms.
- Leaks may remain unnoticed until ceilings or insulation become wet.
- Roof spaces can experience large temperature changes.
- Limited access can make maintenance difficult.
- Poorly protected tanks may collect dust or other contaminants.
These limitations should be considered before installing a new tank or retaining an older one.
How to Support an Attic Water Tank Safely
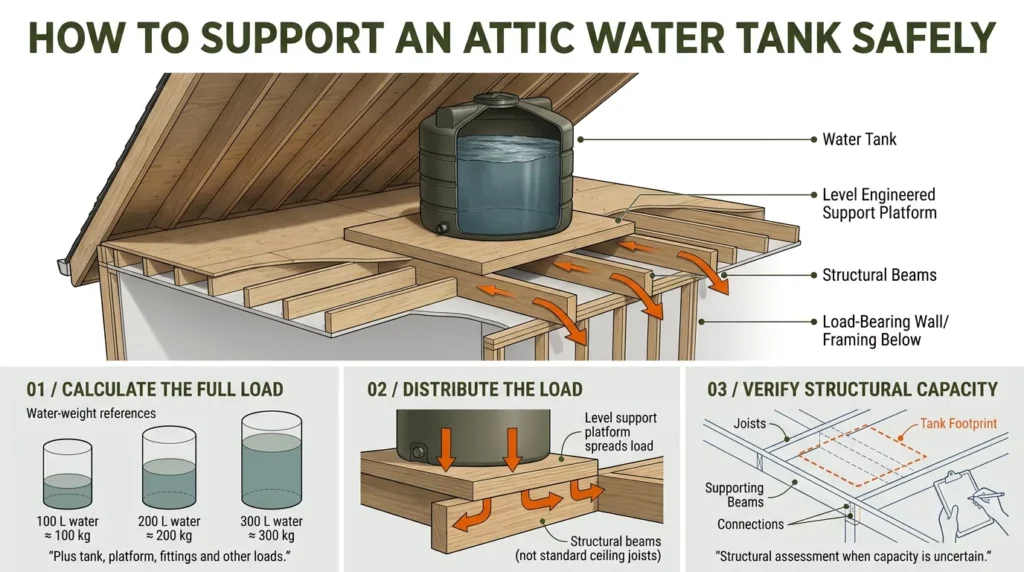
An attic water tank must stand on a support system that can safely carry its full operating load.
Never assume that existing ceiling joists or attic flooring can support a filled tank simply because they support a person’s weight.
The support arrangement must transfer the load into suitable structural members.
A qualified structural engineer should assess the framing when its capacity is uncertain or reinforcement may be required.
Calculate the weight of a full tank
Water contributes most of the weight in many storage-tank installations. A useful initial estimate is approximately 1 kilogram per liter of water.
For example, a tank containing 200 liters of water holds approximately 200 kilograms of water alone. The empty tank, support platform, fittings, and other loads add to that total.
| Water capacity | Approximate water mass |
| 100 liters | 100 kg |
| 150 liters | 150 kg |
| 200 liters | 200 kg |
| 300 liters | 300 kg |
| 500 liters | 500 kg |
These figures represent water mass only, not the complete installed load. Actual structural design must consider all applicable loads and their distribution.
A tank’s weight is not necessarily spread evenly across the entire attic floor. Its base, support arrangement, and framing connections determine how forces reach the structure.
For that reason, a capacity calculation is only the first step. It cannot establish whether a particular attic is safe.
Assess joists, beams, and load-bearing capacity
Roof joists, ceiling joists, beams, and load-bearing walls perform different structural roles. Their ability to support a tank depends on the building’s design and condition.
A professional assessment may consider:
- Joist dimensions, spacing, span, and material.
- Existing cracks, rot, corrosion, or water damage.
- The position of supporting walls and beams.
- Connections between framing members.
- The tank’s full operating weight and footprint.
- Additional loads from stored items or equipment.
- Any proposed changes to the original structure.
Ceiling finishes and ordinary attic boards should not be treated as proof of structural capacity.
A support system must transfer the load through suitable framing or another engineered arrangement.
Do not cut, notch, drill, or reinforce structural members without appropriate approval.
Choose a suitable support platform
A tank support platform provides a stable base and distributes loads according to its design. Its material and dimensions must suit the tank and the supporting structure.
A suitable installation generally requires:
- A level and stable bearing surface.
- Compatibility with the tank manufacturer’s base requirements.
- Adequate support beneath the intended footprint.
- Secure connections where the design requires them.
- Resistance to the expected service environment.
- Access for inspection and maintenance.
Plywood, timber, or steel may form part of a suitable support system, but none is automatically safe in every attic.
A thicker board cannot compensate for undersized or damaged framing. The platform and the supporting structure must work together.
Know when structural reinforcement is necessary
Reinforcement may be needed when existing framing cannot safely support the proposed load.
The required solution depends on the building rather than a universal timber size or platform design.
A structural engineer can assess the existing arrangement, determine the load path, and specify appropriate changes.
A contractor can then complete the work according to the approved design.
Consider professional assessment before installation when:
- The tank is large or unusually heavy.
- The attic structure is old or poorly documented.
- Previous leaks have damaged the framing.
- Joists show noticeable movement or deterioration.
- The tank will sit above a bedroom or another occupied room.
- A replacement tank has a different capacity or footprint.
Do not fill or continue using a tank if its support appears unstable. Keep people away from the affected area and arrange an appropriate professional inspection.
Attic Water Tank Installation: A Step-by-Step Overview
Attic tank installation should follow a coordinated structural and plumbing plan. The exact sequence depends on the tank, the existing water system, manufacturer instructions, and local requirements.
Step 1: Inspect the attic and plan the installation
Before work begins, confirm that the proposed location can accommodate the tank and its connections.
Review the structure, access route, water supply, drainage arrangements, and maintenance needs.
The planning stage should establish:
- The required tank capacity and dimensions.
- The tank’s full operating load.
- The approved support arrangement.
- The positions of inlet and outlet connections.
- Access to isolation valves and service components.
- Suitable overflow and leak-management arrangements.
- Applicable building and plumbing requirements.
The tank must also be transportable into the attic without damaging the building or creating unsafe working conditions.
Step 2: Position and secure the tank
The tank should sit on its approved, level support system. Its position must allow the connections to operate without placing unnecessary strain on the tank walls or pipework.
Follow the manufacturer’s instructions for base support, clearances, and restraint. Some installations may require additional measures to limit movement.
Avoid placing heavy stored items around the tank if they obstruct inspection or add unassessed loads to the structure.
Step 3: Connect the inlet, outlet, and isolation valves
The inlet supplies water to the tank, while the outlet serves the connected plumbing system. Their arrangement varies by tank design and application.
Correct installation requires compatible fittings, suitable seals, and properly supported pipework.
Connections should not be forced or overtightened, especially when plastic bulkhead fittings are involved.
An isolation valve allows the relevant supply to be shut off for servicing or emergency response. Its position should be accessible without requiring someone to cross an unsafe attic.
The installer should verify that every connection matches the manufacturer’s instructions and the applicable plumbing requirements.
Step 4: Install overflow protection and check for leaks
The overflow arrangement manages excess water if the tank continues filling beyond its intended level.
A properly selected and routed overflow pipe helps prevent uncontrolled discharge into the attic.
The installation should also address the following:
- Correct operation of the float valve.
- Suitable overflow capacity and routing.
- Protection against debris and pest entry where required.
- Accessible isolation controls.
- Leak containment where appropriate.
- A safe discharge destination that complies with local requirements.
An overflow pipe is not a substitute for a functioning float valve. Likewise, a leak tray cannot compensate for an inadequate overflow arrangement.
Step 5: Complete testing and commissioning
Before the installation is handed over, the responsible professional should verify that the system operates correctly.
Commissioning may include checking:
- The tank’s position and support.
- The inlet valve and normal filling level.
- The outlet and associated pipework.
- Fittings, seals, and visible joints for leakage.
- The overflow arrangement and discharge route.
- Isolation controls and access provisions.
- Any required safety devices and documentation.
Testing should follow the tank manufacturer’s instructions and applicable procedures. Do not rely on an arbitrary waiting period or a partial-fill test as proof that the installation is safe.
The installer should explain the normal operating conditions, maintenance requirements, and steps to take if a leak occurs.
How to Prevent Attic Water Tank Leaks and Overflow
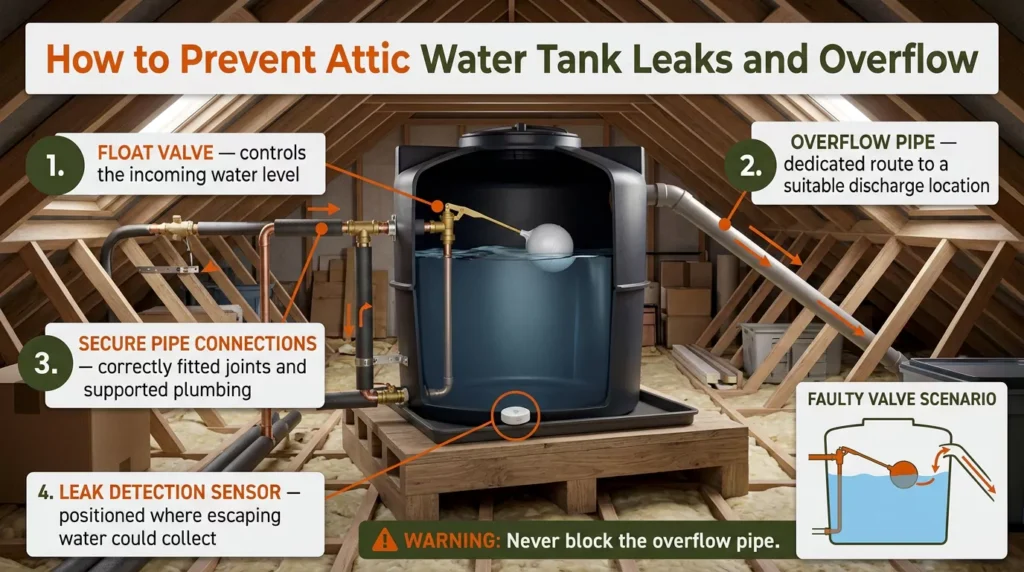
Attic water tank leaks commonly originate from damaged tank walls, deteriorated fittings, faulty valves, or leaking pipe joints.
Overflow can occur when the inlet control fails or the system is incorrectly adjusted.
Regular inspection and correct installation help identify these problems before they cause extensive damage.
Common causes of leaks
| Warning sign | Possible cause | Recommended response |
| Water around the tank | Overflow, a leaking fitting, or tank damage | Identify the source safely and arrange repairs. |
| Tank keeps filling | Faulty float valve or another filling-control problem | Have the valve and water supply checked. |
| Damp pipe joints | Failed seals, loose connections, or damaged fittings | Arrange repair and inspect surrounding materials. |
| Rust or corrosion | Deterioration of a metal tank or component | Assess the affected component for repair or replacement. |
| Water stains on ceilings | A leak or overflow above the room | Treat it as a potential active leak and check for electrical hazards. |
| Unusual banging or vibration | Possible pipe movement, air, or a plumbing fault | Have the system assessed if the noise persists. |
These symptoms are clues, not definitive diagnoses. Water can travel along framing or pipework, so the visible damp area may be some distance from the original leak.
Maintain the float valve and overflow pipe
A float valve regulates the amount of water entering a storage tank. As the water rises, the float mechanism should close the inlet at the intended level.
Wear, debris, or damage can prevent the valve from closing properly. The result may be continuous filling and overflow.
During appropriate inspections, check for:
- A filling level that appears abnormal.
- Water escaping through the overflow.
- Visible damage or deterioration around the valve.
- Obstructions affecting the float mechanism.
- Loose or damaged pipe connections.
- Debris that could obstruct the overflow arrangement.
A qualified plumber should repair or replace faulty components where necessary. Do not block an overflow pipe to stop water from escaping, because doing so can worsen flooding.
Use leak detection and secondary containment appropriately
Leak sensors can alert occupants when moisture appears near a tank or water heater. Some systems also operate automatic shut-off valves when a leak is detected.
These devices can improve early detection, especially where an attic is rarely visited.
However, their effectiveness depends on placement, power, connectivity, maintenance, and compatibility with the plumbing system.
Secondary containment, such as a suitable drain pan, may help collect limited leakage where the tank design and installation permit it.
Its capacity, materials, and drainage arrangements must suit the application.
Important precautions include:
- Keep sensors accessible and test them according to their instructions.
- Ensure any automatic shut-off system can control the relevant supply.
- Do not allow a drain pan to overflow into the attic.
- Use an approved drainage route where one is required.
- Never direct water toward electrical equipment or vulnerable building materials.
A containment tray or sensor is a backup measure. Neither replaces correct installation, reliable valves, or routine inspection.
What to do when an attic tank leaks
An active attic leak requires a prompt response. The priority is to stop further water damage without putting anyone at risk.
- Keep clear of unsafe areas. Do not walk across a wet, damaged, or inadequately supported attic floor. Avoid rooms beneath a visibly sagging ceiling.
- Isolate the water supply if safely accessible. Use the appropriate valve only if you can reach it without entering a dangerous area.
- Consider electrical hazards. If water is near wiring, lights, or electrical equipment, stay clear and contact a qualified electrician or emergency service as appropriate.
- Arrange professional help. A plumber should identify the source and repair the fault. Structural damage may require a separate assessment.
- Document the damage. Photographs taken from a safe location can help with repairs and insurance documentation.
- Dry and inspect affected materials. Wet insulation, ceilings, and framing may need professional assessment to determine whether cleaning or replacement is necessary.
If the ceiling is bulging or appears close to collapse, keep people out of the room below. Do not puncture the ceiling or attempt to catch water from underneath it.
Tank Insulation, Water Quality, and Maintenance
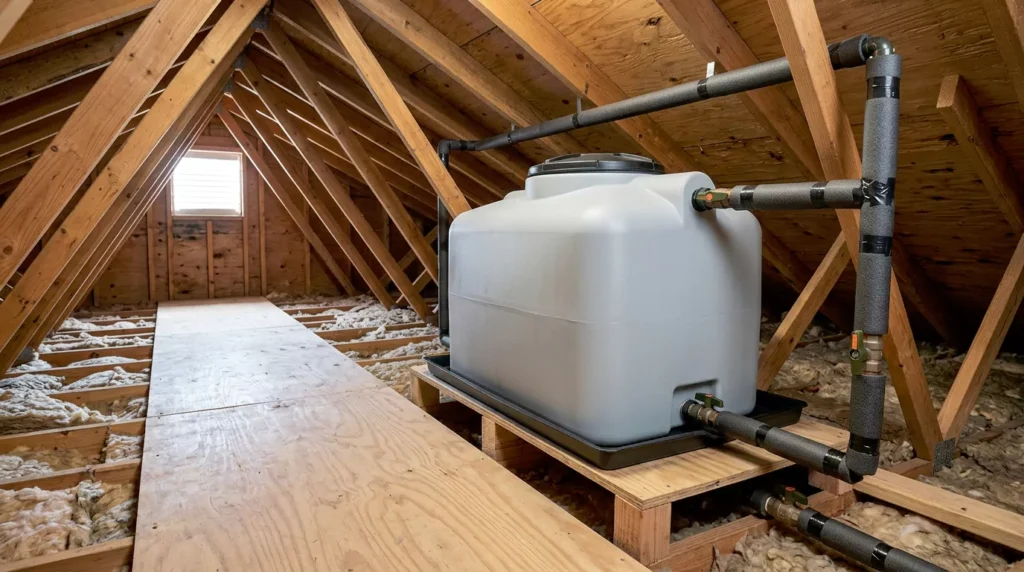
A tank needs more than structural support to remain reliable. Suitable insulation, a secure cover, clean stored water, and routine inspections help protect both the plumbing system and the building.
When tank and pipe insulation are needed
Tank and pipe insulation reduce heat transfer. In cold climates, appropriate insulation can also help reduce the risk of freezing, although it cannot guarantee protection during prolonged cold conditions.
The correct approach depends on the climate, attic temperature, water system, and manufacturer instructions.
Good practice includes:
- Insulating exposed pipes where required.
- Using compatible insulation around the tank.
- Avoiding arrangements that obstruct inspection or ventilation.
- Checking insulation for dampness or deterioration.
- Addressing air leaks and cold exposure where relevant.
- Inspecting for signs of condensation on pipes or nearby surfaces.
Insulation should not conceal active leaks or prevent access to important valves and fittings. If water is collecting around the tank, establish its source before assuming condensation is responsible.
Prevent contamination with suitable covers
A properly fitted tank cover helps keep dust, insects, and other debris out of stored water. Suitable screens and protective fittings may also be necessary for vents and overflow openings.
The tank and its connections should use materials appropriate for their intended water use.
Inspect for:
- Cracked, missing, or poorly fitted covers.
- Dirt, sediment, or unusual discoloration.
- Evidence of insects or other animals.
- Corrosion or damaged internal surfaces.
- Deteriorated seals and fittings.
- Signs that water quality has changed.
A cold-water storage tank should not automatically be treated as a source of drinking water.
Whether water is suitable for drinking depends on the system design, supply, and applicable water-quality requirements.
If contamination is suspected, avoid using the affected water for drinking or food preparation until the issue has been assessed.
Follow the appropriate local guidance for testing, cleaning, and disinfection.
Inspect, clean, repair, and replace the tank
The right inspection schedule depends on the tank, its age, local conditions, water quality, and manufacturer guidance. There is no single interval that fits every installation.
A practical maintenance plan should include regular visual checks and professional servicing where necessary.
| Component | What to check |
| Tank body | Cracks, corrosion, deformation, and visible leaks. |
| Support platform | Movement, instability, moisture damage, or deterioration. |
| Pipe connections | Drips, staining, damaged seals, and unsupported pipework. |
| Float valve | Abnormal filling levels, failure to close, or visible damage. |
| Overflow pipe | Obstructions, damage, and unsuitable discharge arrangements. |
| Tank cover | Secure fit, damage, and evidence of contamination. |
| Insulation | Dampness, gaps, deterioration, or exposed pipes. |
| Surrounding attic | Water stains, wet insulation, mold, and signs of pests. |
Tank cleaning should follow the manufacturer’s instructions and relevant local water-hygiene guidance.
Avoid using unapproved cleaning chemicals or methods that could leave harmful residues. An older tank does not always need immediate replacement based on age alone.
However, persistent leakage, severe corrosion, cracks, contamination problems, or repeated valve failures may make replacement the safer and more practical choice.
The decision should consider the tank’s condition, repair history, availability of replacement parts, and the cost of continued maintenance.
Attic Water Heaters and Hot-Water Cylinders: Safety Differences
An attic water tank and an attic water heater are not interchangeable. A cold-water storage tank holds water for distribution, while a water heater raises water temperature.
A hot-water cylinder stores heated water, and some systems operate under pressure.
These differences affect installation, structural loading, drainage, and safety requirements.
Structural support and access requirements
A filled hot-water cylinder or tank-style water heater can place a substantial load on the building.
The total load includes the appliance, stored water, associated equipment, and any required support structure.
Before installation, confirm that:
- The attic structure can support the complete operating load.
- The appliance has the clearances specified by its manufacturer.
- Service components remain accessible.
- The installation allows safe removal and replacement.
- Any required restraint or structural reinforcement is provided.
Heat-pump water heaters may have additional space and airflow requirements. Gas-fired appliances may require specific ventilation and exhaust arrangements. Electric units have their own electrical requirements.
The appliance type and its installation instructions must guide the design.
Temperature, pressure, and expansion protection
Hot-water systems require appropriate safety controls. A temperature and pressure relief valve protects compatible equipment against specified unsafe operating conditions. Temperature controls help regulate water heating.
An expansion vessel serves a different purpose. In applicable closed systems, it accommodates the increase in water volume as water heats.
These components are not interchangeable. Their selection, sizing, placement, and discharge arrangements must suit the equipment and applicable plumbing requirements.
Never cap, obstruct, or modify a relief-valve discharge pipe to prevent dripping. Have persistent discharge investigated by a qualified professional.
Drainage and electrical or fuel safety
A water heater installed above occupied rooms needs appropriate provisions for leaks and safety-device discharge.
Depending on the appliance and local requirements, these may include a drain pan, approved drainage, leak detection, and an automatic shut-off system.
The design must also account for electrical isolation or fuel-system safety, as applicable.
Do not assume that every water heater needs the same pan, pipe size, or discharge location. These details depend on the appliance, installation conditions, and local code.
Attic Water Tank Installation and Replacement Costs
The cost of installing or replacing an attic water tank depends on more than the tank’s purchase price.
Structural work, difficult attic access, plumbing changes, and leak protection can significantly affect the total project.
Factors that affect the final price
| Cost component | What affects the cost |
| Tank purchase | Capacity, material, design, and manufacturer. |
| Labor | Installation complexity and local labor rates. |
| Structural assessment | The scope of engineering work and documentation. |
| Support or reinforcement | The existing framing and approved design changes. |
| Plumbing modifications | Pipe routing, valves, fittings, and connection changes. |
| Overflow and leak protection | Required drainage, containment, and detection equipment. |
| Removal and disposal | Access difficulties and the condition of the old tank. |
| Testing and compliance | Required commissioning, permits, inspections, or documentation. |
Because no specific service location or installation details have been supplied, a reliable project price cannot be established here.
Local quotations should separate the tank, labor, structural work, plumbing, and additional safety provisions.
Ask the contractor whether the quote includes removal of the old tank, disposal, testing, and repairs to any damaged framing.
When repair or replacement makes sense
Repair may be appropriate when a fault is limited to a replaceable valve, fitting, or seal and the tank remains in sound condition.
Replacement deserves consideration when the tank has structural damage, persistent leaks, severe corrosion, repeated failures, or contamination problems that cannot be reliably resolved.
Before replacing an existing tank, verify the support arrangement again. A new tank may have a different footprint, filled weight, connection position, or maintenance requirement.
Changing the tank without reviewing these factors can introduce problems even when the new equipment is in good condition.
Frequently Asked Questions
1. How much does a full attic water tank weigh?
Water weighs approximately 1 kilogram per liter. A tank holding 200 liters therefore contains about 200 kilograms of water. Add the empty tank, platform, fittings, and other relevant loads to determine the complete operating load.
2. Can attic ceiling joists support a water tank?
They may be suitable in some installations, but their capacity must be verified. Joist dimensions, span, condition, connections, and load distribution all matter. Consult a structural engineer when capacity is uncertain.
3. Does an attic water tank need a support platform?
The tank needs support that meets its manufacturer’s requirements and transfers its load safely into the building structure. A suitable platform may distribute the load, but it cannot compensate for inadequate framing.
4. Should an attic water tank have a lid?
A suitable, secure cover helps protect stored water from dust, insects, and other contaminants. The cover should fit the tank correctly without interfering with required vents, connections, or maintenance access.
5. Why does my attic water tank keep overflowing?
A faulty float valve is one possible cause. Debris, damaged components, incorrect adjustment, or other plumbing faults can also contribute. Have the filling controls and overflow arrangement inspected rather than blocking the overflow pipe.
6. How can I detect an attic tank leak early?
Inspect visible fittings, valves, the tank body, and nearby surfaces for moisture or staining. Leak sensors can provide additional warning in suitable locations. Keep in mind that water may travel through insulation or framing before becoming visible.
7. Does an attic water tank need insulation?
Insulation may reduce heat loss and help protect against freezing in cold conditions. Requirements depend on climate, tank design, and the plumbing system. Insulation does not replace suitable protection against prolonged freezing.
8. How often should an attic water tank be cleaned?
The appropriate cleaning interval depends on water quality, tank condition, system design, and local guidance. Follow the manufacturer’s recommendations and arrange cleaning or disinfection when inspection findings or water-quality concerns warrant it.
9. When should an attic water tank be replaced?
Consider replacement when the tank has serious cracks, persistent leaks, severe corrosion, or recurring contamination problems. Age alone is not a complete diagnosis. Evaluate the tank’s condition and repair history before deciding.
10. Is an attic water heater the same as a cold-water tank?
No. A cold-water tank stores water for distribution, while a water heater heats water. A hot-water cylinder stores heated water. Each equipment type has different support, plumbing, and safety requirements.
11. Can I install a larger tank in my attic?
Only after confirming that the proposed tank suits the plumbing system and that the building can safely support its full operating load. A larger tank increases the stored-water mass and may require a different support design.
12. What should I do if water is leaking through the ceiling?
Keep people away from a bulging or sagging ceiling. Isolate the supply only if the valve is safely accessible, and avoid wet electrical equipment. Contact a qualified plumber and arrange structural or electrical assessment when needed.
Conclusion
Attic water tanks can provide useful water storage when their installation meets the building’s structural and plumbing requirements.
The most important steps are verifying the full operating load, providing suitable support, installing reliable valves and overflow protection, and maintaining access for inspection.
Regular checks can help identify damaged fittings, corrosion, contamination, and moisture before problems become extensive.
Hot-water equipment requires additional attention to temperature, pressure, and appliance-specific safety provisions.
If you are planning a new installation or replacing an existing tank, obtain professional advice where structural capacity or plumbing compliance is uncertain. A well-planned system protects both the water supply and the rooms below.

Daniel Carter specializes in attic maintenance, insulation, ventilation, moisture control, and home improvement. He understands common attic problems and their practical solutions. Through clear, informative guides, he helps homeowners identify issues, prevent damage, improve energy efficiency, and maintain safer, healthier homes.