Ductwork in the Attic: Insulation, Leaks, and Condensation
Ductwork in the attic carries heated or cooled air between your HVAC system and the rooms in your home. Because attics experience significant temperature changes, poorly insulated or leaking ducts can waste energy, reduce comfort, and contribute to moisture problems.
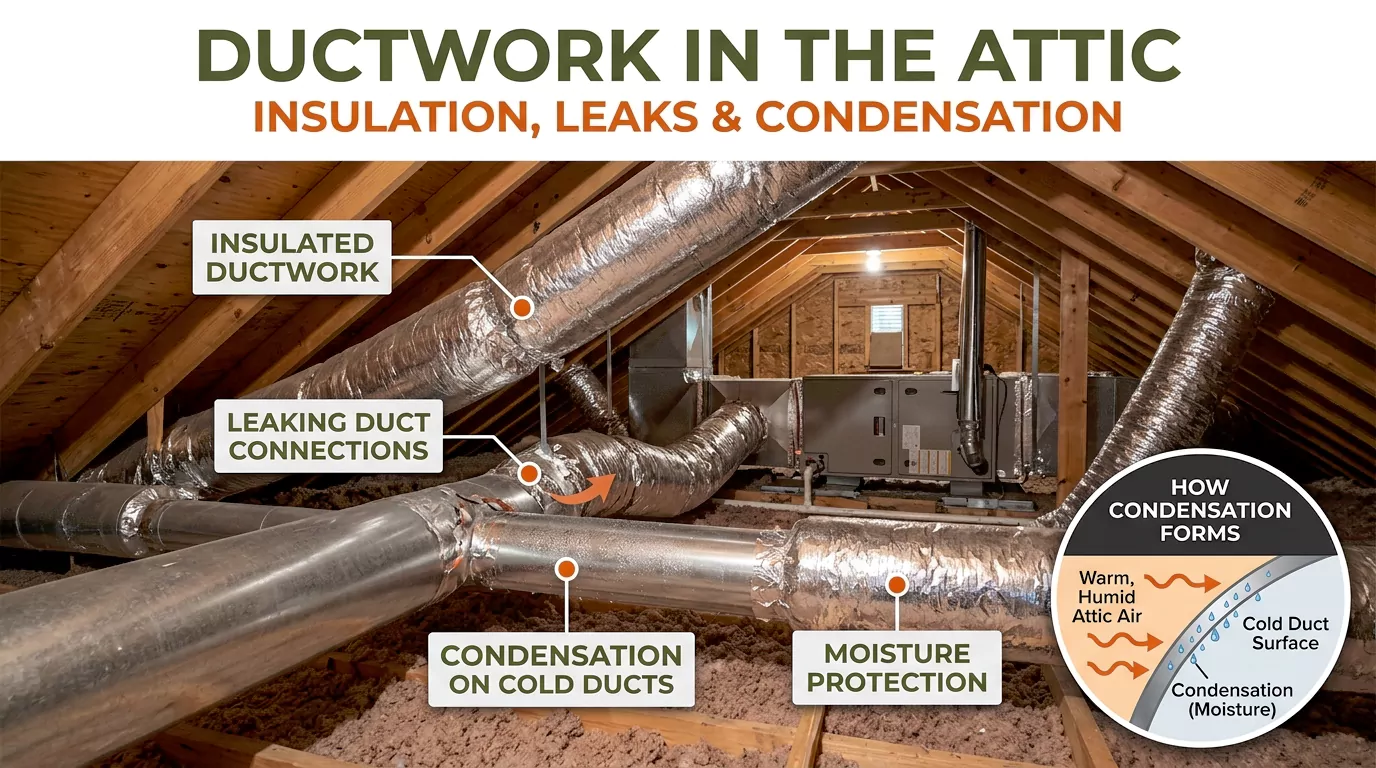
Proper attic ductwork needs adequate insulation, sealed connections, suitable support, and a correctly designed air distribution system. These measures help reduce heat transfer and air leakage. They also lower the risk of condensation when humid air contacts cold duct surfaces.
The right solution depends on the problem. Sweating AC ducts may need insulation repairs, while leaking connections require air sealing. Bathroom exhaust ducts need proper insulation and an outdoor termination to prevent moisture from entering the attic.
This guide explains how attic ductwork works, what causes common problems, how to identify their likely sources, and when professional repairs are necessary.
What Is Attic Ductwork and Why Does It Matter?
Attic ductwork is the network of ducts installed in the space beneath a home’s roof. It connects the heating and cooling equipment to the rooms that need conditioned air.
The system typically includes supply ducts, return ducts, branch connections, plenums, and registers. Some homes also have separate exhaust ducts that remove moisture and odors from bathrooms or other areas.
Supply ducts and return ducts
Supply ducts carry conditioned air from the HVAC equipment into living spaces. Return ducts carry air back to the system for conditioning.
Both types can lose energy when they run through an unconditioned attic. In summer, hot attic air can warm cooled supply air. In winter, cold attic conditions can increase heat loss from heated air.
Leaky return ducts can also draw unwanted attic air, dust, or other contaminants into the system. The actual effect depends on the duct layout, leakage locations, and system pressure.
Why attic ductwork needs attention
Ductwork outside the home’s conditioned space faces conditions that differ from those inside living areas.
Common concerns include:
- Heat transfer through inadequately insulated duct walls.
- Air escaping through loose joints and damaged connections.
- Condensation on cold duct surfaces during humid weather.
- Crushed flexible ducts that restrict airflow.
- Wet insulation that loses thermal performance.
- Moisture entering the attic through disconnected exhaust ducts.
These problems can occur separately or together. For example, a torn insulation jacket and a leaking duct joint may both contribute to moisture around one section of ductwork.
Should Ductwork in the Attic Be Insulated?
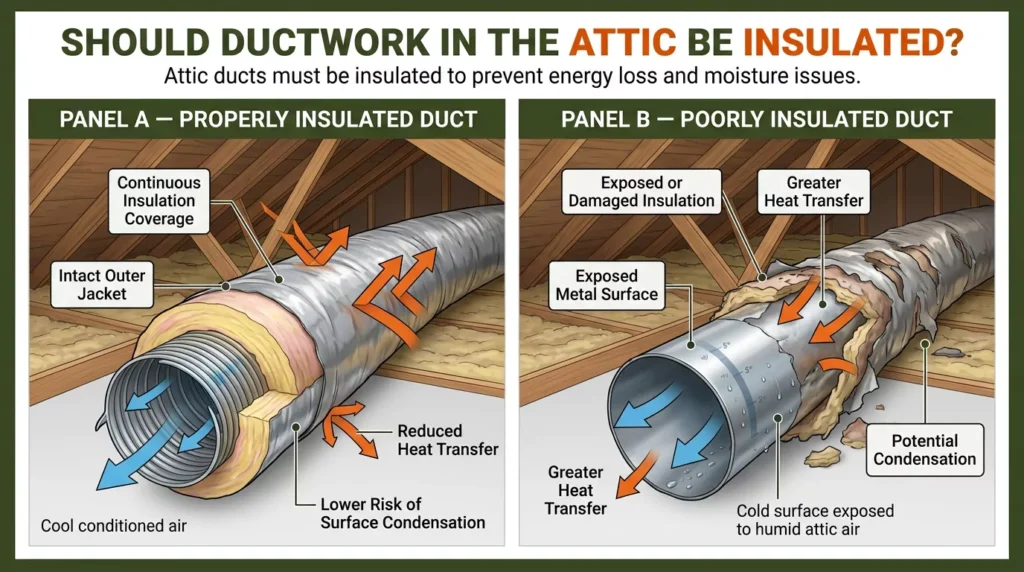
Yes. Ducts that run through unconditioned attics generally need insulation appropriate for their application and local requirements. Insulation helps limit heat transfer between the air inside the duct and the surrounding attic.
The required insulation level depends on the duct’s function, climate, building design, equipment, and adopted building codes. Do not assume one R-value applies to every installation.
How duct insulation works
Duct insulation slows heat movement through the duct wall. During summer, it helps prevent attic heat from warming cooled supply air. During winter, it helps reduce heat loss from heated air.
Insulation also helps keep the duct’s exterior temperature closer to the temperature of the surrounding air. This reduces the chance that humid attic air will condense on a cold duct surface.
However, insulation alone cannot correct every problem. A leaking joint, damaged outer jacket, excessive humidity, or poorly functioning HVAC system may still need attention.
Understanding duct insulation R-values
R-value measures a material’s resistance to heat flow. Under comparable conditions, a higher R-value indicates greater thermal resistance.
You may encounter R-4, R-6, or R-8 duct insulation when reviewing existing systems or replacement materials. These figures describe insulation performance, not a universal rule for every attic.
The supplied research references R-8 requirements for certain ducts outside conditioned spaces under the 2024 International Residential Code. Actual requirements must be verified against the locally adopted code, the specific duct application, and applicable exceptions.
When comparing insulation products, check:
- The labeled R-value and intended application.
- Whether the insulation covers the entire duct.
- Whether elbows and connections receive adequate coverage.
- Whether the outer facing and seams remain intact.
- Whether the installation meets applicable code and manufacturer requirements.
Why insulation continuity matters
A duct can have an adequate insulation rating and still perform poorly when the installation contains gaps or compressed sections.
Pay particular attention to elbows, supports, transitions, and connections near the air handler. Tight straps can crush flexible ducts, while exposed fittings can create localized areas of heat transfer.
Inspect the complete duct run rather than judging it by one visible section. A continuous, correctly installed insulation layer provides better protection than insulation that is thick in some places and missing in others.
What Causes Condensation on Attic Ductwork?
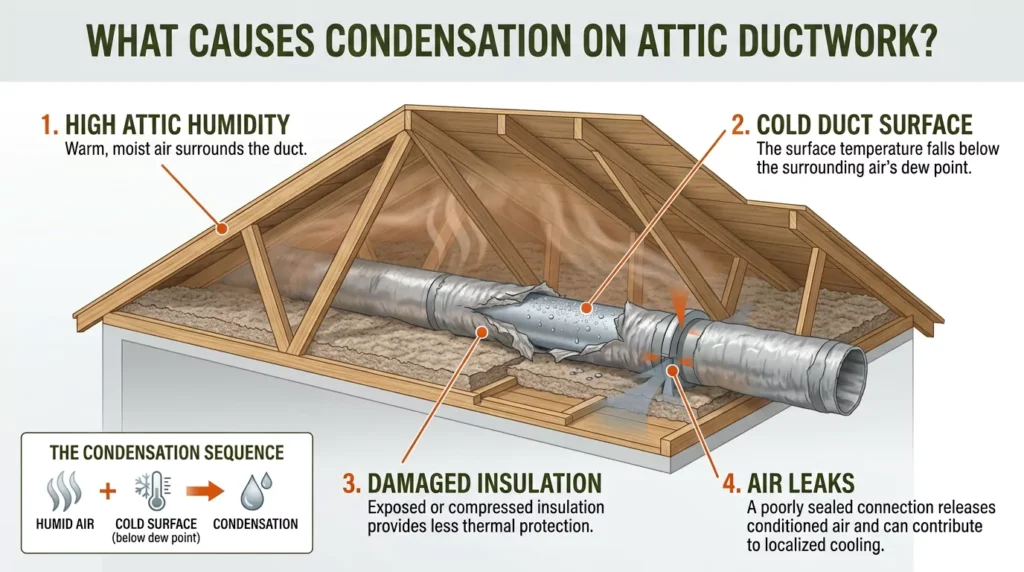
Condensation forms when a surface becomes colder than the dew point of the surrounding air. The dew point is the temperature at which water vapor begins turning into liquid water under the existing conditions.
For example, warm, humid attic air can release moisture onto a cold metal AC duct. The same process can affect the exterior of an inadequately insulated flexible duct.
Several conditions can contribute to this problem.
1. Cold ducts and high attic humidity
Air contains varying amounts of water vapor. When humid air touches a surface below its dew point, moisture can collect on that surface.
The risk depends on both temperature and humidity. There is no single attic temperature that guarantees condensation will occur in every home.
Hot, humid weather can create challenging conditions for cold AC ducts. A properly insulated duct is less likely to develop exterior condensation, but damaged insulation or leaking connections can create vulnerable spots.
2. Damaged insulation and vapor barriers
Flexible ductwork commonly contains an inner liner, an insulation layer, and an outer jacket. The jacket helps protect the insulation and may serve as a vapor-control layer.
Tears, loose seams, rodent damage, and poorly sealed transitions can compromise the assembly. Humid air may then reach colder surfaces within the duct system.
Compressed or wet insulation also provides less effective thermal protection. This can make it harder to maintain the intended temperature difference across the duct assembly.
Look for missing insulation, torn jackets, exposed sections, and damaged seams. Replace or repair affected materials using compatible products and appropriate installation methods.
3. Duct leaks and poorly sealed connections
Duct leakage occurs when air escapes through gaps, seams, or loose connections. It can reduce the amount of conditioned air reaching rooms and affect system performance.
Common leakage points include:
- Connections between ducts and plenums.
- Branch junctions and fittings.
- Flexible duct collars and clamps.
- Connections near ceiling registers.
- Damaged duct sections and seams.
Cold supply air escaping into a humid attic can cool nearby surfaces and contribute to localized condensation. Leaks can also waste energy even when visible moisture is absent.
Inspect connections for separation, damaged sealant, and loose fittings. Appropriate duct mastic or listed tape may be suitable, depending on the joint and manufacturer’s instructions.
4. HVAC airflow and humidity problems
Some condensation problems originate beyond the insulation itself.
A clogged filter, dirty coil, incorrect blower settings, or other airflow problems can affect system performance. An oversized air conditioner may also cycle off before removing enough indoor moisture under certain conditions.
These problems do not automatically mean they caused the sweating ducts. A technician should assess airflow, operating conditions, indoor humidity, and equipment performance before recommending a mechanical repair.
5. Compressed or poorly supported flexible ducts
Flexible ducts need proper support to maintain their intended shape and airflow capacity.
Excessive sagging, sharp bends, crushed sections, and tight support straps can restrict airflow. Compression can also reduce the effectiveness of the insulation surrounding the air passage.
Correcting the support and routing may improve performance. However, damaged liners or wet insulation may require repair or replacement rather than simple repositioning.
Why Bathroom Exhaust Ducts Need Special Attention
Bathroom exhaust ducts work differently from AC supply ducts. They carry warm, moisture-laden air from bathrooms toward an outdoor termination.
When this air travels through a cold attic in an inadequately insulated duct, it can cool enough for water vapor to condense inside. Poorly sealed connections can also allow bathroom moisture to escape directly into the attic.
Potential consequences include damp insulation, water staining, corrosion, and conditions that support mold growth.
What proper bathroom exhaust ductwork requires
A properly installed exhaust system should:
- Use a suitable duct that connects securely to the exhaust fan.
- Follow the manufacturer’s requirements for duct size and routing.
- Be insulated where required or recommended for the installation.
- Have sealed connections that limit moisture leakage.
- Discharge outdoors through an appropriate termination.
- Avoid releasing bathroom exhaust directly into the attic.
Insulation helps reduce cooling of the moist air inside the duct. Sealed connections help keep that moisture within the exhaust pathway until it reaches the outdoor termination.
Check the fan, duct route, joints, and termination together. Insulating a duct will not correct a disconnected section or an exhaust outlet that releases moisture into the attic.
Signs of Leaking or Sweating Attic Ducts
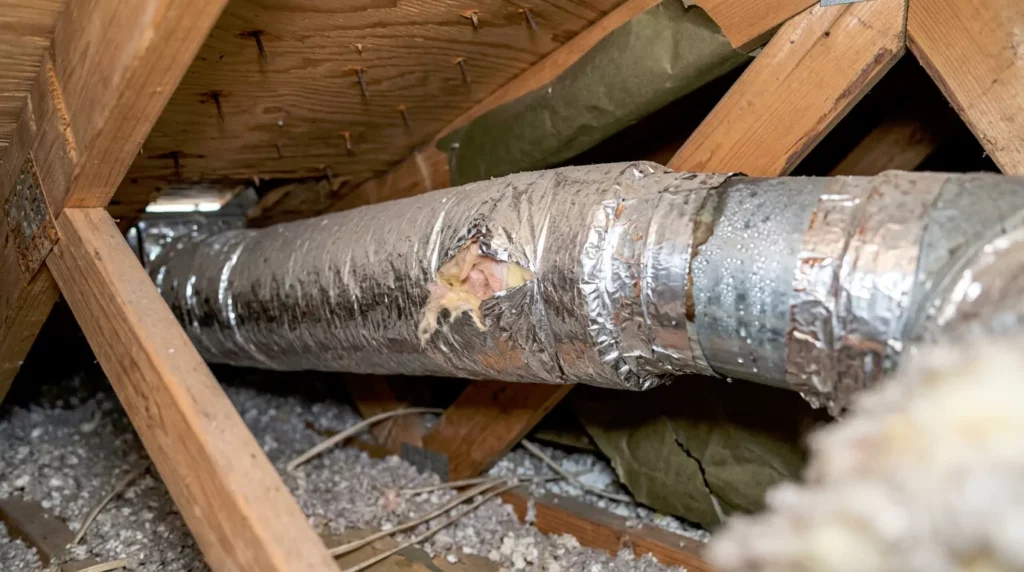
Visible water is an important warning sign, but it does not identify the source by itself. Condensation, roof leaks, plumbing leaks, and HVAC drain problems can produce similar symptoms.
Look for these clues:
| Sign | Possible explanation |
| Water droplets on the outside of a cold duct | Surface condensation caused by humid surrounding air. |
| Wet insulation around a duct | Condensation, air leakage, an external water leak, or another moisture source. |
| Moisture concentrated near a duct joint | A leaking connection or localized temperature problem. |
| Brown ceiling stains | Roof leakage, plumbing leakage, or moisture from attic equipment or ducts. |
| Water around the air handler | A condensate drain, drain pan, or equipment issue may be involved. |
| Sagging or crushed flexible duct | Poor support, physical damage, or restricted airflow. |
| Loose duct connections | Potential air leakage and reduced system performance. |
| Persistent musty odors | Possible damp materials or microbial growth requiring investigation. |
These signs are clues, not definitive diagnoses. Note where the moisture first appears, whether it changes when the HVAC system runs, and whether the surrounding insulation is wet.
If water is near electrical equipment, avoid touching the affected area. Arrange a professional inspection.
How to Diagnose Attic Ductwork Problems
A useful diagnosis starts with the location and pattern of the moisture. Replacing insulation before identifying the source may leave the original problem unresolved.
Step 1: Identify where the moisture appears
Observe whether water forms on the duct exterior, inside an exhaust duct, around a joint, or near the HVAC equipment.
Also note whether the moisture appears during cooling, after rain, during cold weather, or after bathroom use. These patterns can help narrow the possibilities.
Do not assume that every wet duct has a condensation problem.
Step 2: Check visible insulation and duct condition
From a safe, accessible location, look for:
- Torn or missing insulation.
- Damaged outer jackets or exposed duct surfaces.
- Wet, compressed, or sagging insulation.
- Loose connections and separated joints.
- Crushed or sharply bent flexible ducts.
- Exhaust ducts that appear disconnected or improperly routed.
Avoid moving insulation unnecessarily or stepping on ceiling drywall between structural supports.
Step 3: Consider other sources of water
Moisture around attic ductwork can come from several sources.
Roof leaks may become more noticeable after rain and may leave wet roof sheathing or framing.
Plumbing leaks may track along pipes or appear below bathrooms and other water-using areas.
HVAC condensate problems may cause water near the air handler, drain pan, or condensate line.
Duct condensation may produce droplets on cold surfaces or damp insulation near affected duct sections.
These patterns can overlap. A professional assessment may be needed to confirm the source.
Step 4: Have the system tested when necessary
An HVAC technician may inspect duct connections, measure temperature and humidity, evaluate airflow, and check accessible insulation.
Depending on the symptoms, the assessment may include duct leakage testing, static pressure measurements, or inspection of the evaporator coil and condensate drain.
Ask the technician to explain the suspected cause and how the proposed repair addresses it. If the quote recommends full replacement, ask which components are damaged and whether targeted repairs are reasonable.
How to Fix Attic Ductwork Insulation, Leaks, and Condensation
The correct repair depends on the confirmed cause. Insulation, sealing, moisture control, and equipment maintenance solve different problems.
Repair or replace damaged insulation
Replace missing or badly damaged insulation with material suitable for the duct and installation. Restore continuous coverage around fittings and transitions.
Wet insulation should be assessed before being covered again. If it remains damp, has deteriorated, or has become contaminated, replacement may be necessary after the moisture source is corrected.
Do not simply cover wet materials with a fresh insulation layer.
Seal leaking duct connections
Suitable duct mastic and listed tapes can help seal compatible joints. The choice depends on the connection, materials, temperature conditions, and product instructions.
A sound repair should address the actual joint or seam rather than cover up a loose or damaged connection.
Traditional cloth duct tape is not a reliable substitute for products specifically approved for duct sealing. Follow the relevant product listing and manufacturer instructions.
Repair damaged vapor-control layers
Restore torn outer jackets and damaged seams with compatible materials. The repair should maintain the intended continuity of the insulation assembly.
If the insulation beneath the jacket is wet or damaged, repairing the jacket alone may not be sufficient. Address the moisture source and assess the insulation before closing the assembly.
Correct flexible duct routing and support
Flexible ducts should not be crushed, kinked, or pulled tightly around corners. Proper support helps maintain the intended cross-section and reduces unnecessary airflow resistance.
Have damaged sections corrected or replaced as appropriate. Avoid compressing insulation with straps or supports.
Correct bathroom exhaust routing
Reconnect loose exhaust ducts and verify that they discharge outdoors through a suitable termination. Insulate the duct where required or recommended for the installation.
A disconnected exhaust duct can introduce moisture directly into the attic, so correcting the route is essential to resolving the underlying problem.
Address indoor humidity and HVAC performance
If humidity remains high, investigate possible moisture sources and system operation.
Potential measures include repairing air leaks, correcting ventilation problems, maintaining the HVAC system, or using dehumidification where appropriate.
Indoor humidity targets should be considered alongside climate and building conditions. The commonly cited 30%–50% indoor relative humidity range is general guidance, not a substitute for evaluating actual attic conditions.
Evaluate attic ventilation carefully
Attic ventilation can help manage heat and moisture in an appropriately designed attic. However, more ventilation is not always the right answer.
Ventilation strategy depends on whether the attic is vented or unvented and how the roof assembly is designed. It does not replace duct insulation, duct sealing, or proper exhaust routing.
Converting an attic to an unvented, conditioned space is a larger building-envelope project. It requires attention to moisture control, insulation placement, ventilation equipment, and applicable code requirements.
Repair or Replace Attic Ductwork?
Minor defects may be repairable, but extensive damage can justify replacement. The decision should reflect the condition of the duct, insulation, inner liner, and connections.
| Condition | Potential approach |
| Small tear in an otherwise sound outer jacket | Compatible repair, after checking the insulation underneath. |
| Loose or leaking connection | Reconnect and seal the joint correctly. |
| Localized missing insulation | Restore the insulation with a suitable product. |
| Crushed flexible duct | Correct the routing or support; replace damaged material if necessary. |
| Wet insulation | Identify the source, dry or replace materials as appropriate, and prevent recurrence. |
| Deteriorated inner liner or widespread physical damage | Consider replacing the affected duct sections. |
| Recurring condensation across multiple locations | Investigate system-wide insulation, leakage, humidity, and operating conditions. |
| Extensive contamination or persistent moisture damage | Obtain an appropriate professional assessment before deciding on remediation or replacement. |
A complete duct replacement is not automatically necessary because one section is sweating. Equally, repeated patching may be a poor investment if the duct material has deteriorated throughout the system.
What Affects Attic Ductwork Repair Costs?
There is no single reliable price for every attic duct repair. The final cost depends on the cause, the amount of damaged material, accessibility, local labor rates, and the work required to prevent recurrence.
Common cost factors include:
- Inspection and diagnosis: More complex symptoms may require additional testing.
- Insulation work: The duct length, insulation rating, material, and condition affect the scope.
- Duct sealing: The number and accessibility of leaking joints influence labor.
- Duct replacement: Extensive deterioration generally requires more material and labor than a localized repair.
- Moisture damage: Wet insulation, damaged ceilings, or contaminated materials may need separate attention.
- Access limitations: Restricted attic space, difficult duct routes, and safety requirements can increase labor.
When comparing quotes, ask whether the price includes diagnosis, sealing, insulation, material removal, disposal, and any necessary moisture repairs.
A useful quote identifies the source of the problem, describes the proposed work, and explains why that approach is preferable to alternatives. Local estimates are more useful than generic national figures when pricing an actual project.
Common Mistakes to Avoid
Adding insulation without diagnosing the moisture
Additional insulation may help when insufficient thermal protection is the problem. It will not fix a roof leak, a blocked condensate drain, or an exhaust duct that discharges into the attic.
Covering wet insulation
New insulation should not conceal an unresolved moisture problem. Identify the water source and assess the condition of the existing materials first.
Using unsuitable tape or sealant
Choose products intended for the specific duct application. Follow their installation instructions and applicable requirements rather than relying on ordinary household tape.
Assuming attic ventilation solves every problem
Ventilation can be helpful in the right design, but it cannot compensate for disconnected exhaust ducts or badly leaking HVAC connections.
Ignoring small signs of moisture
A few droplets may seem minor, but recurring moisture can damage insulation and surrounding materials. Investigate persistent or increasing dampness before the damage spreads.
Treating every water stain as duct condensation
Ceiling stains can have multiple causes. Confirm the source before authorizing repairs.
Attic Ductwork Maintenance and Safety
Regular visual checks can reveal insulation damage and loose connections before they become more serious. Inspection is especially useful after roof work, pest activity, HVAC repairs, or a water leak.
A practical maintenance routine includes:
- Check accessible duct insulation for tears and missing sections.
- Look for loose connections and visible air leakage.
- Check flexible ducts for sagging, kinks, and compression.
- Verify that bathroom exhaust ducts remain connected and discharge outdoors.
- Investigate recurring dampness, ceiling stains, or musty odors.
- Arrange professional service for persistent condensation or equipment-related moisture.
Attic inspection safety
Attics can contain exposed nails, unstable walking surfaces, hot conditions, electrical hazards, and materials that irritate the skin or respiratory system.
Use the designated access point and walk only on suitable structural supports or an established safe platform. Do not step on ceiling drywall.
Avoid disturbing suspected asbestos-containing materials or heavily contaminated insulation. If water is near electrical equipment, keep clear and arrange appropriate professional assistance.
A qualified HVAC professional is the better choice when the duct system is difficult to access, moisture keeps returning, electrical components are involved, or the source remains unclear.
Frequently Asked Questions
Should all ductwork in an attic be insulated?
Ducts in unconditioned attics generally need insulation appropriate for their function and local requirements. The correct specification depends on the duct type, climate, equipment, and applicable code.
Why are my AC ducts sweating in the attic?
Sweating occurs when a duct’s exterior surface falls below the dew point of the surrounding air. Poor insulation, damaged jackets, high humidity, or leaking connections can contribute.
Will adding insulation stop duct condensation?
It may help if inadequate insulation is the main cause. However, air leaks, damaged vapor-control layers, moisture sources, and HVAC problems may also need correction.
What R-value should attic duct insulation have?
There is no universal value for every installation. The supplied research references R-8 for certain ducts outside conditioned spaces under the 2024 IRC, but the applicable local code and duct application must be checked.
Should bathroom exhaust ducts in the attic be insulated?
Insulation helps reduce cooling of warm, moist exhaust air and the risk of internal condensation. The duct should also be properly connected, sealed, and terminated outdoors.
Can sweating ducts cause mold?
Persistent moisture can support mold growth on susceptible insulation and building materials. Correct the moisture source and assess damp or contaminated materials appropriately.
How can I tell condensation from a roof leak?
Condensation may appear on cold duct surfaces during particular operating or weather conditions. Roof leaks may correlate with rainfall and wet roof materials. These clues are not definitive, so investigate the source before choosing a repair.
Is duct sealing different from air sealing?
Yes. Duct sealing closes leaks in the HVAC duct system. Building air sealing closes gaps in the home’s walls, ceiling, and other boundaries. Both can matter when air leakage contributes to moisture or energy loss.
When should I replace attic ductwork?
Replacement may be appropriate when ducts have extensive physical damage, deteriorated liners, widespread insulation failure, or recurring problems that cannot be resolved reliably with localized repairs.
Does attic ventilation prevent duct condensation?
It may help manage attic conditions when the ventilation design is appropriate. It does not replace proper duct insulation, sealed connections, or correctly routed exhaust ducts.
Conclusion
Ductwork in the attic can affect comfort, energy use, and moisture control throughout a home. Proper insulation limits heat transfer, sealed connections reduce air leakage, and correctly routed exhaust ducts help keep moisture outdoors.
When condensation appears, start by identifying where the water forms and considering other possible sources. Repair the underlying problem before adding insulation or replacing ductwork. If moisture persists, insulation is wet, or the cause is unclear, arrange a qualified inspection.
A diagnosis based on the duct condition, humidity, airflow, and building details is more reliable than a one-size-fits-all repair. It also helps homeowners choose the work that addresses the actual problem rather than paying for unnecessary replacement.

Daniel Carter specializes in attic maintenance, insulation, ventilation, moisture control, and home improvement. He understands common attic problems and their practical solutions. Through clear, informative guides, he helps homeowners identify issues, prevent damage, improve energy efficiency, and maintain safer, healthier homes.