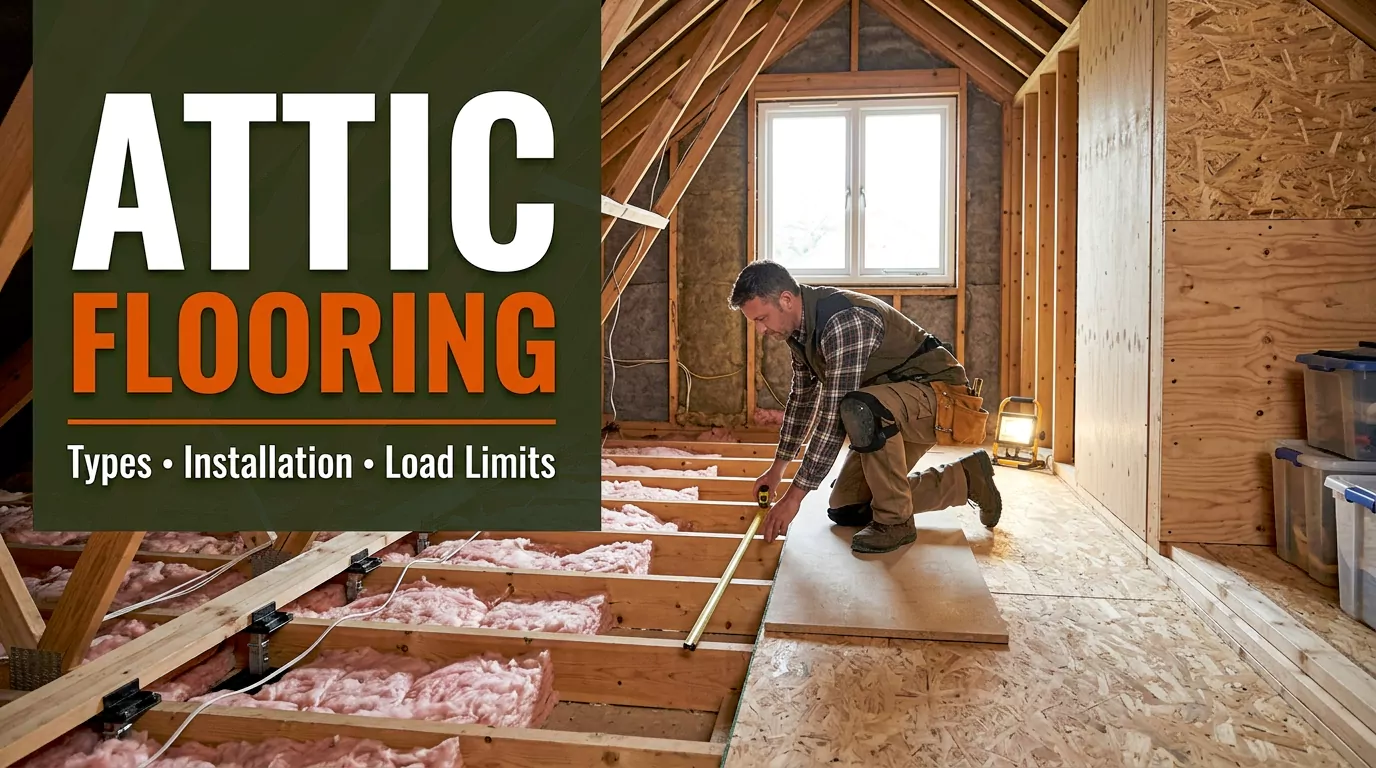
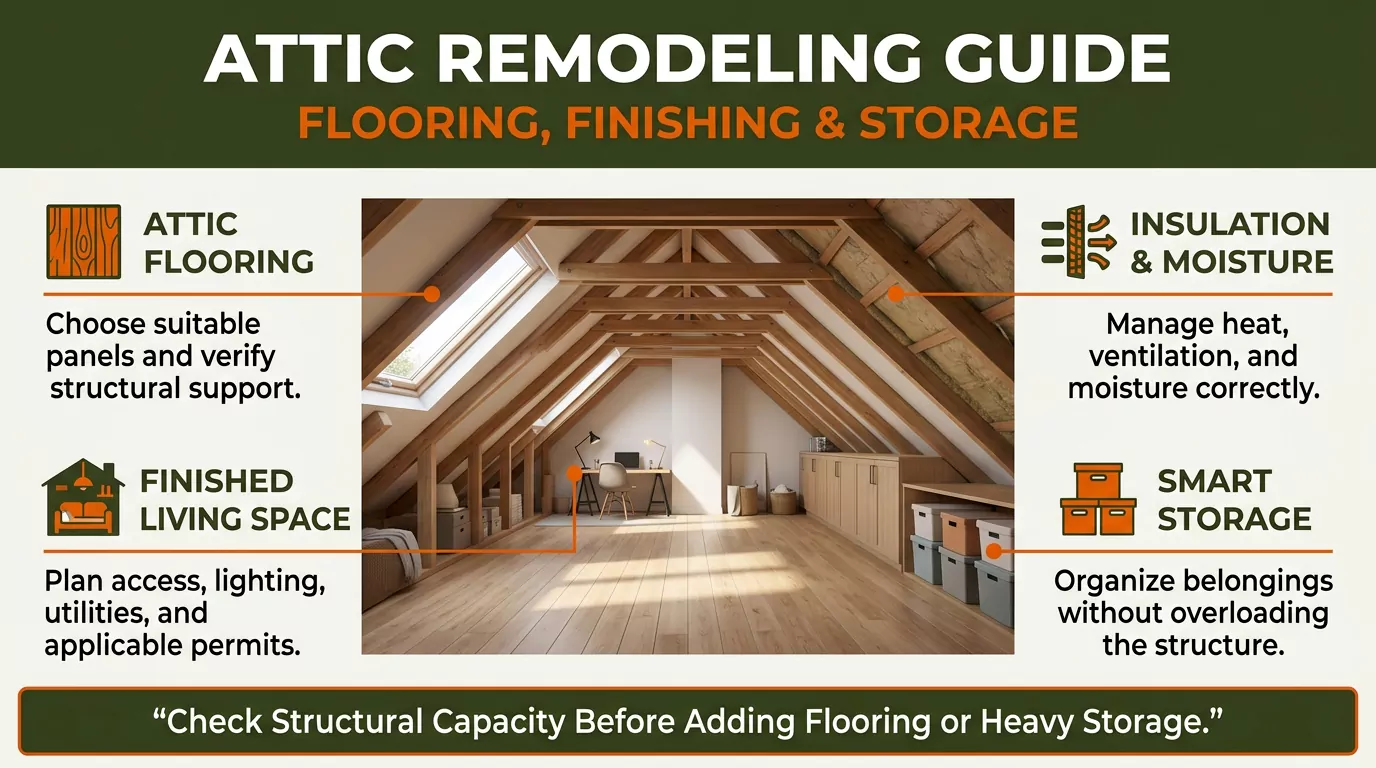
Attic Remodeling Guide: Finishing, Flooring, and Storage
Attic remodeling can create useful storage, improve home organization, or add a new living area. The right approach depends on your attic’s structure, available headroom, access, and existing building systems.
Before adding flooring or storing heavy belongings, confirm that the framing can support your plans. Then address roof leaks, insulation, ventilation, and other building concerns. These steps help prevent structural damage and expensive repairs.
This guide explains how to plan an attic remodel, choose flooring, improve storage, manage moisture, estimate costs, and understand the requirements for a finished room.
Choose the Right Type of Attic Remodeling
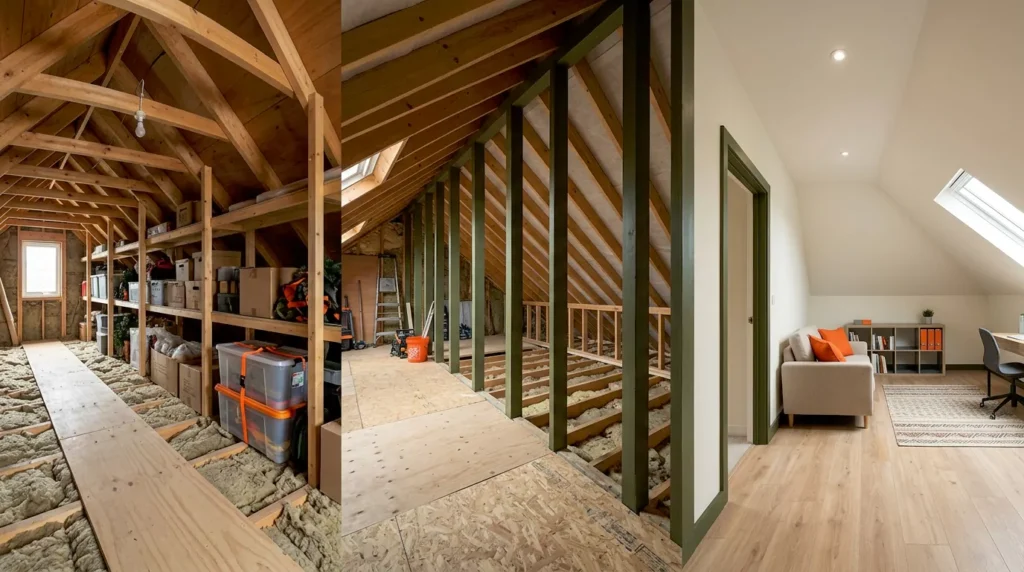
The best attic remodeling project depends on how you intend to use the space. Some homeowners need organized storage, while others want a bedroom, home office, or hobby room. Each option has different structural, construction, and budget requirements.
Storage-only improvements
A storage-focused project may include organizing belongings, adding suitable shelving, improving lighting, and installing limited flooring where the structure permits. The goal is to improve access without converting the attic into a living area.
Partial attic flooring
Partial flooring creates a designated walkway or storage platform. It can preserve access to insulation and other parts of the attic. However, the existing framing must still support the intended loads.
Full attic conversion
A full conversion may create a bedroom, office, playroom, or recreation area. It generally requires more extensive work, including structural assessment, insulation, electrical systems, heating and cooling, finished surfaces, safe access, and applicable permits.
Storage improvements versus a finished attic
| Consideration | Storage attic | Finished living space |
| Main purpose | Store household belongings | Support regular occupancy |
| Flooring | Suitable decking or approved storage platforms | Structurally adequate subfloor and finished flooring |
| Insulation | Depends on the existing attic assembly | Designed for the intended conditioned space |
| Access | Safe ladder or existing access where appropriate | Code-compliant permanent access where required |
| Lighting | Adequate safe lighting | Planned lighting and electrical systems |
| Permits | Depend on the work and local rules | Often required for conversion work |
| Cost | Usually lower for limited improvements | Usually higher because more systems and finishes are needed |
Important: A storage attic does not automatically become safe for heavy storage when you add plywood. Flooring provides a surface, but the supporting structure must carry the load.
Inspect Your Attic Before Starting
A thorough inspection helps identify problems before you spend money on materials. Check the roof, framing, access, insulation, moisture, and existing utilities. If you plan to change the attic’s use, arrange a professional assessment before designing the finished space.
Check the roof and structural framing
Look for:
- Roof leaks, water stains, and damaged sheathing.
- Cracked, sagging, or deteriorated joists.
- Damaged rafters or roof trusses.
- Loose connections or signs of previous structural changes.
- Pest damage, droppings, or nesting materials.
- Exposed wiring, damaged cables, and unsafe electrical equipment.
Roof trusses and rafters serve different structural roles. Trusses use connected members to distribute loads through a designed system. Cutting or altering their components without an engineered solution can compromise the roof.
If you find significant damage, stop work and arrange a qualified inspection.
Measure headroom and usable floor area
Measure the attic’s height at several points. Sloped ceilings can leave large areas unsuitable for standing or walking. Identify the sections that offer practical headroom for furniture, shelving, or daily activities.
For a proposed living area, consider:
- Finished ceiling height rather than only the existing framing height.
- Usable floor area after walls and insulation are installed.
- Staircase location and landing space.
- Window placement and emergency escape requirements.
- Space needed for HVAC equipment and electrical access.
The commonly cited seven-foot ceiling-height guideline is not a universal rule for every jurisdiction or every part of a building. Verify the applicable requirements with your local building department.
Identify existing utilities
Attics often contain electrical cables, junction boxes, ductwork, plumbing, exhaust ducts, and HVAC equipment.
Map these before adding flooring or shelves. Flooring panels and fasteners must not damage concealed wiring or obstruct required access to equipment.
Also identify the attic’s current insulation and ventilation arrangement. This information will affect the remodeling design.
Understand Structural Load Capacity and Attic Safety
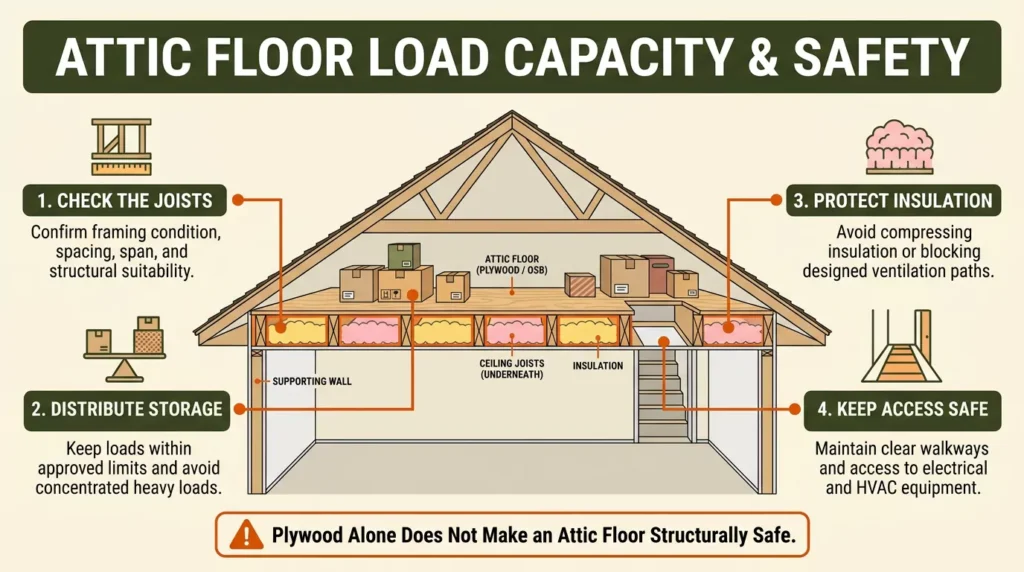
Structural load capacity is the amount of weight a building component or complete structure can safely support. An attic floor may need to carry the weight of the flooring, stored items, people, furniture, and construction materials.
Do not estimate safe load capacity from joist dimensions alone. Joist size, span, spacing, wood grade, condition, connections, and the building’s structural design all matter.
How attic floor joists work
Floor joists are horizontal framing members that transfer loads to supporting walls or beams. In many homes, the attic’s existing joists primarily support the ceiling below rather than a finished room.
Before installing flooring, establish:
- Whether the framing is designed for the intended use.
- Whether the joists have damage, excessive deflection, or unsuitable spans.
- Whether additional dead loads from flooring and finishes are acceptable.
- Whether heavy equipment or concentrated storage loads need special support.
- Whether the framing requires an engineered upgrade.
A structural engineer or other appropriately qualified professional can determine whether reinforcement is needed.
Can you reinforce an attic floor?
Potential solutions may include sistering joists, adding properly designed supports, or installing engineered framing. However, the correct approach depends on the existing structure and load path.
Adding plywood, doubling joists, or placing a beam beneath the attic floor does not automatically make it safe. Reinforcement must be designed to transfer loads properly to supporting structures.
Essential attic safety precautions
- Never walk directly on ceiling drywall or unsupported insulation.
- Use a stable, appropriate access ladder and adequate lighting.
- Wear suitable protective equipment when inspecting dusty insulation.
- Keep storage away from electrical hazards and heat-producing equipment.
- Avoid covering junction boxes or blocking equipment service clearances.
- Do not cut, drill, or alter trusses without professional approval.
- Keep walkways clear and avoid stacking heavy belongings in one small area.
If your attic contains vermiculite insulation or suspected asbestos-containing material, avoid disturbing it until it has been assessed appropriately.
Plan Attic Flooring and Subflooring
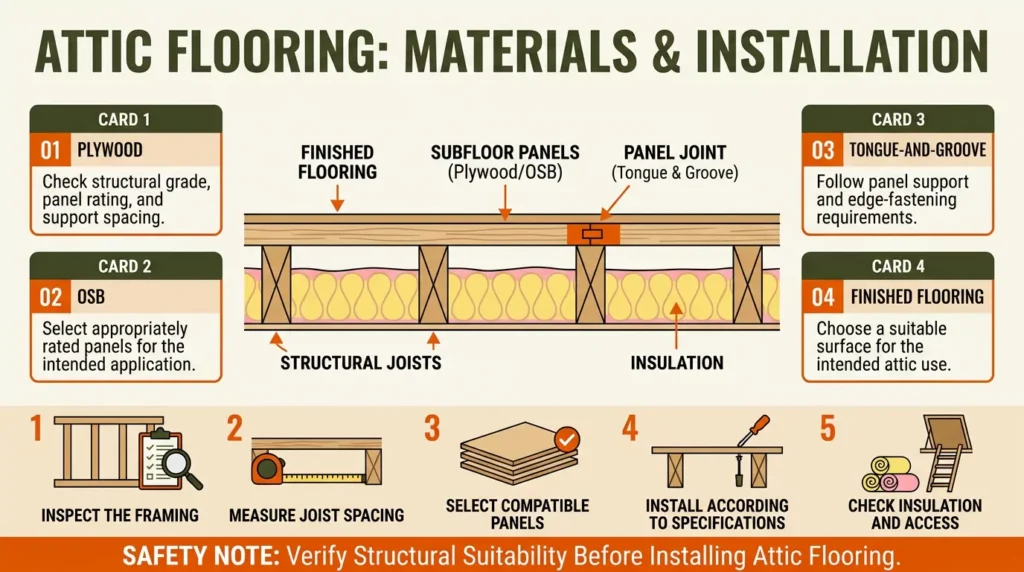
Attic flooring begins with a suitable structural base. The subfloor or decking sits over the supporting framing, while a finished floor provides the visible surface in a converted room.
These layers serve different purposes. The correct combination depends on structural capacity, joist spacing, expected loads, moisture conditions, and intended use.
Best materials for attic flooring
Plywood
Plywood is widely used for structural subfloors and storage decking. Its suitability depends on panel grade, thickness, span rating, support spacing, and installation requirements. It is available in several grades and thicknesses.
Oriented strand board (OSB)
OSB is an engineered wood panel made from compressed wood strands. Appropriate structural-grade panels can provide a practical alternative to plywood when their ratings and installation requirements match the project.
Tongue-and-groove subfloor panels
These panels have interlocking edges that help create a continuous floor surface. They still require compatible framing, correct fastening, and installation according to the manufacturer’s specifications.
Finished flooring
Carpet, laminate, luxury vinyl plank, and engineered wood may suit finished attic rooms. Choose based on floor height, noise, temperature variation, moisture exposure, weight, and the manufacturer’s installation requirements.
How to choose the right panel thickness
There is no single panel thickness that works for every attic.
Some storage-flooring guides recommend 3/4-inch panels. That can be a useful starting point for evaluating options, but it is not a substitute for checking structural requirements. Thinner panels may be suitable in some approved assemblies, while wider support spacing or higher loads may require different specifications.
Use the following checklist:
- Confirm the framing’s suitability for the intended load.
- Measure the joist spacing accurately.
- Check the panel’s span rating and structural grade.
- Follow the manufacturer’s fastening and edge-support requirements.
- Account for moisture exposure and the intended finish.
- Avoid compressing insulation beneath new decking.
Step-by-step attic flooring installation
Once the structure has been approved for the intended use, a typical installation follows this sequence.
Step 1: Inspect the framing
Check the joists, connections, and surrounding structure. Resolve damage and structural concerns before installing panels.
Step 2: Measure and plan the layout
Record joist spacing, attic dimensions, access points, and obstructions. Plan a walkway and storage zones before cutting panels.
Step 3: Select and cut compatible panels
Choose rated panels for the approved support spacing and intended load. Cut them to fit around permitted obstructions without compromising framing or utilities.
Step 4: Secure the decking
Fasten the panels according to the specified screw type, spacing, edge support, and installation pattern. Do not drive fasteners blindly where wiring or plumbing may be present.
Step 5: Check access and insulation
Verify that the floor feels stable and that ventilation paths, insulation, and service access remain unobstructed. Do not load the floor beyond its approved capacity.
Common attic flooring mistakes
Avoid installing flooring over damaged or inadequately sized joists. Do not assume thin plywood will safely carry heavy boxes simply because it spans the framing.
Other mistakes include blocking soffit airflow, covering electrical junction boxes, compressing insulation, and leaving unsupported panel edges. Each can create safety, performance, or maintenance problems.
For a deeper material and installation discussion, read our supporting guide on attic flooring types, installation, and load limits.
Improve Attic Insulation, Ventilation, and Moisture Control
An attic remodel can change how heat and moisture move through your home. Insulation, air sealing, ventilation, and moisture control must work together. Poor planning can cause condensation, mold growth, wood deterioration, and damage to stored belongings.
Should attic insulation go on the floor or roof?
The answer depends on the attic’s design.
- Unconditioned attic: Insulation commonly separates the ceiling of the living space from the attic. The attic itself remains outside the home’s conditioned envelope.
- Conditioned attic: Insulation and air control are generally designed along the roofline and relevant attic boundaries, bringing the space into the home’s thermal envelope.
A finished attic may need the second approach, but it is not simply a matter of spraying foam onto rafters. Roof ventilation, moisture movement, climate, roof materials, and local requirements all affect the design.
Compare common attic insulation materials
| Material | Common application | Important consideration |
| Fiberglass batts | Between suitable framing members | Must fit correctly without gaps or compression. |
| Loose-fill fiberglass | Attic floors and suitable cavities | Coverage depth and installation quality affect performance. |
| Cellulose | Loose-fill or approved dense-pack applications | Requires suitable installation and moisture management. |
| Spray foam | Selected roofline or cavity assemblies | Requires careful detailing and professional assessment of the roof assembly. |
| Rigid foam board | Selected roof, wall, or floor assemblies | Needs appropriate detailing at joints, edges, and fire-protection layers. |
Why ventilation matters
In a vented attic, intake vents near the lower roof and exhaust vents near the upper roof can support airflow. Common examples include soffit intake vents and ridge exhaust vents.
However, ventilation is not a universal cure for moisture problems. Indoor air leakage, roof leaks, poorly insulated surfaces, and damp ductwork can still create condensation.
Before adding insulation or changing the roof assembly:
- Repair active roof leaks.
- Seal appropriate air leaks from the living space.
- Preserve designed ventilation channels where required.
- Ensure exhaust ducts terminate outdoors where required, not inside the attic.
- Use a climate-appropriate insulation and moisture-control design.
- Check for condensation and moisture damage before closing walls.
Do not combine an unvented roof assembly with details intended for a vented attic without confirming that the complete assembly is suitable.
How to prevent attic moisture damage
Look for damp wood, water stains, musty odors, rusted fasteners, and wet insulation. These signs may indicate roof leaks, condensation, plumbing leaks, or inadequate moisture control.
Plastic containers can help protect belongings, but sealed bins will not fix an underlying moisture problem. Store only items suited to the attic’s actual temperature and humidity conditions.
Finish the Attic for Comfortable Use
A finished attic needs more than flooring and painted walls. It must provide suitable access, temperature control, lighting, electrical safety, and appropriate interior finishes.
Learn more about finishing an attic, including planning, insulation, and cost considerations, before turning unused space into a comfortable living area.
Drywall and ceiling finishing
Sloped ceilings and knee walls can create attractive interiors, but they require careful planning.
Before installing drywall or wall panels:
- Inspect the framing and complete any required structural work.
- Verify insulation and air-sealing details.
- Confirm electrical wiring and required inspections.
- Maintain required ventilation or roof-assembly clearances.
- Select finishes that comply with applicable fire-safety requirements.
Light-colored finishes can make a small attic feel brighter. Built-in cabinets and low-profile furniture can also help preserve usable floor area.
Electrical wiring and lighting
Plan lighting around the attic’s layout. Recessed lights, suitable ceiling fixtures, wall sconces, and task lighting can serve different purposes.
A storage attic may need basic fixed lighting, while an office or bedroom may require more extensive circuits, outlets, and safety devices.
Electrical work should comply with local requirements. Use a qualified electrician for new circuits, concealed wiring, or other work beyond your competence. Keep access to junction boxes and electrical equipment unobstructed.
Heating and cooling
A finished attic can experience large temperature swings. The right heating and cooling solution depends on the home’s existing equipment and the attic’s insulation and air-sealing design.
Common options include:
- Extending an existing HVAC system, if it has adequate capacity and suitable duct design.
- Installing a ductless mini-split system for independent temperature control.
- Using another approved heating solution where appropriate.
Do not assume the existing HVAC system can handle additional living space. Have a qualified HVAC professional assess capacity, airflow, duct insulation, and condensation risks.
Ideas for different attic layouts
Attic bedroom
Plan for adequate headroom, a safe permanent access route, required emergency egress, privacy, heating and cooling, and fire safety. Low-ceiling areas may suit beds or storage, subject to applicable requirements.
Home office
Prioritize reliable lighting, comfortable temperatures, power outlets, and space for a desk and chair. Use built-in shelving to reduce clutter.
Hobby or craft room
Consider durable flooring, task lighting, accessible storage, and safe power for equipment. Confirm that any heavy machinery or concentrated loads are supported.
Maximize Attic Storage Space
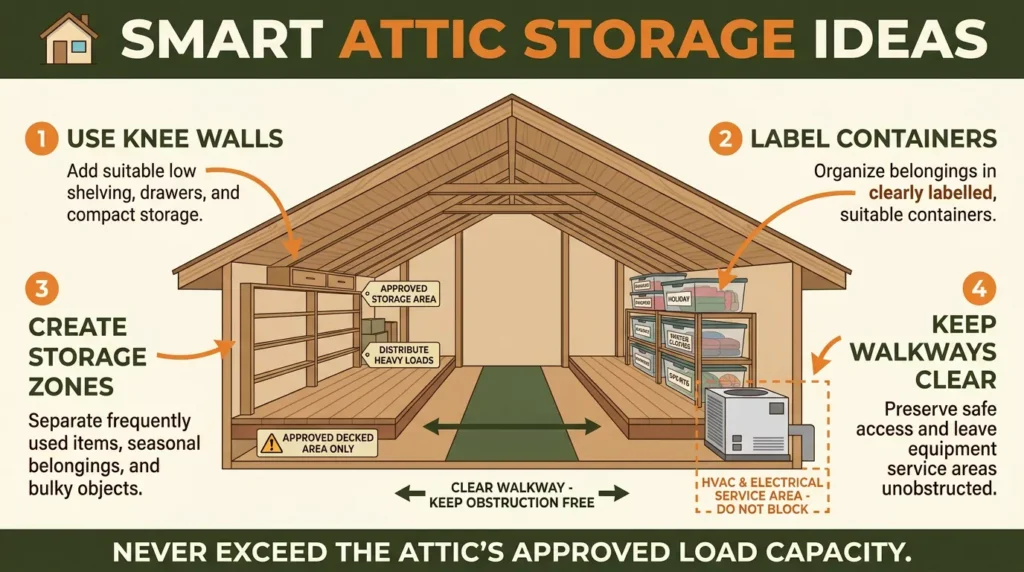
Effective attic storage starts with an organized layout, not simply filling every available corner. The goal is to protect belongings, keep items accessible, and avoid overloading the structure.
Use knee walls and low-ceiling areas
The space beneath sloped roof sections can work well for lightweight, frequently used items. Depending on the structure, suitable options include:
- Low shelving for seasonal decorations.
- Built-in drawers or cabinets.
- Small cubbies for labeled containers.
- Vertical shelving in approved locations.
- Dedicated areas for luggage and other bulky items.
Secure shelving appropriately and keep required service access clear. Do not attach storage systems to roof trusses or other structural components without confirming that the attachment is suitable.
Choose suitable storage containers
Clear or labeled plastic containers make it easier to identify belongings. They can also offer better protection from dust and incidental moisture than cardboard boxes.
Use labels that describe the contents and storage season. Keep an inventory for items that are rarely accessed.
Avoid storing photographs, important documents, delicate fabrics, electronics, and other sensitive belongings in an attic with uncontrolled heat or humidity. Valuable items may be better stored in a stable indoor environment.
Organize storage into zones
A practical attic layout might include:
| Zone | Recommended use |
| Near the access point | Lightweight items used often |
| Central approved storage area | Labeled seasonal containers |
| Low-eave areas | Suitable compact items and built-ins |
| Designated walkway | Clear route for entering and leaving |
| Equipment and service areas | Unobstructed access for inspection and maintenance |
Keep heavier items within the structure’s approved load limits and distribute them according to the assessment. Do not concentrate heavy boxes or equipment in one small area without approval.
Make attic access easier
A properly installed attic ladder or staircase makes storage easier to reach. For a storage attic, the appropriate access system depends on the building layout and local requirements. A habitable conversion generally requires a code-compliant permanent staircase.
Attic lift systems may help move heavy belongings between floors. Before installing one, verify its rated capacity, required opening, electrical needs, structural support, and safety clearances.
For more layouts and organization methods, read our supporting guide to safe and space-saving attic storage ideas.
Understand Attic Remodeling Costs
Attic remodeling costs depend on the size and condition of the space, the work required, local labor rates, material choices, and the intended use. Organizing an existing storage attic is very different from creating a permitted bedroom with new stairs, HVAC, and electrical systems.
Rather than relying on one universal price, build a budget around the work your project actually requires.
What affects the total cost?
| Cost category | What influences the expense |
| Inspection and design | Structural assessments, plans, and specialist advice |
| Flooring and subflooring | Panel type, framing upgrades, surface finish, and installation |
| Insulation and air sealing | Material, coverage area, roof design, and labor |
| Ventilation and moisture repairs | Existing defects, roof repairs, and required assembly changes |
| Access improvements | Ladder replacement, staircase construction, and structural alterations |
| Electrical and lighting | New circuits, outlets, fixtures, and inspection requirements |
| Heating and cooling | Existing system capacity, ductwork, or separate equipment |
| Drywall and interior finishes | Wall area, ceiling slopes, materials, and finishing labor |
| Storage systems | Shelving, cabinets, built-ins, and lift equipment |
| Permits and inspections | Local rules and project complexity |
Storage upgrades versus full attic conversion
A storage-focused project may involve limited flooring, shelving, lighting, and minor repairs. A full conversion may require structural changes, insulation at the appropriate building boundary, a staircase, emergency egress, HVAC, electrical work, and finished walls.
These additional requirements can make a living-space conversion substantially more expensive.
Before work begins, request itemized estimates that separate materials, labor, permits, structural work, and finishing. Also establish a contingency allowance based on the uncertainty of the existing conditions.
How to control your budget
- Define the attic’s purpose before selecting finishes.
- Repair roof leaks and structural defects before cosmetic work.
- Obtain multiple detailed contractor estimates.
- Confirm permit and inspection requirements early.
- Compare materials based on durability and suitability, not price alone.
- Avoid installing finishes before required inspections.
- Reserve funds for hidden damage and necessary upgrades.
An attic remodel may improve home functionality and resale appeal, but financial returns are not guaranteed. Property values, comparable homes, local regulations, and project costs all influence the outcome.
Decide Between DIY and Professional Remodeling
Some attic improvements are manageable for experienced homeowners. Others involve structural, electrical, or building-envelope risks that call for qualified professionals.
| Task | General approach |
| Sorting and labeling storage | Suitable for most homeowners |
| Measuring and planning storage zones | Suitable for most homeowners |
| Installing lightweight storage organizers | Appropriate when the structure and fixings are suitable |
| Painting existing finished surfaces | Often suitable if access and surfaces are safe |
| Installing attic flooring | Only after structural suitability and utility locations are confirmed |
| Reinforcing joists or altering trusses | Requires qualified structural assessment and design |
| Installing new electrical circuits | Use a qualified electrician |
| Modifying HVAC or ductwork | Use a qualified HVAC professional |
| Changing insulation and roof assemblies | Seek appropriate building-envelope expertise |
| Converting an attic into a bedroom | Requires coordinated planning and applicable approvals |
DIY work should never substitute for checking structural capacity. Do not cover questionable framing with plywood or conceal moisture damage behind new drywall.
When hiring a contractor, check relevant licensing, insurance, references, experience with attic projects, and written warranty terms. The contract should define the scope, materials, payment schedule, permits, and responsibility for inspections.
Follow a Practical Attic Remodeling Timeline
The exact schedule depends on the project’s size, the condition of the attic, contractor availability, and approval requirements. A small storage improvement may take much less time than a complete conversion.
A reliable project follows these stages:
Stage 1: Inspect and define the project
Determine the intended use, assess structural conditions, measure the space, and identify roof, moisture, and utility issues.
Stage 2: Plan and obtain approvals
Finalize the layout, select suitable materials, prepare a budget, and confirm applicable permits and inspection requirements.
Stage 3: Complete repairs and structural work
Address leaks, damage, and framing deficiencies. Complete required structural changes before adding new loads or closing concealed areas.
Stage 4: Install building systems and flooring
Complete the planned insulation, air sealing, ventilation, electrical, HVAC, and subfloor work in the correct sequence.
Stage 5: Finish and organize
Install approved interior finishes, lighting fixtures, suitable flooring, and storage systems.
Stage 6: Inspect and maintain
Complete required inspections, resolve outstanding issues, and establish a maintenance routine before regular use.
Do not schedule finishes before essential inspections or structural work. Delays often occur when hidden damage, inadequate framing, or permit requirements emerge after construction starts.
Avoid Common Attic Remodeling Mistakes
Several avoidable mistakes can undermine the safety, durability, and value of an attic project.
- Installing flooring without checking the framing: New panels cannot compensate for joists that are unsuitable for the intended loads.
- Ignoring roof leaks: Finishing a damp attic can conceal damage and lead to costly repairs.
- Compressing insulation: Compression can reduce the material’s thermal performance.
- Blocking ventilation paths: Storage and decking should not obstruct designed airflow channels.
- Mixing incompatible insulation approaches: Changing the roof assembly without considering moisture movement can cause condensation.
- Ignoring electrical hazards: Concealed cables and junction boxes can be damaged or made inaccessible during installation.
- Overloading shelving or floor areas: Concentrated loads may exceed what the framing can safely support.
- Skipping permits or inspections: Unauthorized work can create safety, insurance, and resale complications.
- Choosing finishes too early: Decorative materials should follow decisions about structure, insulation, utilities, and required inspections.
- Storing vulnerable belongings in unsuitable conditions: Heat and humidity can damage items even when containers are sealed.
The best way to avoid these problems is to complete a thorough assessment and resolve building defects before adding storage or finishes.
Maintain Your Remodeled Attic
An attic needs periodic checks after remodeling. Maintenance helps identify leaks, insulation problems, pest activity, and damage before they affect the rest of the home.
Use this checklist as a starting point.
Attic maintenance checklist
- Check for roof leaks, new stains, or damp wood.
- Look for condensation, musty odors, and wet insulation.
- Confirm that ventilation openings remain unobstructed where required.
- Inspect accessible flooring for movement, damage, or loose fasteners.
- Check shelves and storage areas for overloading or instability.
- Keep access paths and equipment service areas clear.
- Look for pest activity and new entry points.
- Confirm that stored belongings remain dry and undamaged.
Inspect the attic after severe weather if it is safe to do so. The inspection frequency should reflect the roof’s condition, local climate, and any known moisture or pest problems.
If you find persistent condensation, recurring leaks, or structural movement, investigate the underlying cause rather than simply replacing damaged finishes.
Frequently Asked Questions
How much does attic remodeling cost?
The cost depends on whether you are organizing storage, adding flooring, or converting the attic into a living area. Structural work, insulation, stairs, electrical systems, HVAC, permits, and finishes can all affect the total. Obtain local estimates based on your attic’s actual condition and project scope.
Can you install flooring over existing attic joists?
Yes, when the framing is suitable for the intended load and the selected panels match the support spacing and installation requirements. Some attics need structural upgrades first. Flooring should not be installed over damaged or inadequate framing simply to create a walking surface.
How do you know whether an attic can support storage?
You need to assess the joists, their span and spacing, material condition, connections, and the expected storage loads. Existing ceiling framing may not be designed for substantial storage. A structural professional can determine safe use and whether reinforcement is necessary.
What is the best flooring for attic storage?
Suitable structural plywood, OSB, or approved decking panels may work for storage when correctly supported and installed. The choice depends on panel ratings, moisture conditions, support spacing, and expected loads. No panel material makes an inadequately supported floor safe.
Is plywood or OSB better for an attic floor?
Both can be suitable. Compare structural ratings, thickness, support spacing, moisture exposure, cost, and manufacturer instructions. The quality of the complete floor assembly matters more than choosing one material based on price alone.
Can you turn any attic into a bedroom?
No. Some attics lack sufficient headroom, usable floor area, suitable structural framing, or a practical route for emergency escape. Others need major changes to access, insulation, electrical systems, or heating and cooling. A professional feasibility assessment should come first.
Does attic remodeling require a permit?
Permit requirements depend on local regulations and the work involved. Storage organization may be treated differently from structural alterations or a conversion into habitable space. Check with the local building department before starting construction.
Should attic insulation go on the floor or roof?
In a typical unconditioned attic, insulation is often placed at the ceiling plane. In a properly designed conditioned attic, insulation may follow the roofline. The correct choice depends on the building assembly, climate, moisture control, and ventilation design.
How can you prevent mold and condensation after remodeling?
Repair leaks, control indoor air leakage, install appropriate insulation, and maintain the intended ventilation or roof assembly design. Ensure exhaust ducts discharge outdoors where required. If moisture persists, investigate its source before replacing affected materials.
Which attic remodeling jobs can homeowners do themselves?
Many homeowners can organize storage, label containers, plan layouts, and complete suitable cosmetic work. Flooring installation requires verified structural suitability. Structural alterations, new electrical circuits, HVAC modifications, and complex insulation changes should involve appropriately qualified professionals.
Conclusion
Attic remodeling works best when safety and practical planning come before appearance. Start by deciding whether you need better storage, partial flooring, or a finished living area.
Then assess the structure, access, roof condition, insulation, and moisture risks. Choose flooring and storage systems that match the approved load capacity, and confirm the applicable building requirements before a conversion.
Professional guidance can prevent expensive mistakes involving joists, trusses, wiring, and the roof assembly. With the right sequence, an attic can become a safer, more organized, and more useful part of your home.

Daniel Carter specializes in attic maintenance, insulation, ventilation, moisture control, and home improvement. He understands common attic problems and their practical solutions. Through clear, informative guides, he helps homeowners identify issues, prevent damage, improve energy efficiency, and maintain safer, healthier homes.